How to Install Minecraft Mods on PC and Mobile?
While Minecraft offers a thrilling gaming experience to all players, the level of excitement can be enhanced by installing your chosen Minecraft mods on your device. These modifications improve the user experience significantly, delivering superior graphics and sophisticated gameplay mechanics.

Furthermore, the ease with which you can install these mods on your device is the best part. It allows you to elevate your virtual sandbox experience to a whole new level. Although installation instructions may vary depending on the mod you are interested in, here’s a general guide on how to install Minecraft mods across different operating systems, including Windows, Mac, Android, and iOS.
For Minecraft mods to be installed on Windows or Mac, mod loaders are required. Forge is a popular mod loader we will be focusing on in this guide. Other alternatives include Fabric and LiteLoader.
In this guide, we’ll detail the installation steps using Forge, one of the most straightforward methods that allows for the easy download and management of Minecraft mods by adding them to your mods folder.
It’s crucial to prepare your system before you begin the mod installation process:
- Open the Minecraft Launcher and launch the game version you are planning to mod from the Play tab.
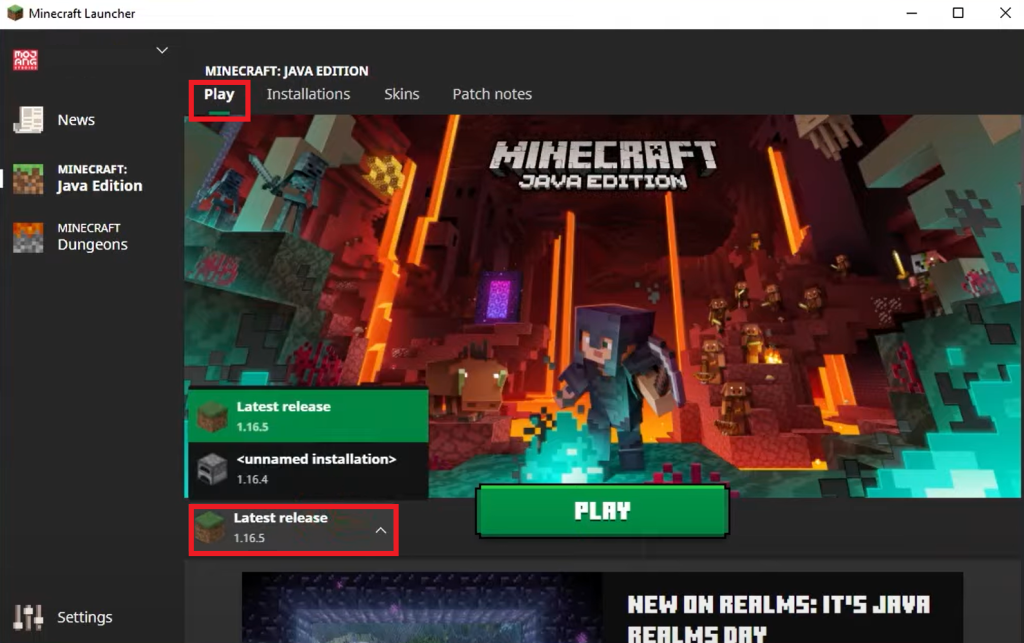
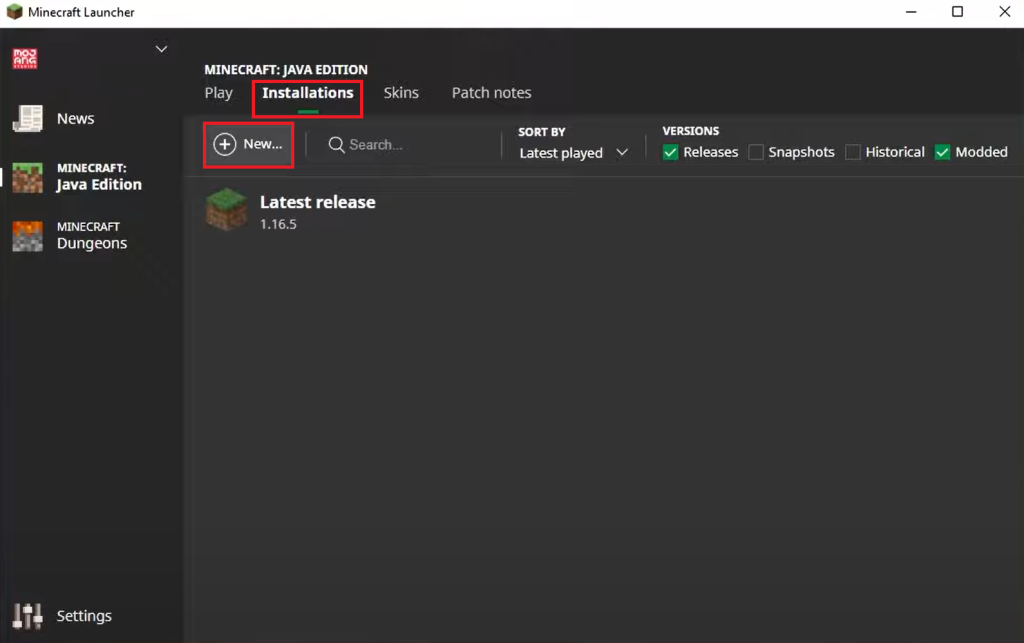
- If your version isn’t listed, navigate to the Installations tab and select New.
- Then, use the drop-down menu under Versions to choose the version you require and click Create.
- Return to the Play tab, select the new version, and hit the Play button to launch it.
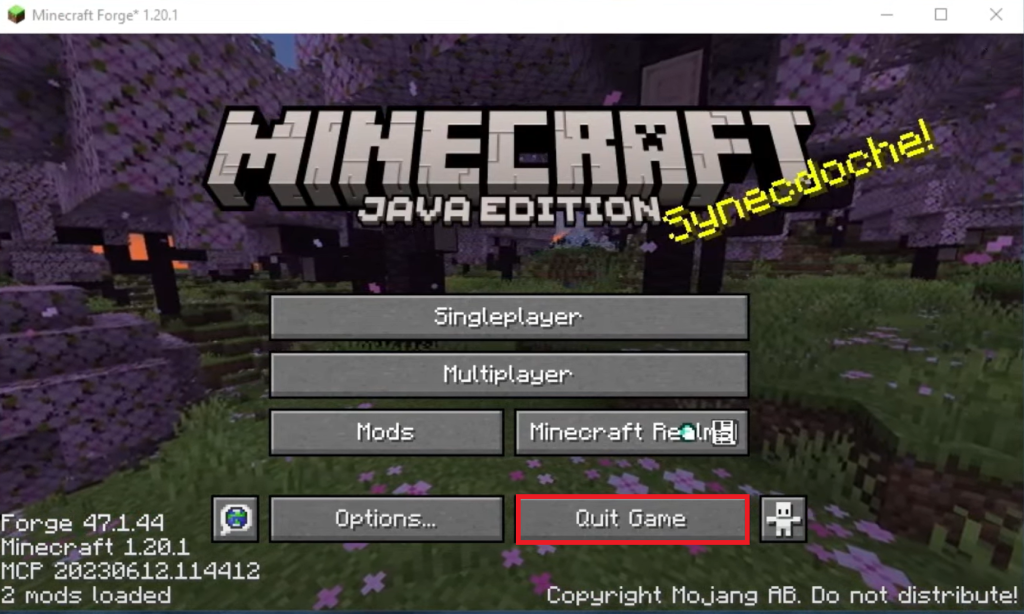
- In the next window, select Quit Game to exit. Then, you can continue with the mod installation instructions on your PC.
Step 1: Install Java
- Open your browser and go to the official Java website.
- Click on the Download Java button.
- Follow the prompts to complete the Java installation.

Step 2: Install Forge
- Visit the official Forge website.
- Select Installer under the Download Recommended section. The latest version of Forge is also available, but its compatibility depends on your system and may include unresolved bugs.
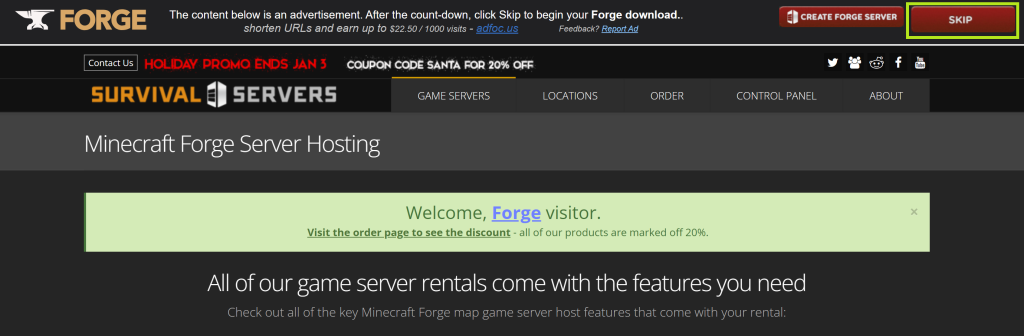
- Avoid clicking anything for 5 seconds on the next screen. After the countdown, click the Skip button in the top right corner to initiate the download.
Note: If you need a specific version of Forge, it can be selected by clicking on the Show all Versions button.
For Mac users, installation steps may vary slightly. Follow the steps below for your specific operating system.
For Windows:
- After the installer has been downloaded, navigate to the download folder.
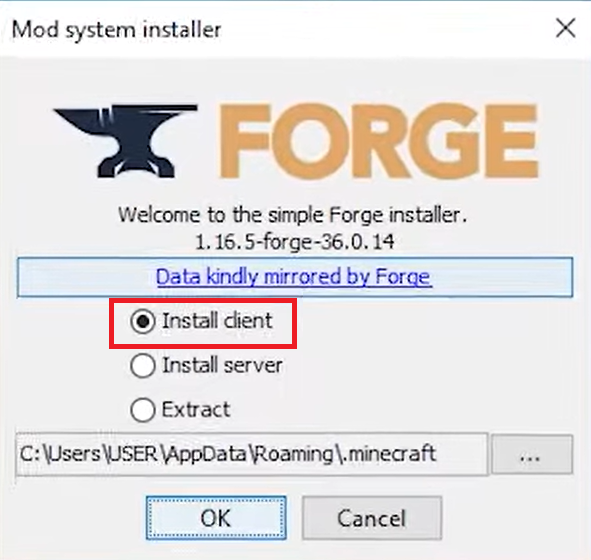
- Right-click the installer file, go to Open with, and select Java.
- The Mod System Installer window should appear. Select Install client and press OK.
- A confirmation dialog box will appear shortly after, signifying the successful installation of Forge. Click on OK.
For Mac:
- From the Downloads folder, run the Forge installer. You may encounter an error message stating that macOS cannot confirm the app is malware-free. Click OK.
- If the error stating “This application can’t be opened” appears, click OK.
- Press Command + Spacebar, search for System Settings.
- Within System Settings, select the Privacy & Security option from the sidebar and scroll down.
- Next to the message about Forge being blocked, click on Open Anyway.
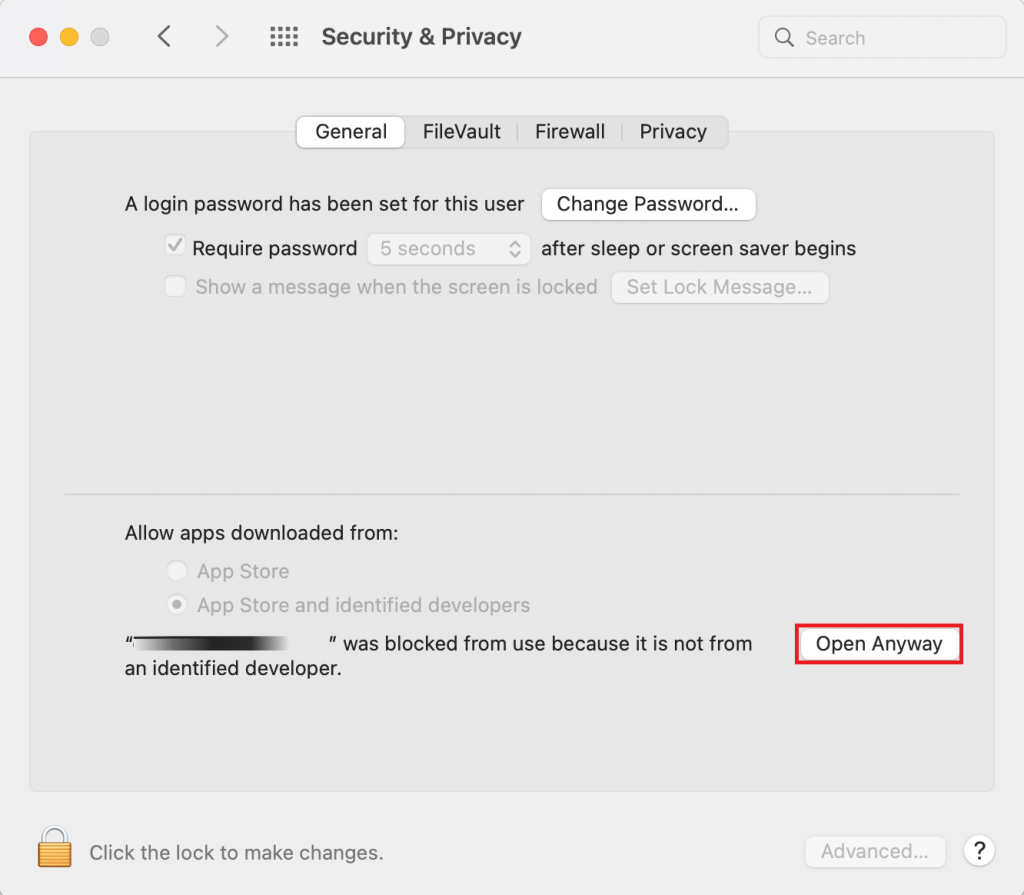
- Enter your password when prompted and click on Open.
- Once the Mod System Installer launches, select Install client and click OK.
- After the installation is complete, a confirmation dialog box will appear. Click on OK.
Step 3: Launch Minecraft
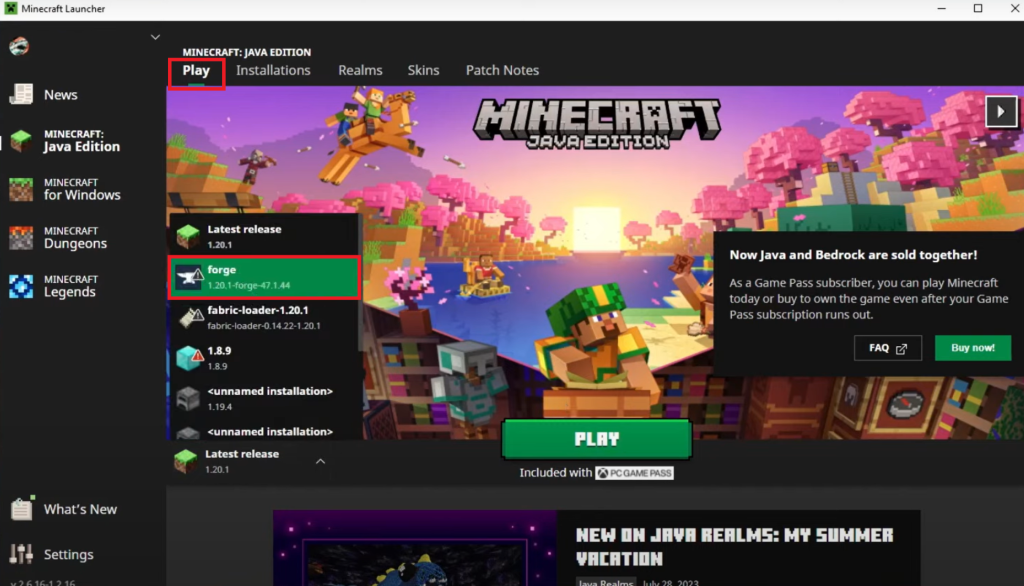
- Open the Minecraft Launcher.
- In the Play tab, choose Forge from the bottom-left corner and click Play.
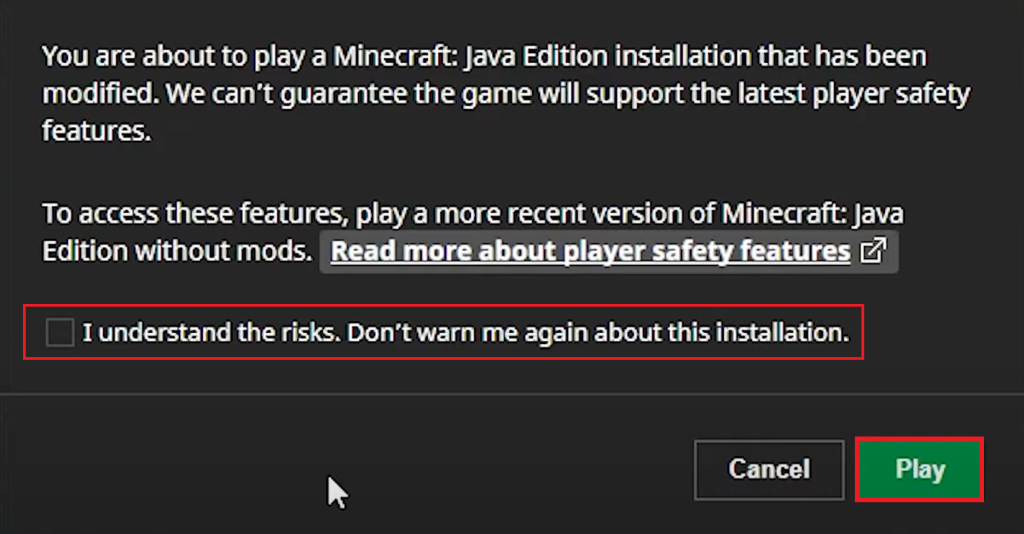
- If a message arises about the modified installation, tick the box for I understand the risks. Don’t warn me again about this installation and proceed by clicking Play.
- After the game starts, go to the Mods tab.
- Click Open mods folder on the bottom left. This will lead you to the directory where mods should be placed.
- If this option isn’t available on older versions of Forge, you’ll need to navigate to the folder manually:
- For Windows users:
C:\Users\[yourname]\AppData\Roaming\.minecraft
- For Mac users:
~/Library/Application Support/minecraft
- If there’s no Mods folder in either location, simply create a new folder and name it Mods.
Keep the folder open, as it will be the destination for any mods you download in the following step.
Step 4: Install Mods
Mods for Minecraft should be downloaded from trustworthy sources such as CurseForge, the Minecraft Forum, or Planet Minecraft.
We’ll use CurseForge as an example for this process:
- Launch your web browser and navigate to the CurseForge website.
- Select Minecraft from the list of games displayed on the site’s header.
- Browse through the mods and choose the one you fancy.
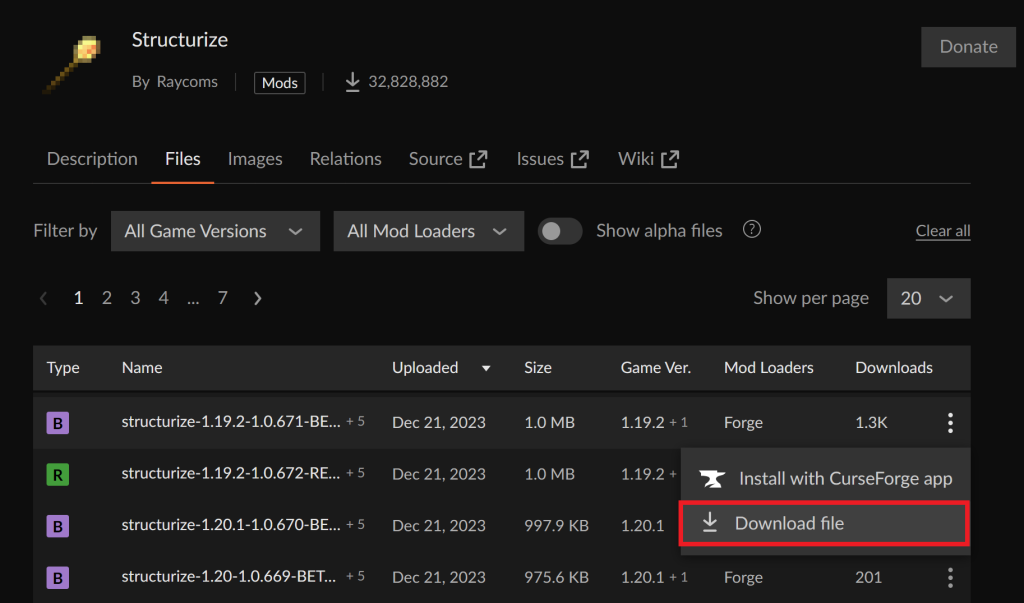
- Go to the Files tab, ensure the Forge version is compatible, and verify that the mod’s Game Version matches your Forge version.
- Click on the download icon to save the file on your device.
- Once the mod is downloaded, transfer it to the Mods folder previously opened.
It’s worth noting that mods are exclusive to the PC versions of Minecraft. For the Bedrock and Pocket editions, however, add-ons are available which, while not as expansive as mods, still permit changes to blocks, items, maps, etc.
To install Minecraft mods on your mobile device, whether Android or iOS, follow these steps:
- First, download the desired mod from a website like Vatonage.
- You’ll be redirected to MediaFire where you can download the add-on file, identifiable by a .mcaddon extension.
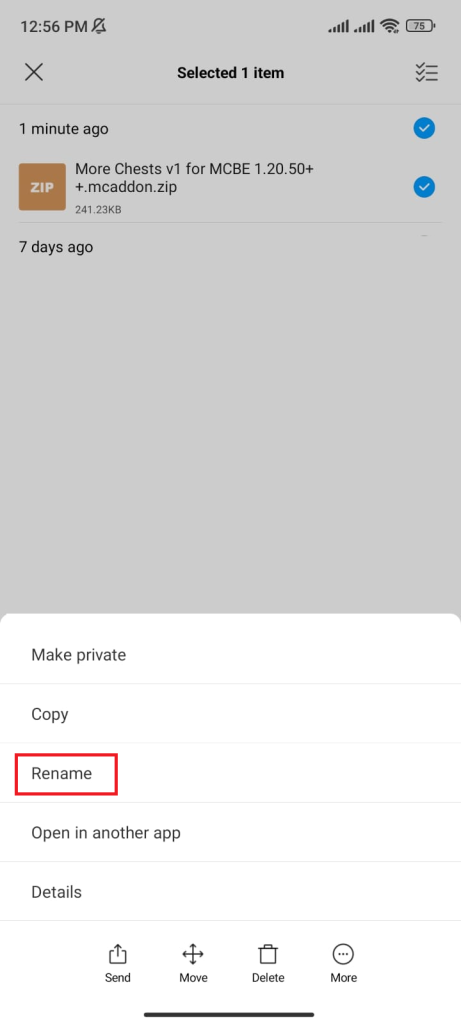
- If the file downloads as a zip, change the extension by renaming it; remove .zip and replace it with .mcaddon.
- For iPhone users, tap the file to open Minecraft. Android users should long-press the file, tap More, then Open with and choose Minecraft.
- Wait for Minecraft to confirm that the mod has imported successfully.
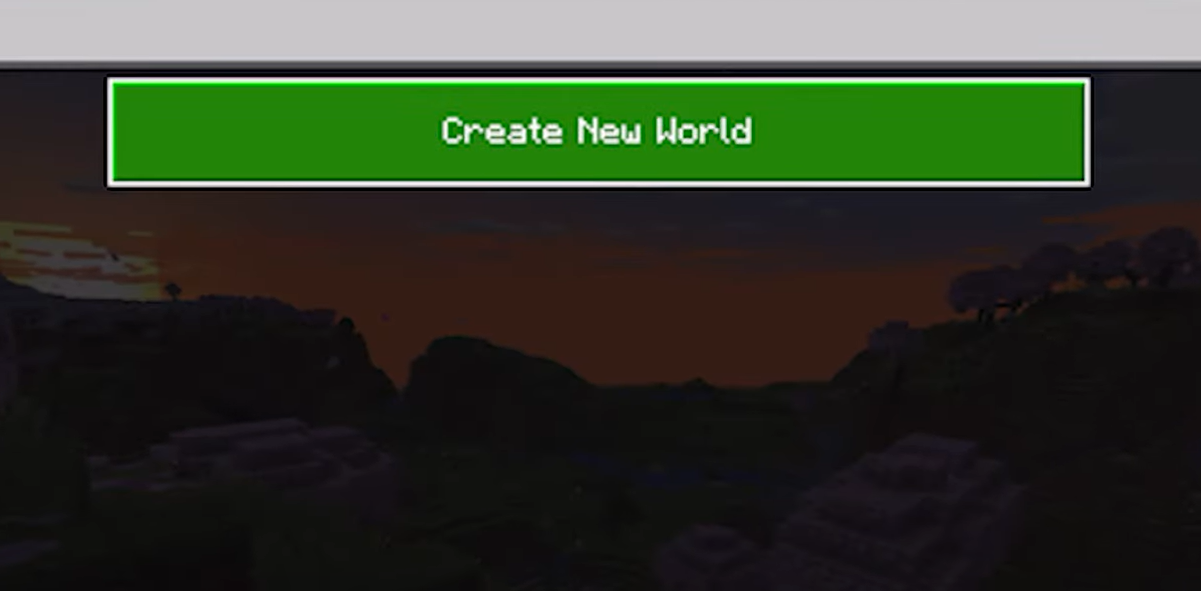
- Create a new world by tapping Create New followed by Create New World.
- In the Experiments tab, enable the necessary settings—usually all of them.
- Access the Behavior Packs tab, find your installed pack under Available/My Packs, and tap Activate.
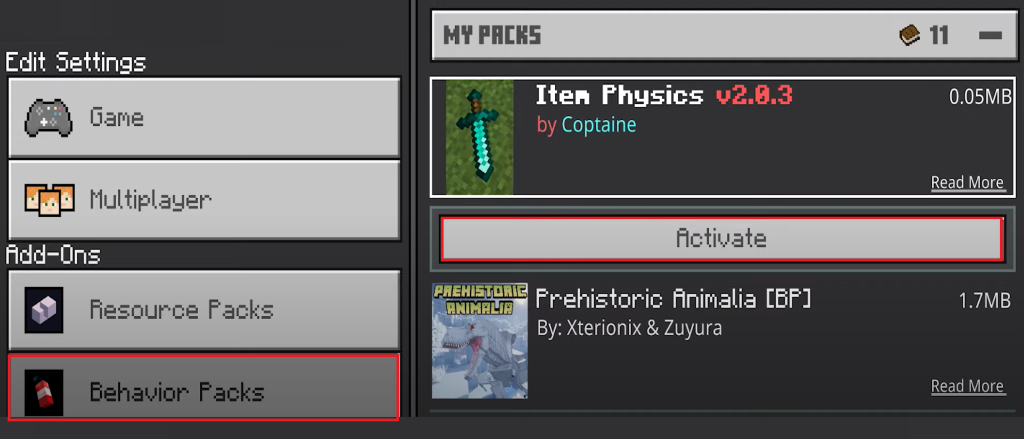
- If needed, go to the Resource Packs tab and activate the pack there as well, though it can be automatically done sometimes.
Enter your world, and your mods or add-ons should be fully operational. Enjoy your enhanced Minecraft experience!