How to Hide the Virus and Threat Protection Area in Windows 10?
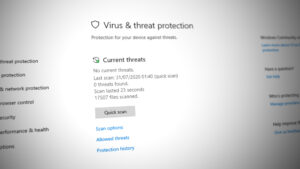
The Virus & Threat Protection area is one of the seven areas of the Windows Defender Security Center. It monitors threats and runs scans on your system to keep you safe. It also gets updates for detecting the latest threats on your device. Users can also run different types of scans and see the results of their previous virus and threat scans. However, the Virus and Threat Protection areas can be hidden from the users. As an administrator, you can hide this section on a system used by multiple users. In this article, we will provide you methods through which you can easily hide the Virus and Threat Protection area in Windows 10.
The Local Group Policy Editor method can only be used on Windows 10 Pro, Windows 10 Education, and Windows 10 Enterprise. If you are using the Windows 10 Home edition, then try using the Registry Editor method. That is because the Group Policy Editor isn’t available in the Windows Home edition.
Method 1: Using the Local Group Policy Editor
The Group Policy is a Windows feature that contains all types of settings for the operating system. Most of the settings that aren’t available in the Settings app and Control Panel can be found in Group Policy Editor. It contains all the settings for the Windows Defender Security Center. You can hide the Virus and Threat Protection area by using one of the settings in Group Policy Editor. Follow the below steps to modify the setting:
This setting is supported on at least Windows Server 2016 and Windows 10 Version 1709.
Note: If you are using the Windows 10 Home version, then skip this method, and head over to the Registry Editor method.
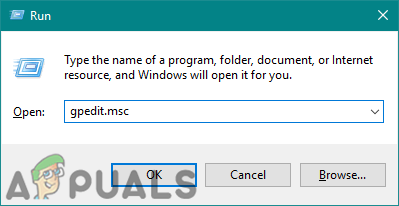
- Hold the Windows key and press R to open a Run dialog. Type “gpedit.msc” in the box and press the Enter to open the Local Group Policy Editor.
Open the Local Group Policy Editor - Now navigate to the following location in the Local Group Policy Editor.
Computer Configuration\Administrative Templates\Windows Components\Windows Security\Virus and threat protection\
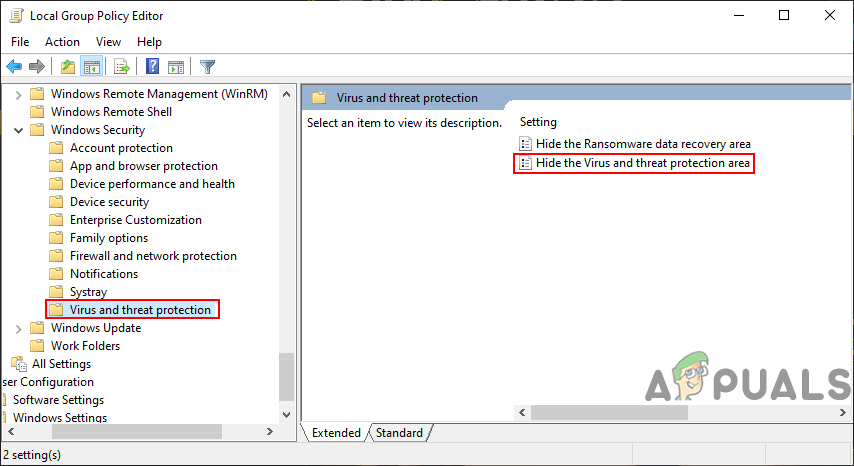
Navigating to the setting - Double-click on the setting named “Hide the Virus and threat protection area” and that will open in another window. Now you need to change the toggle option from Not Configured to Enabled.

Enabling the setting - Click on the Apply and Ok buttons to save the changes. Basically, the group policy will automatically update the new configurations.
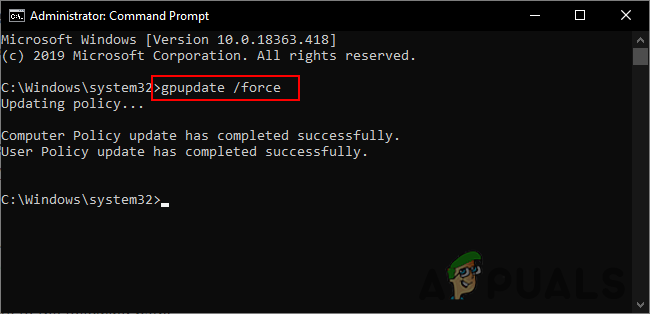
- However, if it does not update automatically, then you need to force update it. Search for CMD in the Windows search feature and run it as an administrator.
- Type the following command in CMD (Admin) window and press Enter.
gpupdate /force
Force updating the group policy - You can always enable the Virus and Threat Protection area again by changing the toggle option to Not Configured or Disabled in step 3.
Method 2: Using the Registry Editor
Another method for hiding the Virus and Threat Protection area is by using the Registry Editor. This configures the same setting as the Group Policy Editor method. If you already used the Local Group Policy Editor method, then your keys and value will be automatically updated for that specific setting. However, if you are using it directly, then you need to create the missing key and value for it. For Windows 10 Home users, this is the only available option to hide the Virus and Threat Protection area. This is a bit technical method, so try following the below steps carefully:
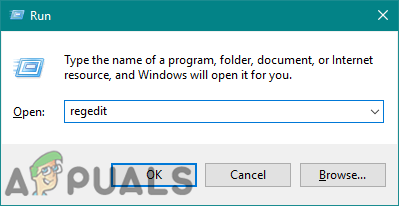
- Press the Windows + R key together to open a Run dialog box. Now type “regedit” and press the Enter key to open the Registry Editor. If prompted by the UAC (User Account Control) dialog, then click on the Yes button.
Opening the Registry Editor - You can also create a Registry backup before making any new changes. Click on the File menu and then choose the Export option. Now name the file and select the location for it. Click on the Save button to save it.

Saving the Registry backup Note: You can recover a backup by clicking on the File > Import option and then selecting the file that you previously created.
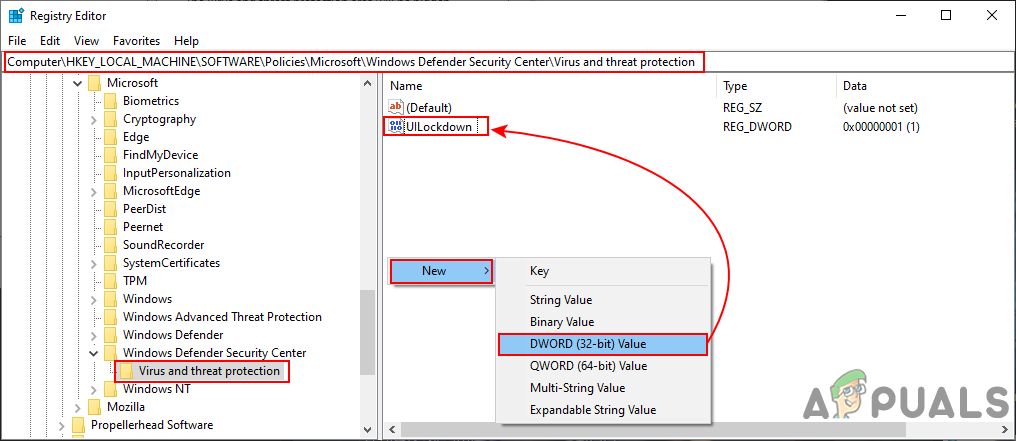
- You need to navigate to the following path in the Registry Editor window:
HKEY_LOCAL_MACHINE\SOFTWARE\Policies\Microsoft\Windows Defender Security Center\Virus and threat protection
Note: If some keys are missing, you can create them by right-clicking on the available key and choosing the New > Key option.
- Right-click on the right pane of the Virus and threat protection key and then choose the New > DWORD (32-bit) Value option. Now name the key as “UILockdown“.
Creating a new value - Double-click on the newly created value to open it. Now change the value data to 1.
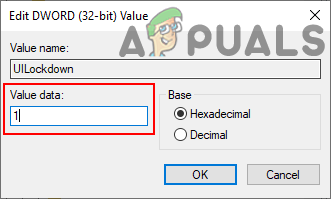
Enabling the value - Finally, after making all the changes, make sure you reboot your computer to apply these changes.
- You can always enable the Virus and Threat Protection area by changing the value data to 0. You can also simply remove the newly created value from the Registry Editor to enable it back.