Fix: VirtualBox not showing Windows
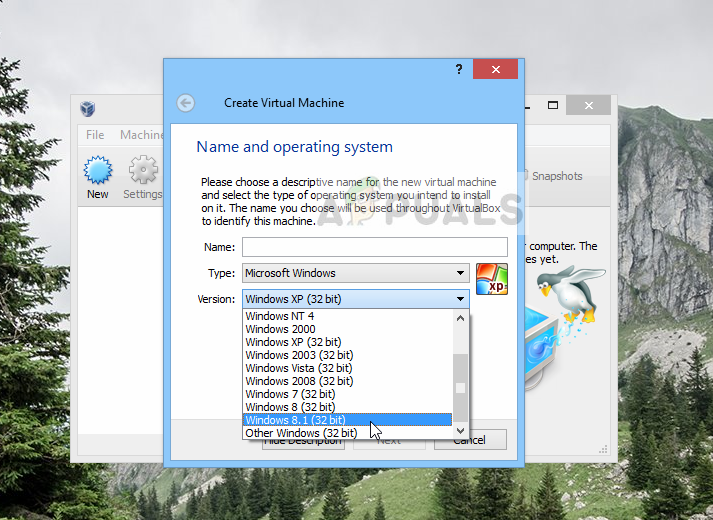
Many users and programmers face an issue while using VirtualBox where they are unable to see 64-bit guest operating systems displayed on the application. This issue is very troublesome as you might even fulfill all the requirements but will be unable to install any 64-bit guest operating system on your VirtualBox setup.
The reasons why you might experience this issue are quite diverse and include several different elements. Since a lot of elevated and BIOS level elements are involved during virtualization (Hyper-V, Hypervisor, Hardware security etc.), it might be possible that you have some options not configured properly.
What causes VirtualBox not to show 64 bit Guest Operating Systems in Windows 10?
There are several different reasons ranging from Hyper-V to hardware security for why you cannot see 64-bit guest operating systems on your device. Here are some of the main culprits listed below:
- Hyper-V: Microsoft’s Hyper-V is known to cause issues with VirtualBox application. It must be disabled to access the full features of the application.
- System Debuggers and VM Platforms: If you have installed system debuggers or other VM managers/platforms on your computer, they might conflict with VirtualBox for resources and cause some of the features not to work.
- Device Guard/Credential Guard: Device Guard or Credential Guard are applications which provide security of hardware and credentials on your computer. They are usually preinstalled by Dell. They have to be removed for VirtualBox to work properly.
- Core isolation: Windows has a core isolation option for its processors. This must be disabled as well.
- CPU with virtualization enabled: A valid CPU is required which has virtualization enabled on it for VirtualBox to work on your computer.
Before we start with the solutions, make sure that you are logged in as an administrator on your computer. Furthermore, you should also have a valid guest OS .iso file which will be used to load the guest operating system on your computer. If the file is not valid or of a different kind, you will not see 64-bit operating systems in the options of VirtualBox.
Prerequisite: Making sure you have x64 CPU
To run 64-bit guest operating systems, it is a must that you have an x64 bit supported CPU. There are usually two types of CPUs i.e. 32-bit and 64-bit. If you have a 32-bit CPU, you will not be able to in any way run 64-bit operating systems.
Here is a short way how to check your type of CPU.
- Right-click on This PC and select Properties.

- Once in the computer properties, check underneath the subheading of System and check the type in front of System type. If both the operating system and processor is 64, you are good to go.

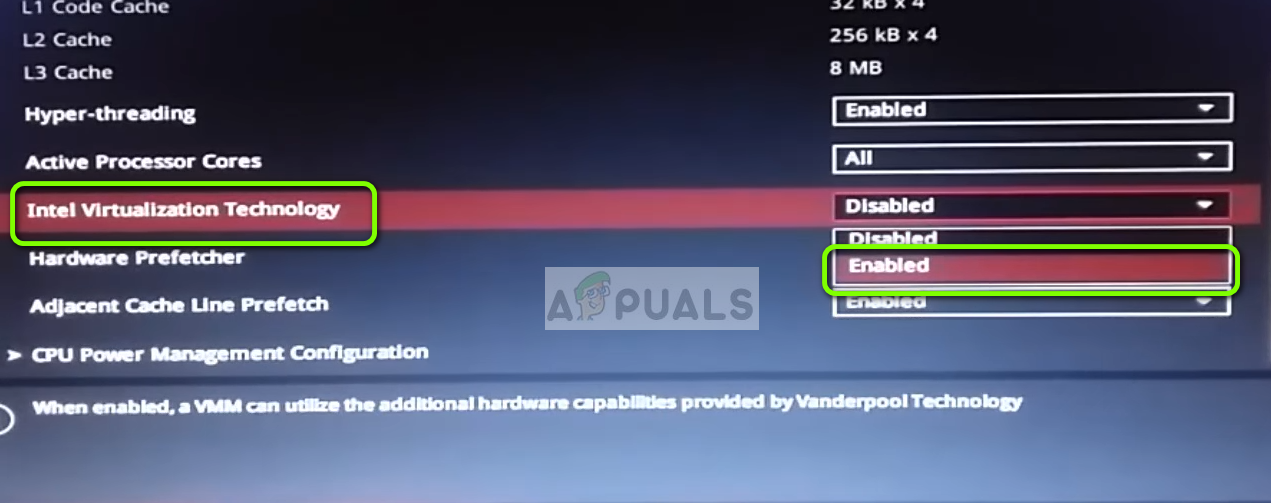
Solution 1: Enabling Intel Virtualization Technology
Virtual Technology is the architecture in computers which allows users to run more than one operating systems using virtualization where the guest operating system is launched in a sandbox. In a sandbox, the application has limited resources and doesn’t have access to the main computer architecture which lies beyond the sandbox. If this basic setting is disabled, you might experience issues with VirtualBox. Here we will enable it in the BIOS.
- Restart your computer and press Del or F2 (depends on the motherboard to motherboard. You can click the correct key which appears underneath the Windows logo when you restart your computer) on the BIOS.
- Once the BIOS is enabled, navigate to the option of Intel Virtualization Technology which is usually present in Advanced. The menu in which it is present might differ motherboard to motherboard so explore yourself.
In the case of ASUS motherboards, follow the following path:
Advanced > CPU Configuration > Intel Virtualization Technology

- Now change the option to Enabled. Save changes and exit the BIOS.
The computer will now restart. Upon the restart, you might need to reinstall the VirtualBox application and after loading all the guest operating systems, check if the issue is resolved.
Solution 2: Disabling Microsoft’s Hyper-V
Hyper-V is a tool developed by Microsoft which allows users to create one or more virtual machines. This is done to run different operating systems in Windows. It almost performs the same tasks as of VirtualBox but has difficult options in addition to confusing architecture. We found from the user reports that Hyper-V must be disabled on your Windows for VirtualBox to run properly.
Check if the Computer is Hyper-V Capable
First, we will check your computer is even Hyper-V capable. If the operating system isn’t and it isn’t installed in the first place, you can skip this solution and move to the next.
- Press Windows + S, type “command prompt” in the dialogue box, right-click on the application, and select Run as administrator.
- Once in elevated command prompt, run the following command:
systeminfo.exe

- Once the results are loaded, navigate to the bottom to search for the entry “Hyper-V Requirements”. If you have Yes in front of the options, it means that your computer supports Hyper-V. If you don’t and see a No, you should skip this solution.

Disabling Hyper-V
Now if Hyper-V is installed on your computer, we will disable it and restart your computer. This will remove the conflict between Hyper-V and VirtualBox and fix the issue.
- Press Windows + R, type “OptionalFeatures.exe” in the dialogue box and press Enter.
- Once the Optional Features are opened, search for the option of Hyper-V. If it is checked, uncheck the option (including the sub-options).

- Restart your computer and launch VirtualBox again. Check if the issue is resolved. You can also reload the 64-bit operating system from its iso file.
Solution 3: Uninstalling Device Guard/Credential Guard
Device Guard is a combination of enterprise-related hardware and software security features that allows a device to only run applications that are properly defined in Windows code integrity policies. It is used as an extra layer of security and is enabled by Default in DELL computers. This option needs to be disabled in order for VirtualBox to display 64-bit guest operating systems on your computer.
Credential Guard is meant to be present in only Windows 10 Enterprise Edition so don’t worry if you cannot see it on your version of Windows.
Disabling Device Guard
- Press Windows + R, type “gpedit.msc” in the dialogue box, and press Enter.
- Once the group policy editor, navigate to the following path:
Computer Configuration > Administrative Templates > System > Device Guard

- Now double-click the policy Turn on Virtualization Based Security and set it as Disabled.
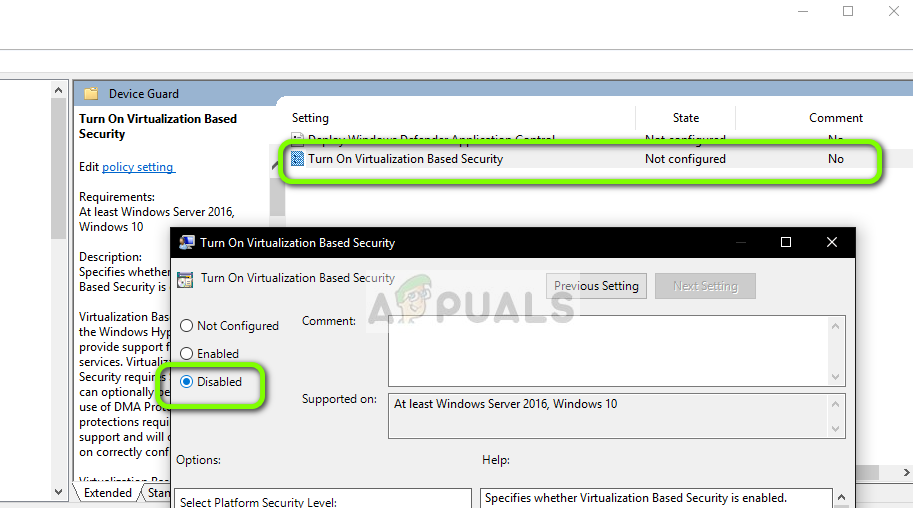
- Save changes and exit. Now restart your computer and try launching VirtualBox. Check if the issue is resolved.
Disabling Credential Guard
If your computer is Windows 10 Enterprise and also contains Credential Guard, we will try disabling it as well in addition to Device Guard. Follow the instructions below.
- Perform the method of disabling Device Guard as demonstrated above. Now press Windows + R, type “regedit” in the dialogue box, and navigate to the following addresses.
HKEY_LOCAL_MACHINE\System\CurrentControlSet\Control\LSA\LsaCfgFlags

HKEY_LOCAL_MACHINE\Software\Policies\Microsoft\Windows\DeviceGuard\EnableVirtualizationBasedSecurity

HKEY_LOCAL_MACHINE\Software\Policies\Microsoft\Windows\DeviceGuard\RequirePlatformSecurityFeatures
Delete each of the above keys listed.
- Now we have to delete Windows Defender Credential Guard EFI variables using bcdedit. Press Windows + S, type “command prompt” in the dialogue box, right-click on the application and select Run as administrator.
- Now execute the following commands one by one proceeding with an Enter after each one of them.
mountvol X: /s

copy %WINDIR%\System32\SecConfig.efi X:\EFI\Microsoft\Boot\SecConfig.efi /Y

bcdedit /create {0cb3b571-2f2e-4343-a879-d86a476d7215} /d "DebugTool" /application osloader

bcdedit /set {0cb3b571-2f2e-4343-a879-d86a476d7215} path "\EFI\Microsoft\Boot\SecConfig.efi"

bcdedit /set {bootmgr} bootsequence {0cb3b571-2f2e-4343-a879-d86a476d7215}

bcdedit /set {0cb3b571-2f2e-4343-a879-d86a476d7215} loadoptions DISABLE-LSA-ISO

bcdedit /set {0cb3b571-2f2e-4343-a879-d86a476d7215} device partition=X:

mountvol X: /d
- Now restart your computer properly. When you are prompted to disable Windows Defender Credential Guard, accept the prompt.
- Restart your computer again. Now try running VirtualBox and after loading the guest operating system again, check if the error is resolved.
Solution 4: Disabling Core Isolation
Core isolation technology enabled Windows to create a secure area of system memory which is totally isolated from the computer’s normal working memory. It helps the running of virtual machines on Windows. In this secure area, the system can run its system processes, security software, etc. without the risk of being interrupted by the core operating system. Sometimes this module causes conflict with Core Isolation. We will disable the Core Isolation and check if this solves the error message.
- Download the .reg file from (here). The file will be named ‘Disabling Credential Guard’.
- Double-click on it to execute. You might be prompted by a UAC to confirm your actions.

- If you want to enable Core Isolation again, download the .reg file from (here).
- Restart your computer and check if the error message is resolved.
Solution 5: Uninstalling System Level Debuggers and other VM Platforms
If you other Virtual Machine software installed on your computer, it will not allow VirtualBox to run 64-bit operating systems on your computer. It might even conflict with other functionalities of the application. Here you have to uninstall all other Virtual Machine software and System-level Debuggers (if any) from your computer.
- Press Windows + R, type “appwiz.cpl” in the dialogue box, and press Enter.
- Once in the application manager, search for other VM platforms or System Level Debuggers. Right-click on them and select Uninstall.

- Restart your computer and check if the issue is resolved. If it isn’t, consider loading the 64-bit operating system back onto your computer.