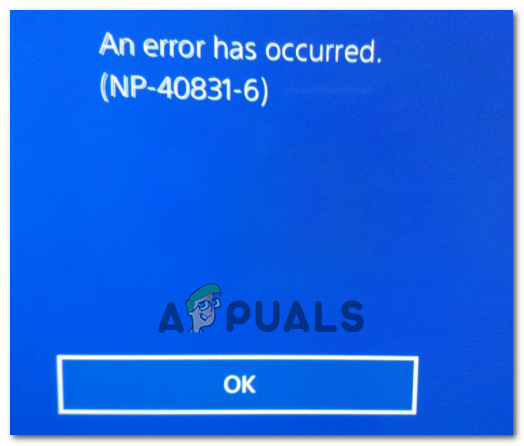
How to Fix PS4 Error NP-40831-6 ‘error occured’
Some Playstation 4 users are unable to sign into their PSN (PlayStation Network) account from the PS4 console. While sign-in on PC works just fine, on PlayStation the attempt terminates with the NP-40831-6 error code.
After investigating this issue thoroughly, it turns out that there are multiple potential causes that might cause this particular behavior. We’ve made a shortlist of potential culprits that might be responsible for the apparition of this issue:
- IP range is regarded as a threat – This particular error code essentially means that Sony is actively blocking your IP from connecting to the PSN network because it regards it as a threat. In this case, the easiest way of fixing the problem is to filter your connection through a VPN network hosted on a PC computer.
- PSN Server issue – As it turns out, you can also expect to see this problem in instances where this issue is caused by a widespread server problem that is way beyond your control. In this case, the only thing you can do is confirm the problem and wait for Sony to fix their server issues.
- TCP / IP Inconsistency – Depending on your router model and your ISP, you might see this error message due to a simple IP or TCP inconsistency that affects the connectivity to the PSN network. In this case, you can fix the problem either by rebooting your router or by resetting the network connection altogether.
- Conflicting IP address – In case Sony decides to disallow the connection with your router due to an IP address that is not accepted, you can most likely circumvent the problem altogether by filtering the connection through a hotspot.
- Bad DNS or insufficient MTU – According to some affected users, this problem can also appear when your ISP ends up forcing a bad DNS range or it automatically assigns an MTU value that is not enough for the current connection. In this case, you can get the issue resolved by configuring the network manually with a different DNS range and a sufficient MTU bandwidth.
- Pending mandatory firmware update – Under certain circumstances, you might expect to see this error in instances where a mandatory firmware update doesn’t get installed due to a glitch. In this case, you can resolve the issue by entering Safe Mode and doing the update from there instead.
Method 1: Checking for PSN server issues
As with the vast majority ps PS4 issues, the first things you should do when troubleshooting for a local issue is to make sure that you’re not actually dealing with a server issue that is beyond your control.
This particular error (NP-40831-6) is sometimes linked to a PSN server issue, having to do with a problem with the Account Management function.
If you think you might be dealing with a server issue, you should start by checking the official status page of PSN. Once you’re there, go ahead and inspect every function of PSN and see if Sony is currently reporting any problems.
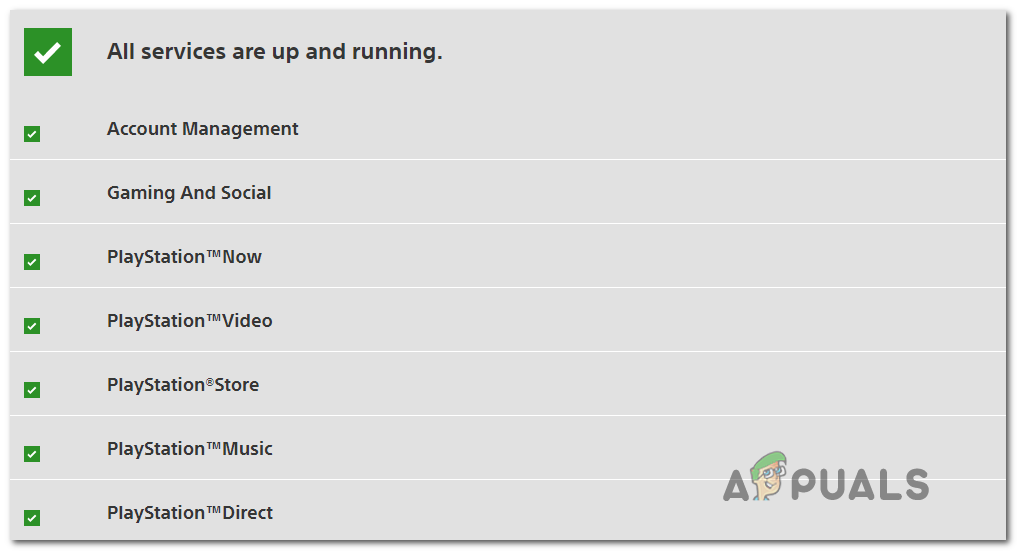
In case you found no evidence of a server issue and no other users in your area are encountering the same problem, you can conclude that you’re dealing with a problem that’s only occurring locally (for your particular setup). If this is true, move down to the next method below to troubleshoot your local network.
Method 2: Restart or Reboot router
As it turns out, this problem can also occur due to a network inconsistency brought about by a glitched or badly configured router. Several affected users that were previously dealing with the same problem have confirmed that they managed to get the issue resolved after rebooting or resetting their network device.
If you’re dealing with a problem caused by your router, one of the following potential fixes below should take care of the issue (especially if you’ve connected your PS4 to your Wi-Fi network.
Note: If you’re using a router with limited bandwidth, disconnecting every non-essential device can make all the difference. Remove every non-essential device that is not relevant right now before following one of the sub-guides below.
A. Rebooting your router
If you are afraid of data loss, the ideal way to start is with a simple router reboot. This operation will end up clearing the majority of TCP / IP glitches that might contribute to the apparition of this error code on PlayStation 4.
If you didn’t try to restart your network device (router) yet, you can do so by pressing on the On/Off button (typically located on the back).

Once the router is turned off, go ahead and disconnect the power cable and wait for 1 minute to allow the power capacitors enough time to clear any temp data stored in-between restarts.
Next, restore power to your router and start the device back up to see if this rends up resolving the NP-40831-6 error code. If the same problem is still occurring, move down to the next potential fix below.
B. Resetting your router
If the simple reset procedure didn’t work in your case, you might want to start considering the fact that you might be dealing with an issue caused by a router setting that is affecting the connection with PlayStation Network.
However, since there are a lot of scenarios that might cause this issue the closest cure-all fix you have at your disposal is to reset your router settings back to their factory settings.
But before you engage in this procedure, keep in mind that this operation will end up clearing any custom settings that you might have previously established in your router settings. This includes any forwarded ports, saved PPoE login credentials, whitelisted/blocked devices, and network restrictions.
If you want to go for this procedure, press and hold on the reset button (on the back of your router) and keep it pressed until you see every front LED flashing at the same time – With most models, you need to hold the reset button for about 10 seconds until this happens.
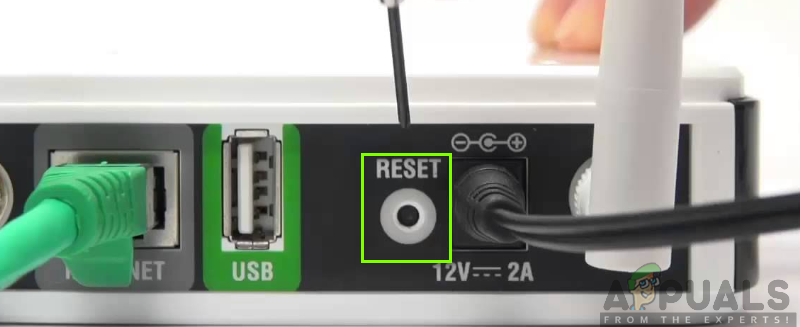
Note: Most manufacturers will place the reset button inside the plastic case, so you’ll need a small object like a toothpick or a small screwdriver to be able to press and hold on it.
After the reset procedure is complete, go through the steps of re-enabling your internet connection. If your ISP is using PPPoE, you will need to re-configure the login credentials before you’ll be able to restore internet access.
Once you have successfully reset your home network, connect your PS4 to the network once again, and repeat the action that was previously causing the NP-40831-6 error code.
If the issue is still not resolved, move down to the next potential fix below.
Method 3: Filtering the connection through a VPN
According to some affected users, this problem can also occur due to a Level 3 Node that is inhibiting the connection between your console and the PlayStation Network.
If this scenario looks like it could be applicable and you’re facing similar issues with different services or games, one solution that might just work in your case is to set up a VPN network on your computer and then filter the connection of your PS4 through it via an ethernet cable.
This particular fix has been confirmed to work by several different users that have been previously dealing with the NP-40831-6.
If you want to try out this fix, follow the instructions below to filter your PS4 Internet connection through a VPN network:
- First things first, install a VPN software of your choice on your PC. You can go for a premium solution or something with a free plan. If you’re having trouble deciding for yourself, we’ve made a shortlist of reliable VPNs that are confirmed to work with network filtering:
ExpressVPN
NordVPN
IPVanish
HotSpot Shield
SurfShark - Once you’ve decided upon the VPN that you want to install, follow the official documentation to complete the installation and configure the VPN on your PC.
- After you’ve installed the VPN of your choice, goa head and plug the end of an ethernet cable into the back of your PC or laptop (one end), and the other end into your PS4 console.
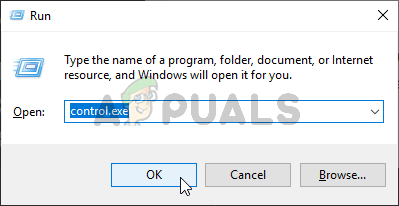
Connecting your PS4 to a PC - Once the connection between your PC and PS4 has been established, move to your PC and press Windows key + R to open up a Run dialog box. Next, type ‘control.exe’ inside the text box and press Enter to open up the classic Control Panel menu.
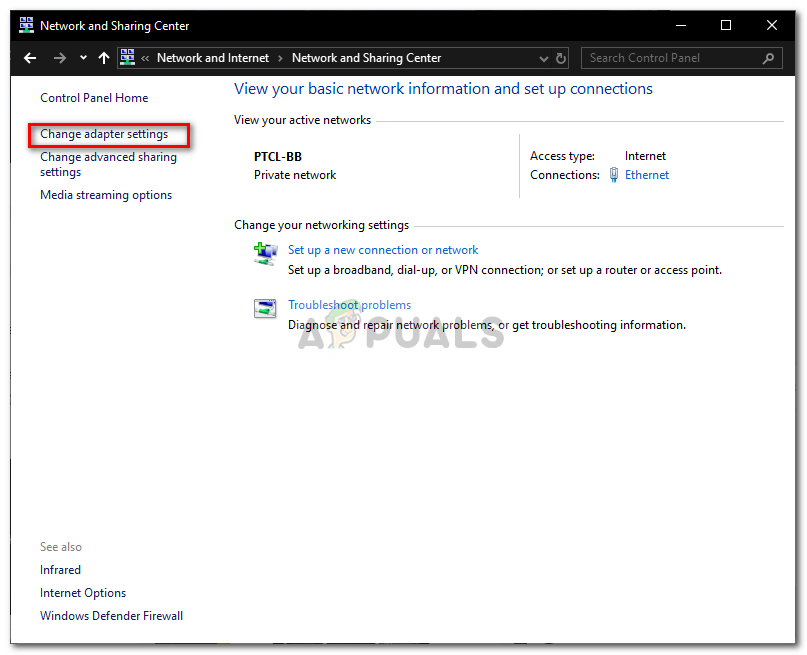
Running the Control Panel - From the classic Control Panel window, go ahead and navigate to Network and Internet > Network and Sharing Center, then click on Change Adapter Settings from the left-hand section of the screen.
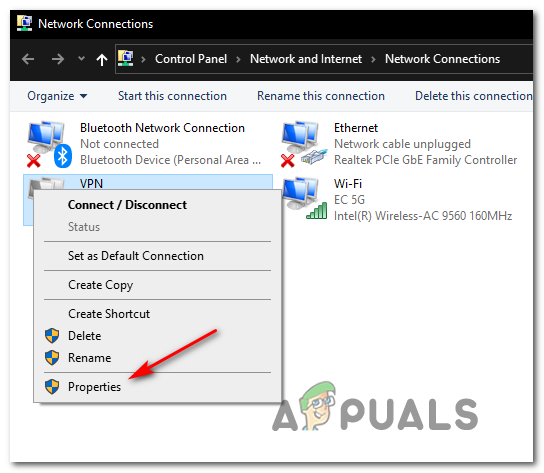
Network and Sharing Center - Next, from the list of available connections, right-click on the entry associated with the VPN that you’re actively using and choose Properties from the newly appeared context menu.
Accessing the Properties screen of the VPN network - Once you’re inside the Properties screen of your VPN, go ahead and select the Sharing tab from the horizontal menu at the top, then check the box associated with Allow other network users to connect through this computer’s Internet Connection.
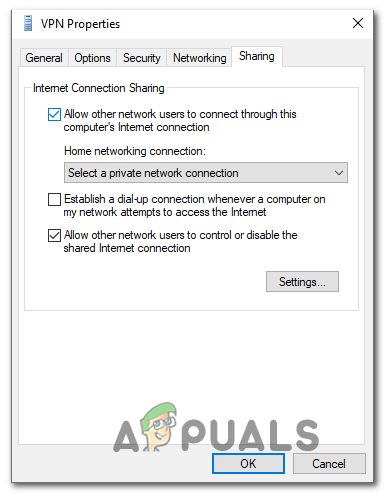
Allow other devices to connect through VPN - Once the Home networking connection drop-down menu is available, go ahead and select the home connection that you want to share with your PS4 before saving the changes.
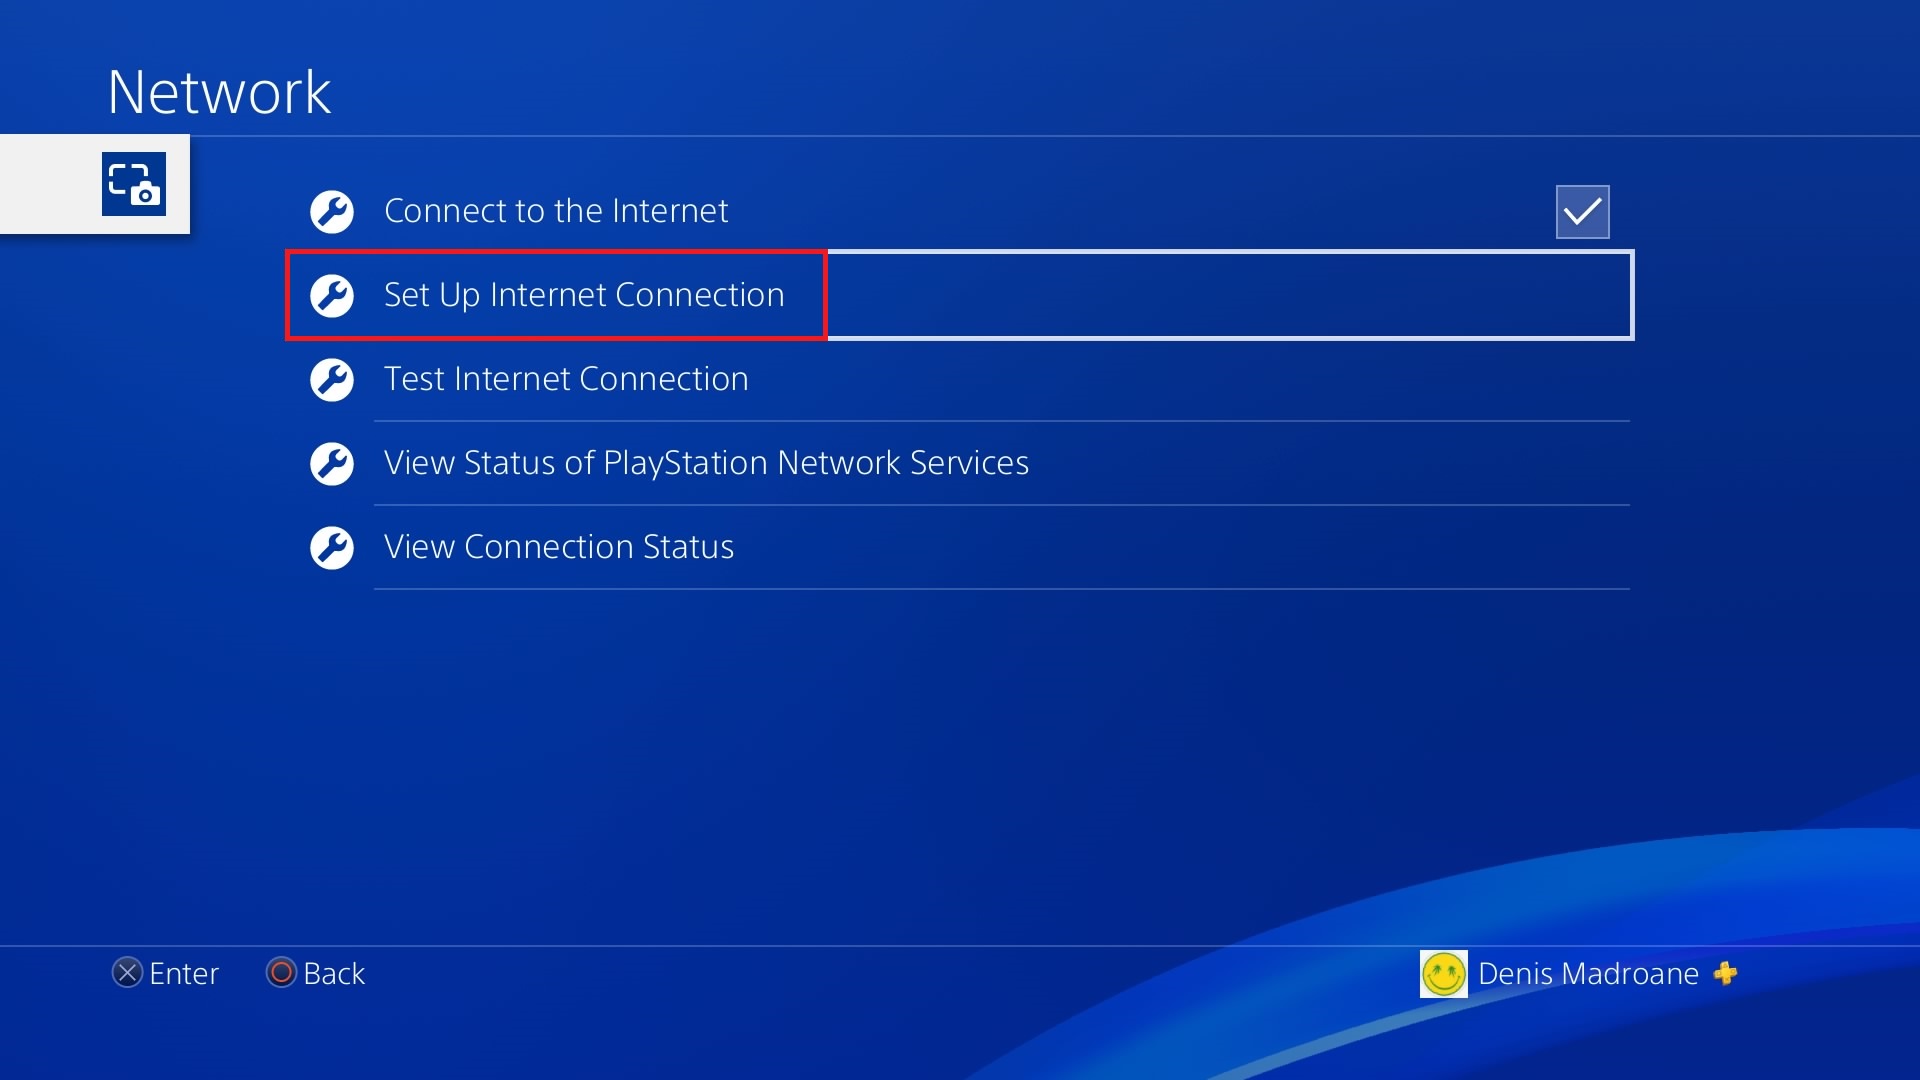
- Next, move over to your Ps4 and go to Settings > Network Settings and select Set Up Internet Connection from the list of available options.
Network Settings – PS4 - Next, choose LAN cable from the list of options and choose the Easy connection method to automatically scan and set up your Ethernet connection.
- When asked whether you want to use a proxy server, choose Do not use a Proxy Server when prompted, then test the connection and wait for internet access to be established.
- Once the operation is complete, repeat the action that has previously caused the NP-40831-6 error code and see if the issue is now resolved.
In case the same error code is still occurring, move down to the next potential fix below.
Method 4: Filtering the connection through a Hotspot (if applicable)
If you only want to connect to PSN to validate ownership (not to play multiplayer games), you should be able to circumvent the NP-40831-6 error code by connecting your PS4 to a hotspot instead of connecting it directly to your home network.
This operation was confirmed to work by a lot of affected users, but it’s not ideal if you plan on joining multiplayer settings. While on a hotspot, you can expect to experience lag.
If you want to attempt this potential workaround, follow the instructions below for some step-by-step instructions on filtering your Internet connection on your PS4 through a PC-based or mobile-based hotspot.
Follow the instructions below to filter the Ps4 connection through a Hotspot:
- Decide on the device that you want to use to hold the wireless hotspot. You can either use your Windows computer to create a hotspot or you can create a mobile hotspot from your Android device.
- Once the hotspot is successfully created and active, move to your PS4 and go to Settings > Network > Set up Internet Connection.
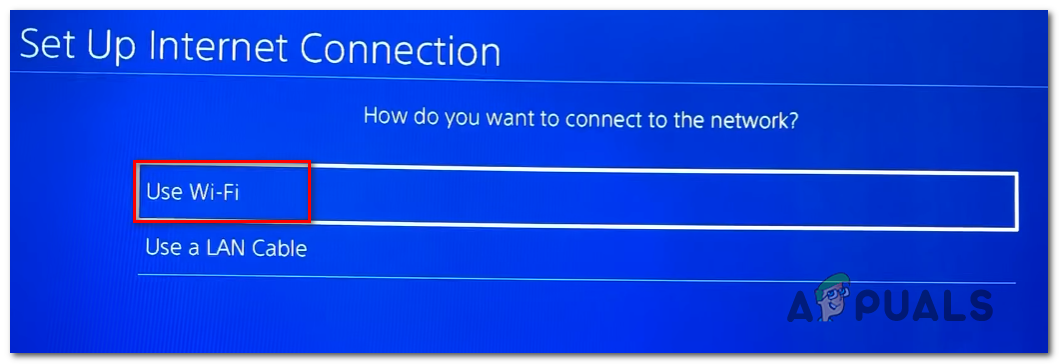
Accessing the Internet Connection Menu - From the next screen, choose Use Wi-Fi, then use the list of available Wi-Fi networks to locate the hotspot network that you’ve previously configured at step 1.
Connecting to the Hotspot that you’ve previously created - Once you have successfully connected to the hotspot network, repeat the action that was previously causing the NP-40831-6 error code and see if the issue is now resolved.
In case the same problem is still appearing, move down to the next potential fix below.
Method 5: Configuring the network manually
As it turns out, this particular error code (NP-40831-6) can also occur due to inconsistency with some network values that were automatically assigned when you choose to set up the connection manually.
According to some affected issues, some ISP (Internet Service Providers) are prone to assign bad DNS (Domain Name Address) values if the users allow this to be assigned automatically.
On top of this, depending on the circumstances where you end up seeing the NP-40831-6 error code, this problem might also be related to the Maximum Transmission Unit (MTU) allowed for this particular connection.
If this scenario is applicable, you should be able to fix this problem by making the switch to a manual DNS range and by modifying the default MTU size to accommodate large data transfers.
Here’s a quick guide on how to do this from the PlayStation 4’s settings menu:
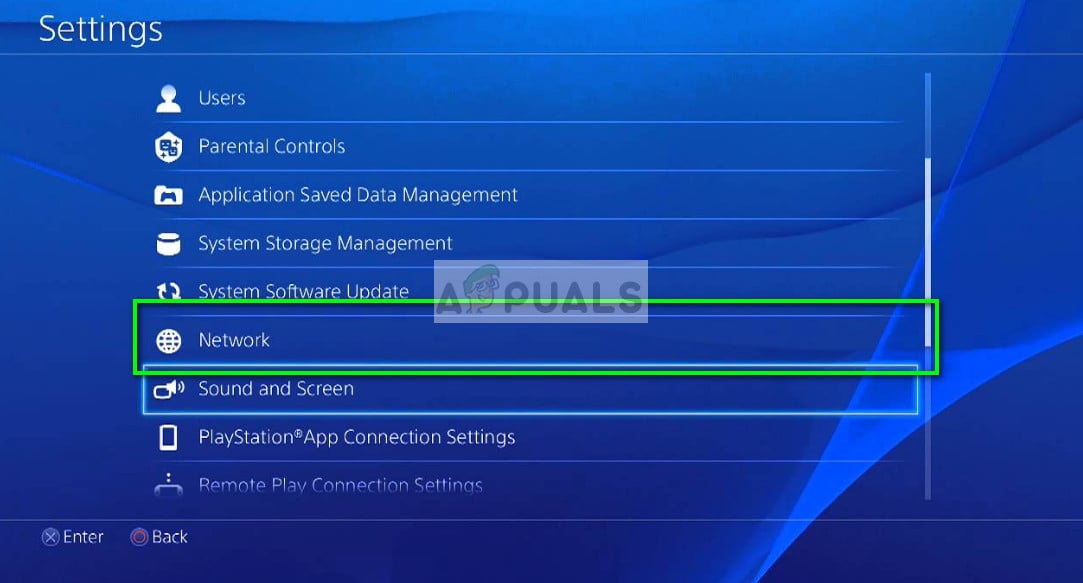
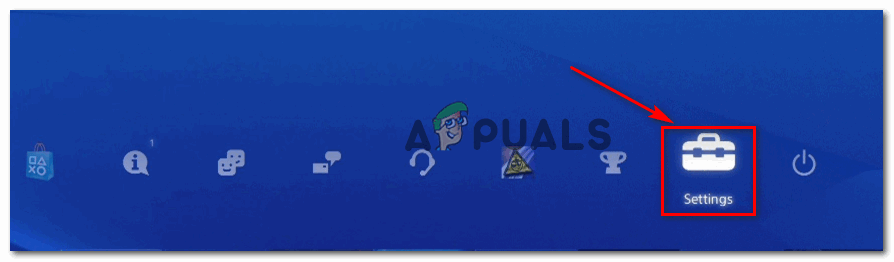
- On your PlayStation 4 console, swipe upwards with the left thumbstick and select the Settings menu from the list of available options.
Accessing the Settings menu on PS4 - Once you’re inside the Settings menu of your PlayStation 4, access the Network menu, then choose Set Up Internet Connection from the next menu and press X to reconfigure the network connection manually.
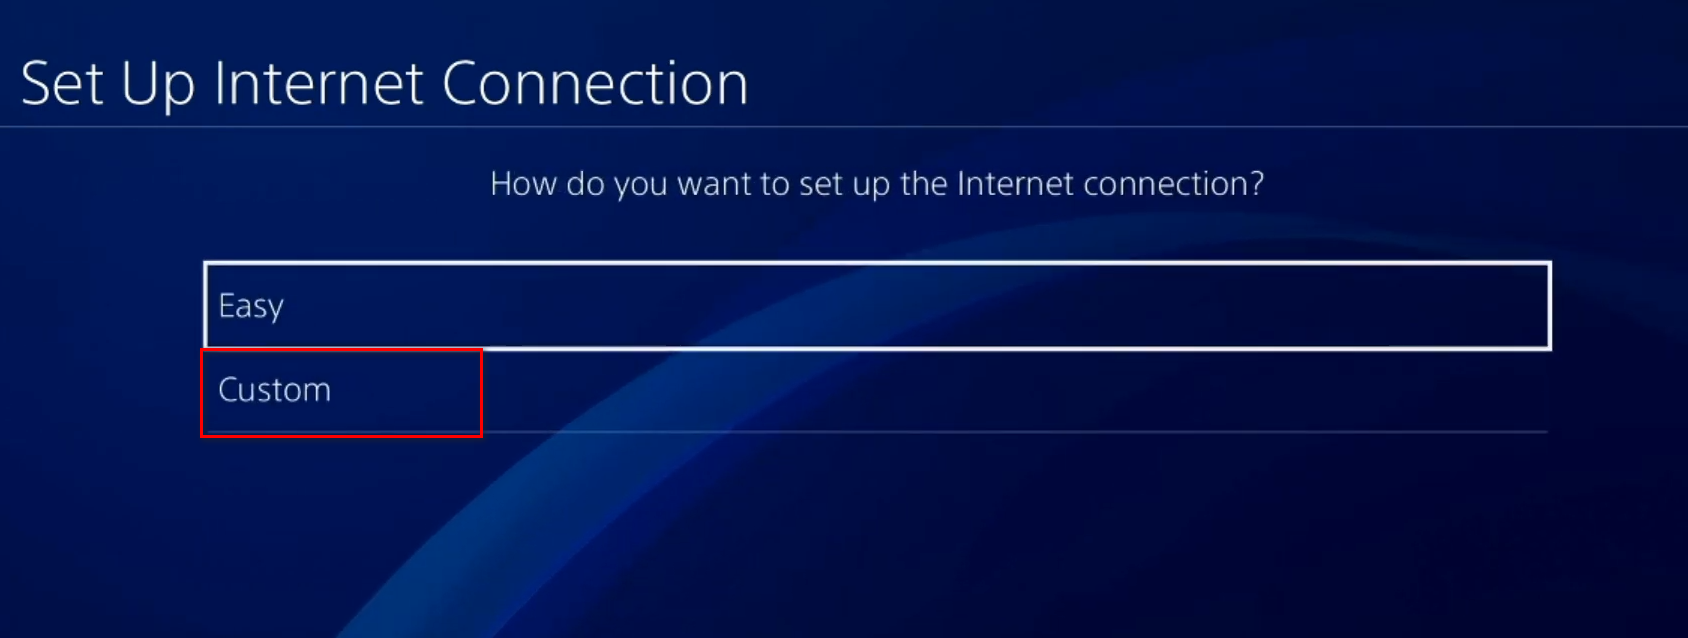
Accessing the Internet Connection Menu - At the next configuration prompt, choose Wired or Wireless, depending on the type of connection that you want to set up. But regardless of what you choose, at the next prompt, choose Custom so you have full control over the network settings.
Going for a Custom Internet Connection on Ps4 - Once you get to the IP Address prompt, choose Automatically, then choose Do Not Specify when asked to select a custom DHCP Host name.
- Once you finally get to the first DNS Settings menu, select Manual from the list of options, then go ahead and modify the two existing entries with the following values:
Primary DNS - 8.8.8.8
Secondary DNS - 8.8.4.4
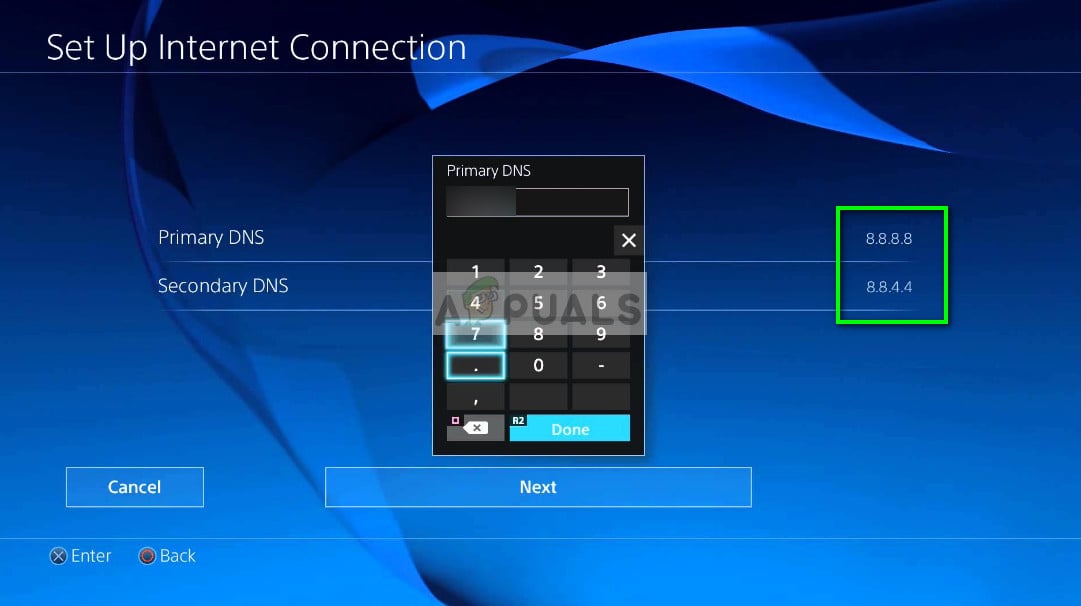
Google DNS settings – PS4 Note: This DNS range is provided by Google. If you’re not comfortable with it, you can look online for additional ranges that you can use.
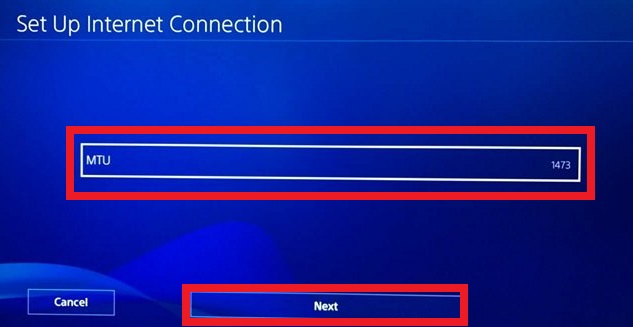
- Once you have successfully adjusted the DNS range, advance to the next screen and you’ll be prompted by MTU Settings. When you see this prompt, choose Manual, then set the MTU value to 1473 before saving the changes.
- Finally, follow through with the remaining prompts to complete the custom setup of your network connection on your PS4, then recreate the action that was causing the NP-40831-6 and see if the issue is now resolved.
If you still end up with the same error code, move down to the next potential fix below.
Method 6: Update firmware via Safe Mode
According to some affected users, this problem can also occur in situations where a glitched update prompt is not appearing even if a mandatory update needs to be installed before you’ll be able to connect to the PlayStation Network.
Several affected users that have been dealing with the same problem have confirmed that they managed to fix this problem by entering Safe Mode on their PS4 and forcing the firmware installation for there.
If you didn’t try this yet, follow the instructions below to install the latest firmware version from safe mode. The instructions will be applicable for every PS4 version released so far (PS4 Vanilla, PS4 Slim, and PS4 Pro).
- Start by ensuring that your console is connected to a stable Internet connection.
- Next, swipe up and access the Notification panel and see if you can find a pending update prompt. If you see one, select it, then press the Option key to bring up the context menu so you can choose Delete and remove it from the queue.
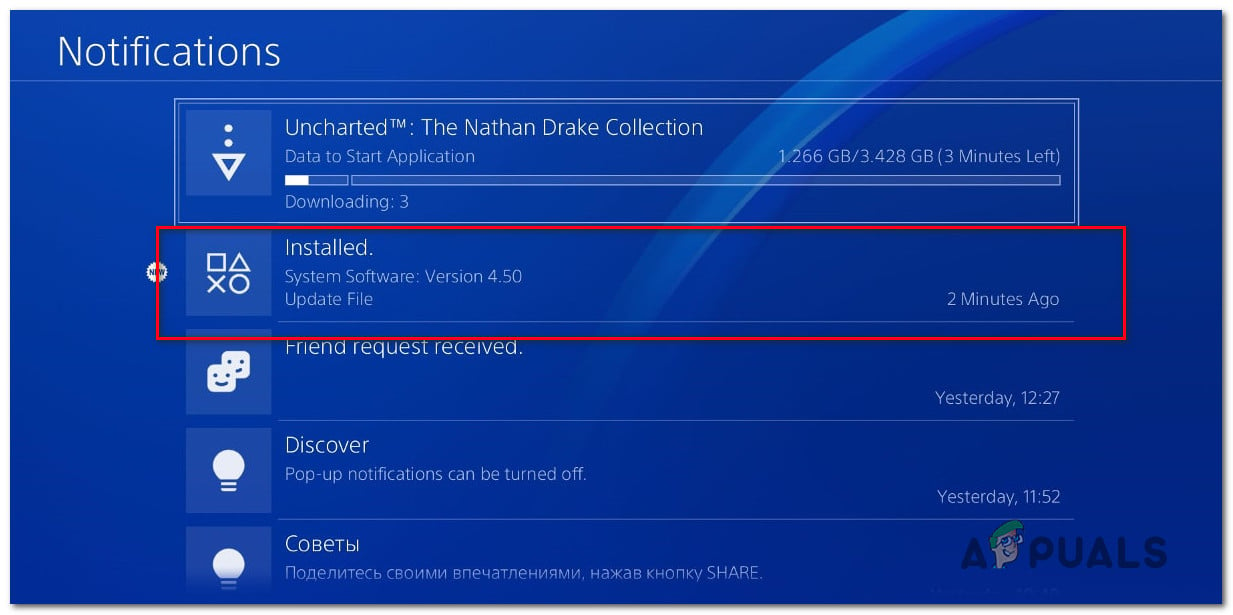
Deleting the update notification - Once the update notification is taken care of, turn of your PS4 completely (don’t put it to sleep). You can use the Power Options menu to do so or you can simply press and hold on the On/Off button on your console (short pressing will put it to sleep).
- After your console is fully turned off, press and hold on the Power button on your console until you hear 2 consecutive beeps. Once you hear the second beep, you can release the power button as it’s signaling that your console is about to enter the Safe Mode menu.
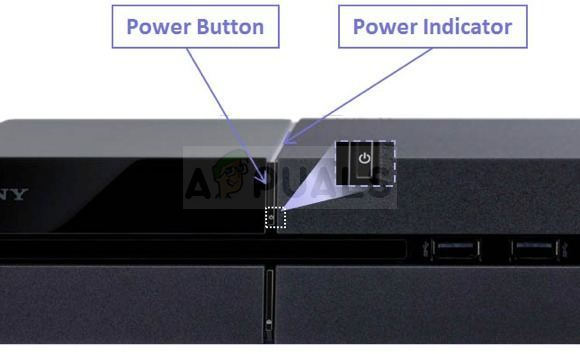
PS4 Power Button - At the first Safe Mode screen, you will be asked to connect your Dualshock controller using ap physical cable (Type-A). Follow the instructions to do so, then press the PS button on your controller to complete the pairing process.
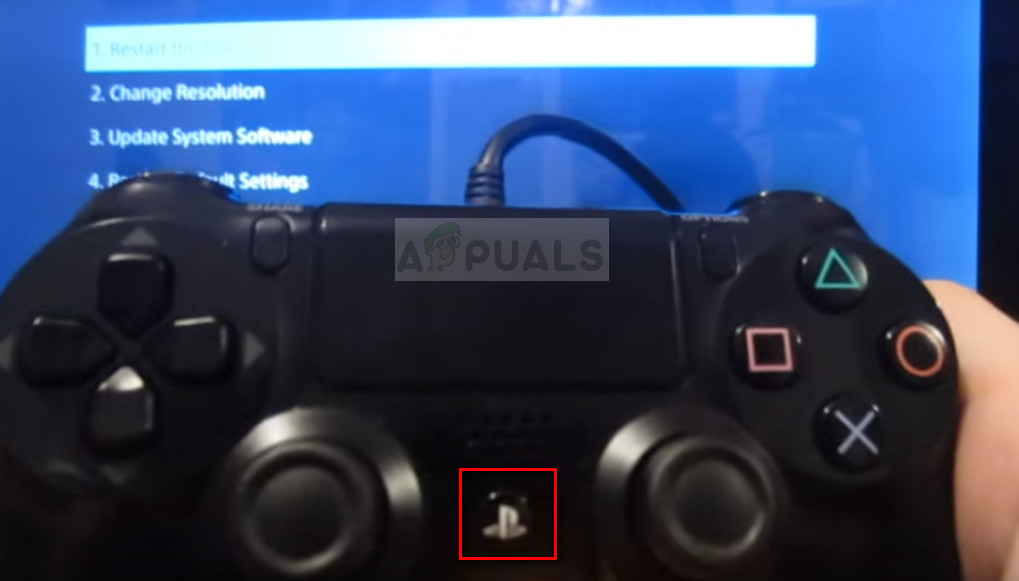
Connect the controller to Ps4 via USB cable and press the PS button - Once your controller is successfully connected, use it to access the Update System Software menu.
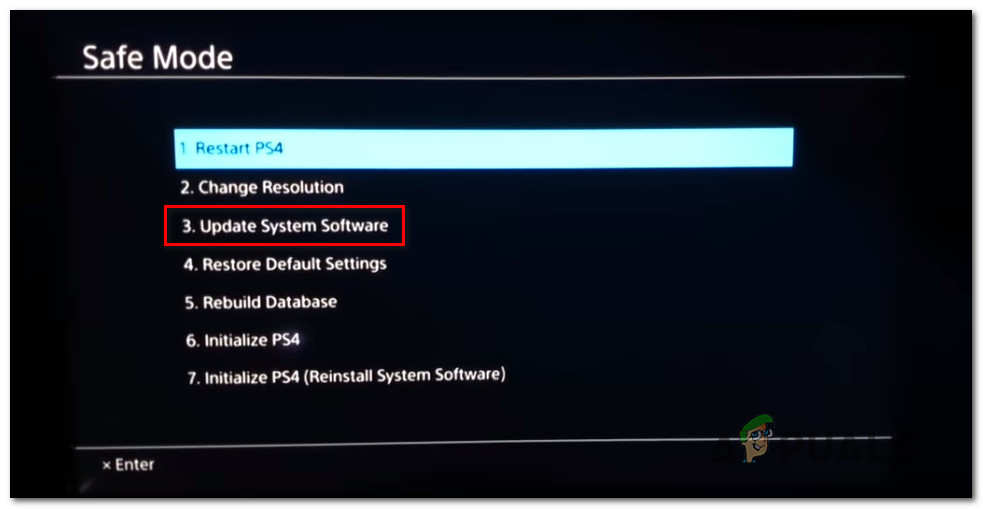
Update PS4 software via Safe Mode - Next, from the Update System Software submenu, choose Update using the Internet and confirm again to initiate the procedure.
- If a new firmware version is identified, wait until the operation is complete, then restart your console conventionally once the operation is complete.
- Once your console boots back up, attempt to re-connect to the PSN network once again and see if the problem is now resolved.