8 Fixes for When One AirPod is Quieter Than the Other
 Reviewed by Huzaifa Haroon
In the realm of contemporary audio technology, Apple’s AirPods have undeniably emerged as an iconic symbol of convenience and high-fidelity sound reproduction. However, a perplexing issue that has left many users puzzled is the occurrence of uneven volume levels between the left and right AirPod.
This discrepancy in audio output not only disrupts the harmonious listening experience but also raises questions about the underlying causes.
Table of Contents
Why is One AirPod Quieter Than the Other?
Our guide will focus on numerous potential issues with Apple AirPods as well as solutions to fix the audio balance between the two AirPods.
Low Battery
A low battery can be the reason for one of the AirPods not functioning. There are several causes for one of your AirPods to lose charge more rapidly than the other. One possible explanation is that you favor using either your right or left AirPod.
Also, the battery life of your AirPods will be shortened on the side that you place into your ears initially since that side will be utilizing the mic. When using Siri with AirPods, the same holds.
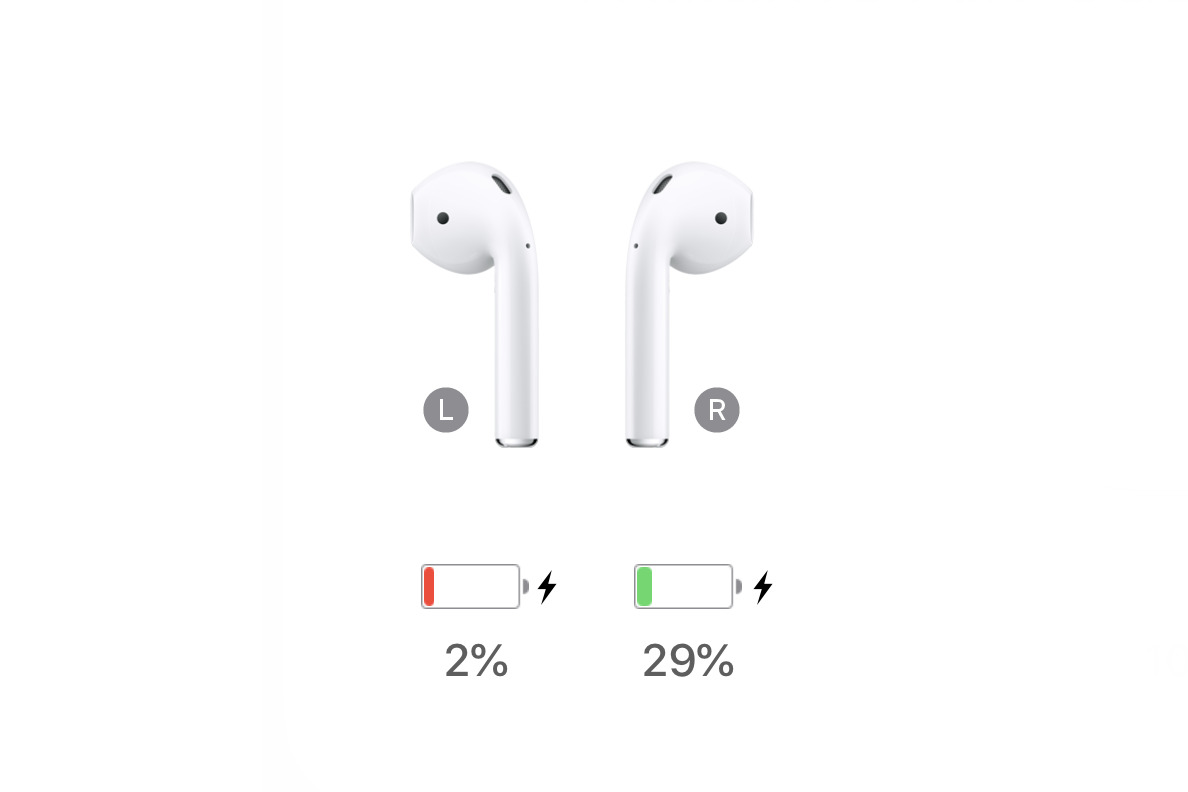
Try fully charging your AirPods to see if this fixes the problem. If you want to be certain that both of your AirPods have power, charge the case using a Lightning wire or a Qi-compatible charging pad at the same time. Follow these steps to see whether your AirPods are charging evenly:
- You can charge an iPhone or iPad by turning on Bluetooth of the iOS device, opening the charging case, and holding it near the device. In a moment, you will be shown an update about the charging.
- On a Mac, you can see how charged your AirPods are by opening the charging case and selecting the Bluetooth icon from the menu bar. Hovering over your AirPods in the list will reveal their charge state.
- When the AirPods are in the charging phase (shown by an amber or orange light), the charge is complete (indicated by a green light).
If one of your AirPods stops charging, battery degeneration is a likely culprit. This usually happens after prolonged use.
It is essential to note that if one of the AirPods fails to charge or loses charge rapidly, it may indicate battery degeneration resulting from prolonged usage. In such cases, considering battery replacement or seeking assistance from Apple Support would be necessary.
Stereo Balance
Users of Apple’s AirPods may not be aware that their devices allow them to independently adjust the volume of the left and right channels. Stereo Balance is a typical option for the hearing impaired to control the level of their less-capable ear.
However, if users are unaware of this functionality and fail to disable it, their Apple devices will play sound from only one speaker, resulting in a potentially lower or absent volume on either the right or left AirPod.
For instance, if the volume on your right AirPod is noticeably lower (or absent altogether), you might have inadvertently pushed the volume control to the left.
Fortunately, there is quite an easy fix for this problem. Here is how to tweak the AirPods’ stereo balance on an iOS device or a Mac:
Adjust Stereo Balance on iPhone
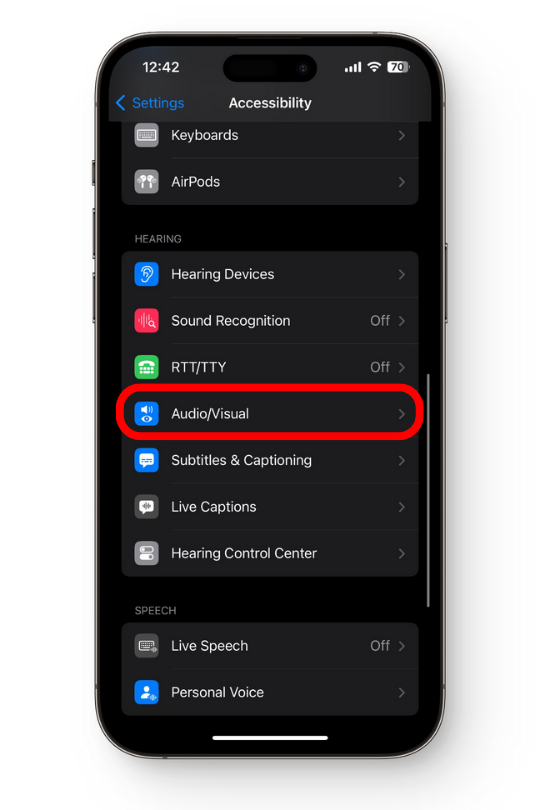
- Choose the Accessibility menu from the Settings.
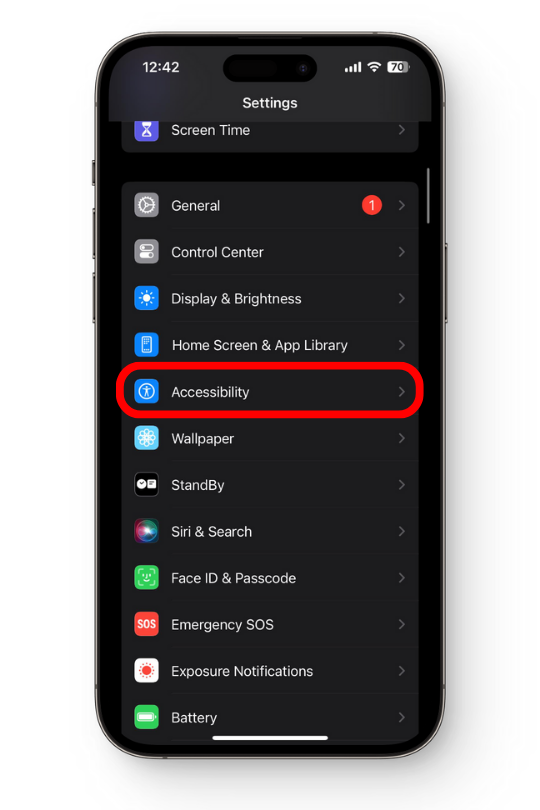
Step 1: Go to Accessibility from Settings Menu - Scroll down and select Audio/Visual.
Step 2: Access Audio/Visual Settings - Look for the Balance slider and ensure it is centered in the middle position. If the slider is not already in the center, move it there.
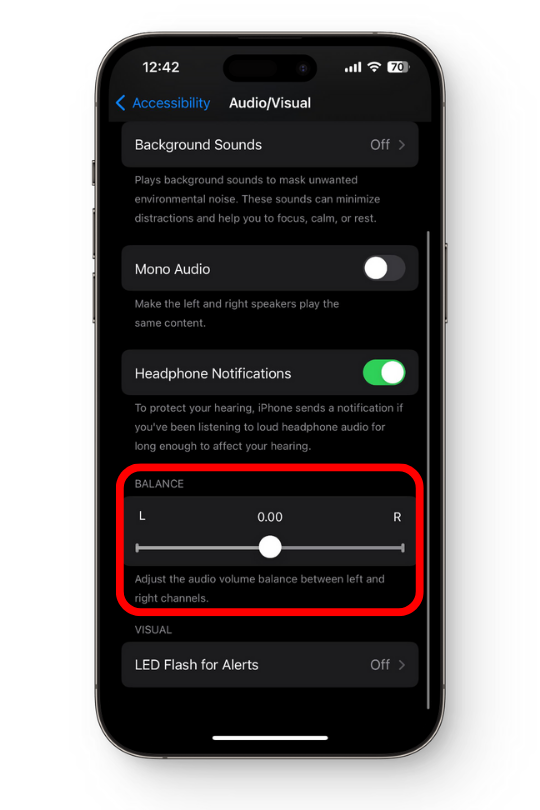
Step 3: Adjusting the Audio Balance - You can also adjust the slider to the right or left to increase the volume on the respective AirPod until a balanced audio output is achieved.
- Remember: The Mono Audio should be off.
Adjust Stereo Balance on Mac
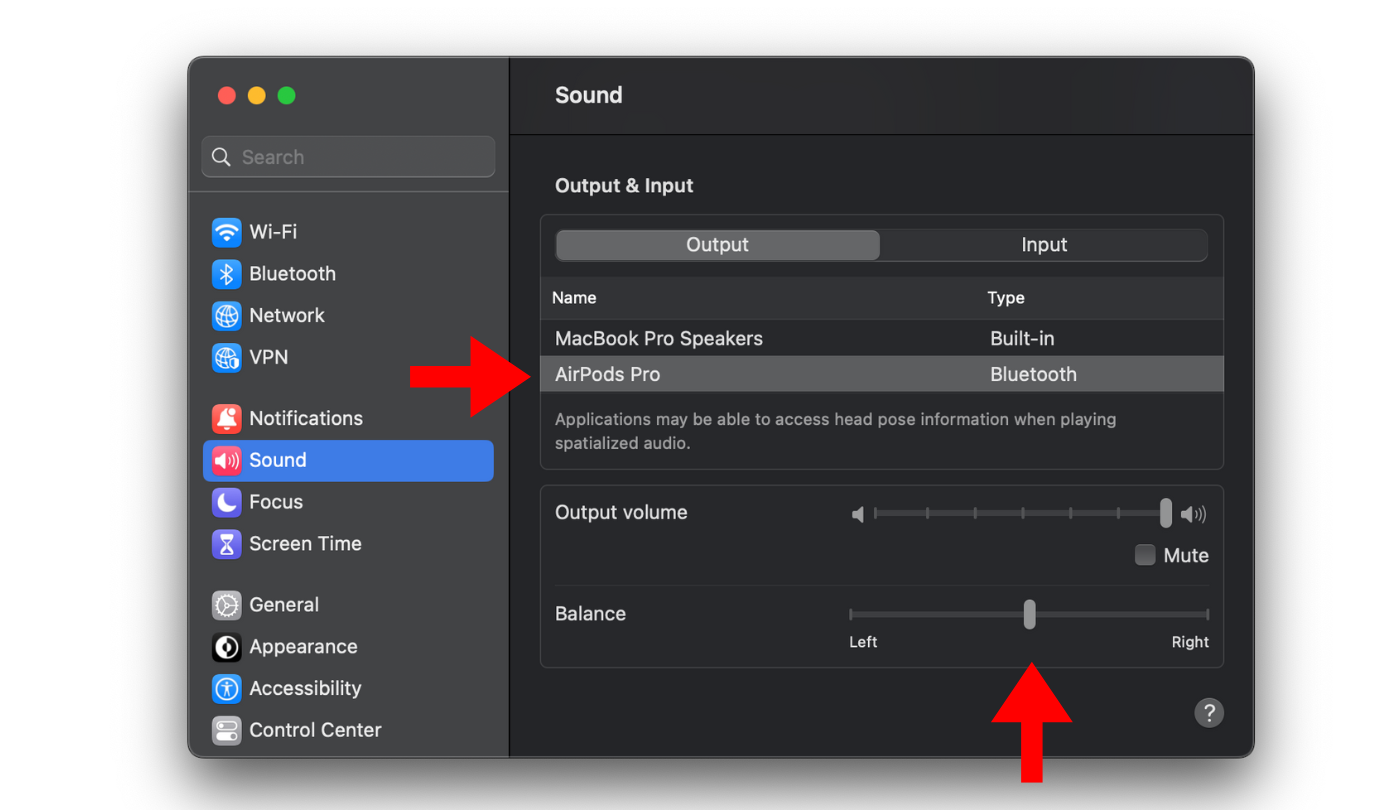
- Launch the System Preferences Panel. Select Sound and navigate to the Output tab.

Accessing Sound Settings on MacBook - In the Output section, choose the AirPods by clicking on their name. In this case, we are taking example of AirPods Pro. Check the Balance settings and place the slider in the middle, between Left and Right.
Bringing a Balance to the Audio of AirPods Pro - Next, launch the System Preferences panel. Choose the Accessibility tab. Go down to the Audio section and turn the slider off where it says Play Stereo Audio as Mono.
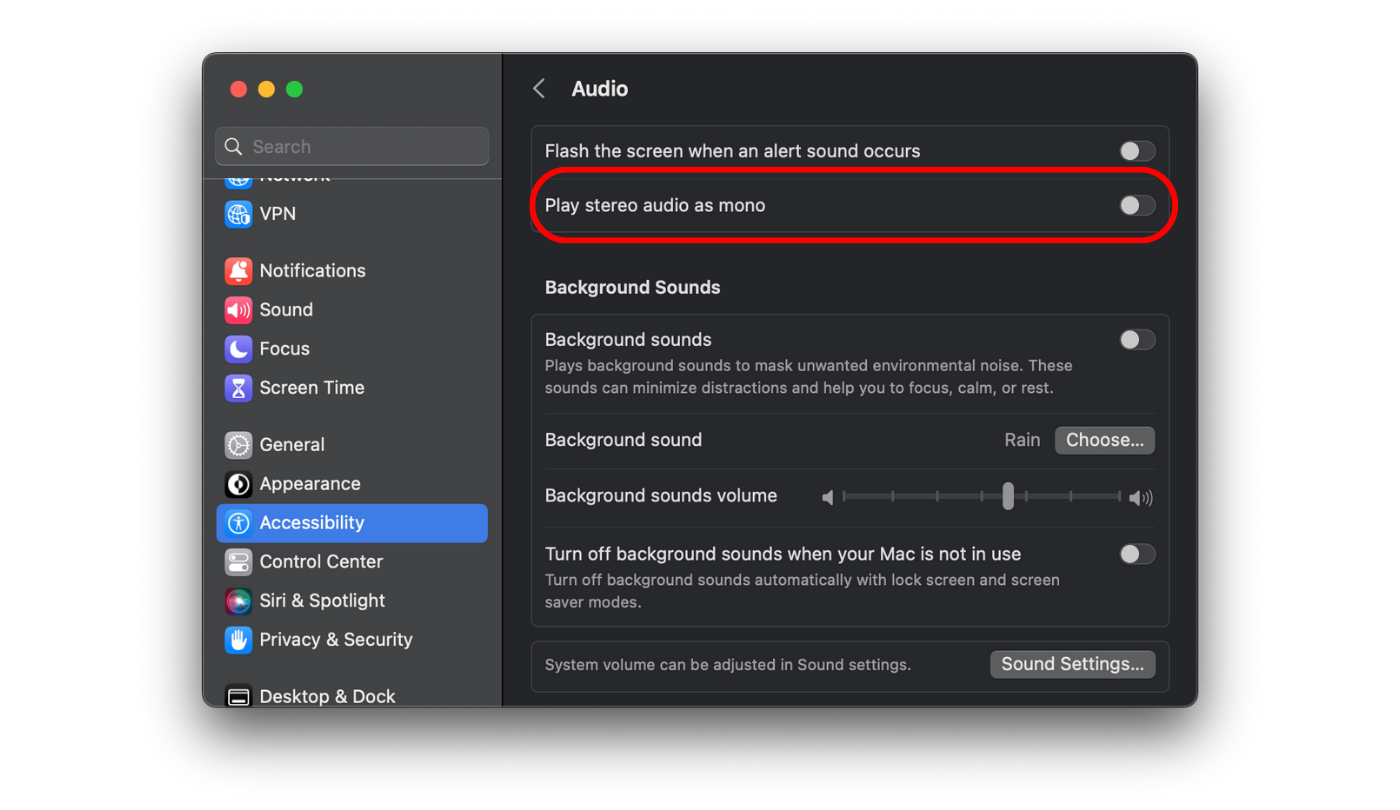
Toggling Off Mono Audio
Software Updates
Sometimes, your AirPods can glitch because they are incompatible with the iOS version, or probably, your iOS version requires an update. Updating your iOS device to the latest software version can often help address these compatibility issues and improve the overall performance of your AirPods.
To check for software updates on your iOS device:
- Open the Settings app on your iPhone or iPad. Scroll down and tap on General. Select Software Update.
- If an update is available, you will see a message indicating the availability of a new iOS version.
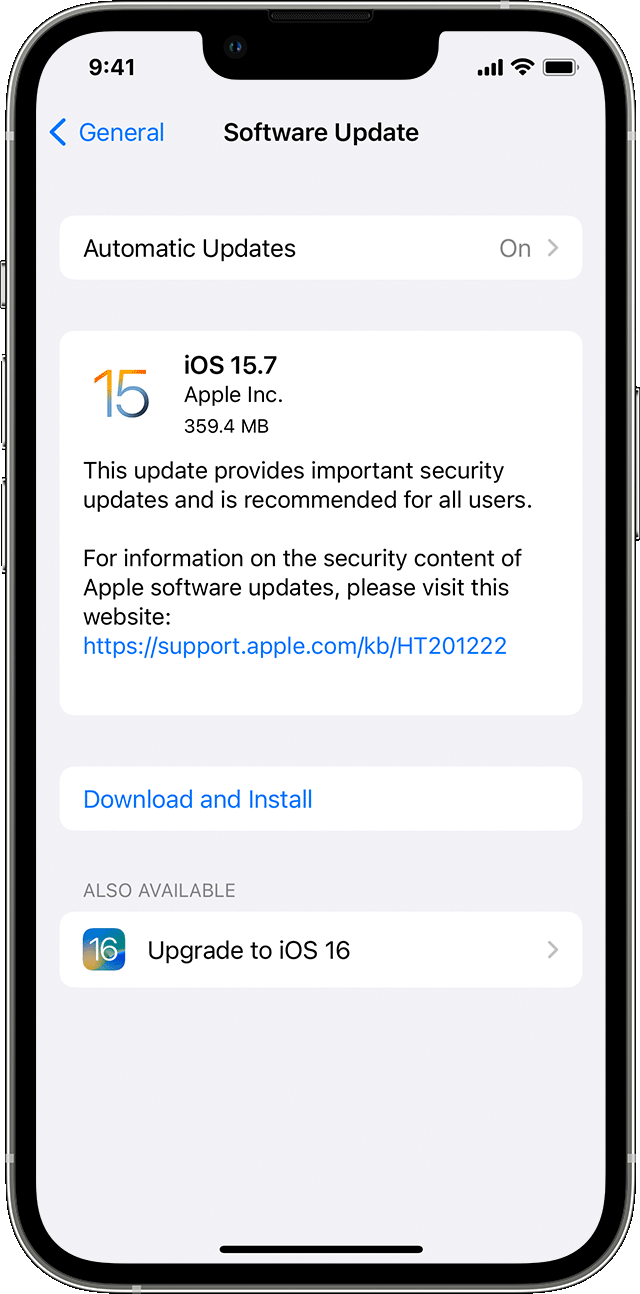
Updating iOS on iPhone | Apple - Tap Download and Install to begin the update process.
- Follow the on-screen instructions to complete the software update.
It is recommended to have your AirPods connected to your device and in close proximity during the software update process to ensure proper synchronization and compatibility.
Dirty AirPods
Dust or lint may readily collect in the AirPods’ crevices, producing a wide range of issues. Firstly, the presence of dirt can impact the clarity of your voice during calls or recordings, resulting in a less desirable listening experience for others.
Additionally, it can interfere with the Bluetooth sensor, causing difficulties in pairing or maintaining a stable connection with your devices. Lastly, build-up of dirt can hinder the charging process by blocking the power from reaching the charging pins and the Lightning connection which leaves your AirPods uncharged.
The good news is that wiping down your AirPods is a breeze. Learn how to safely clean your AirPods below.
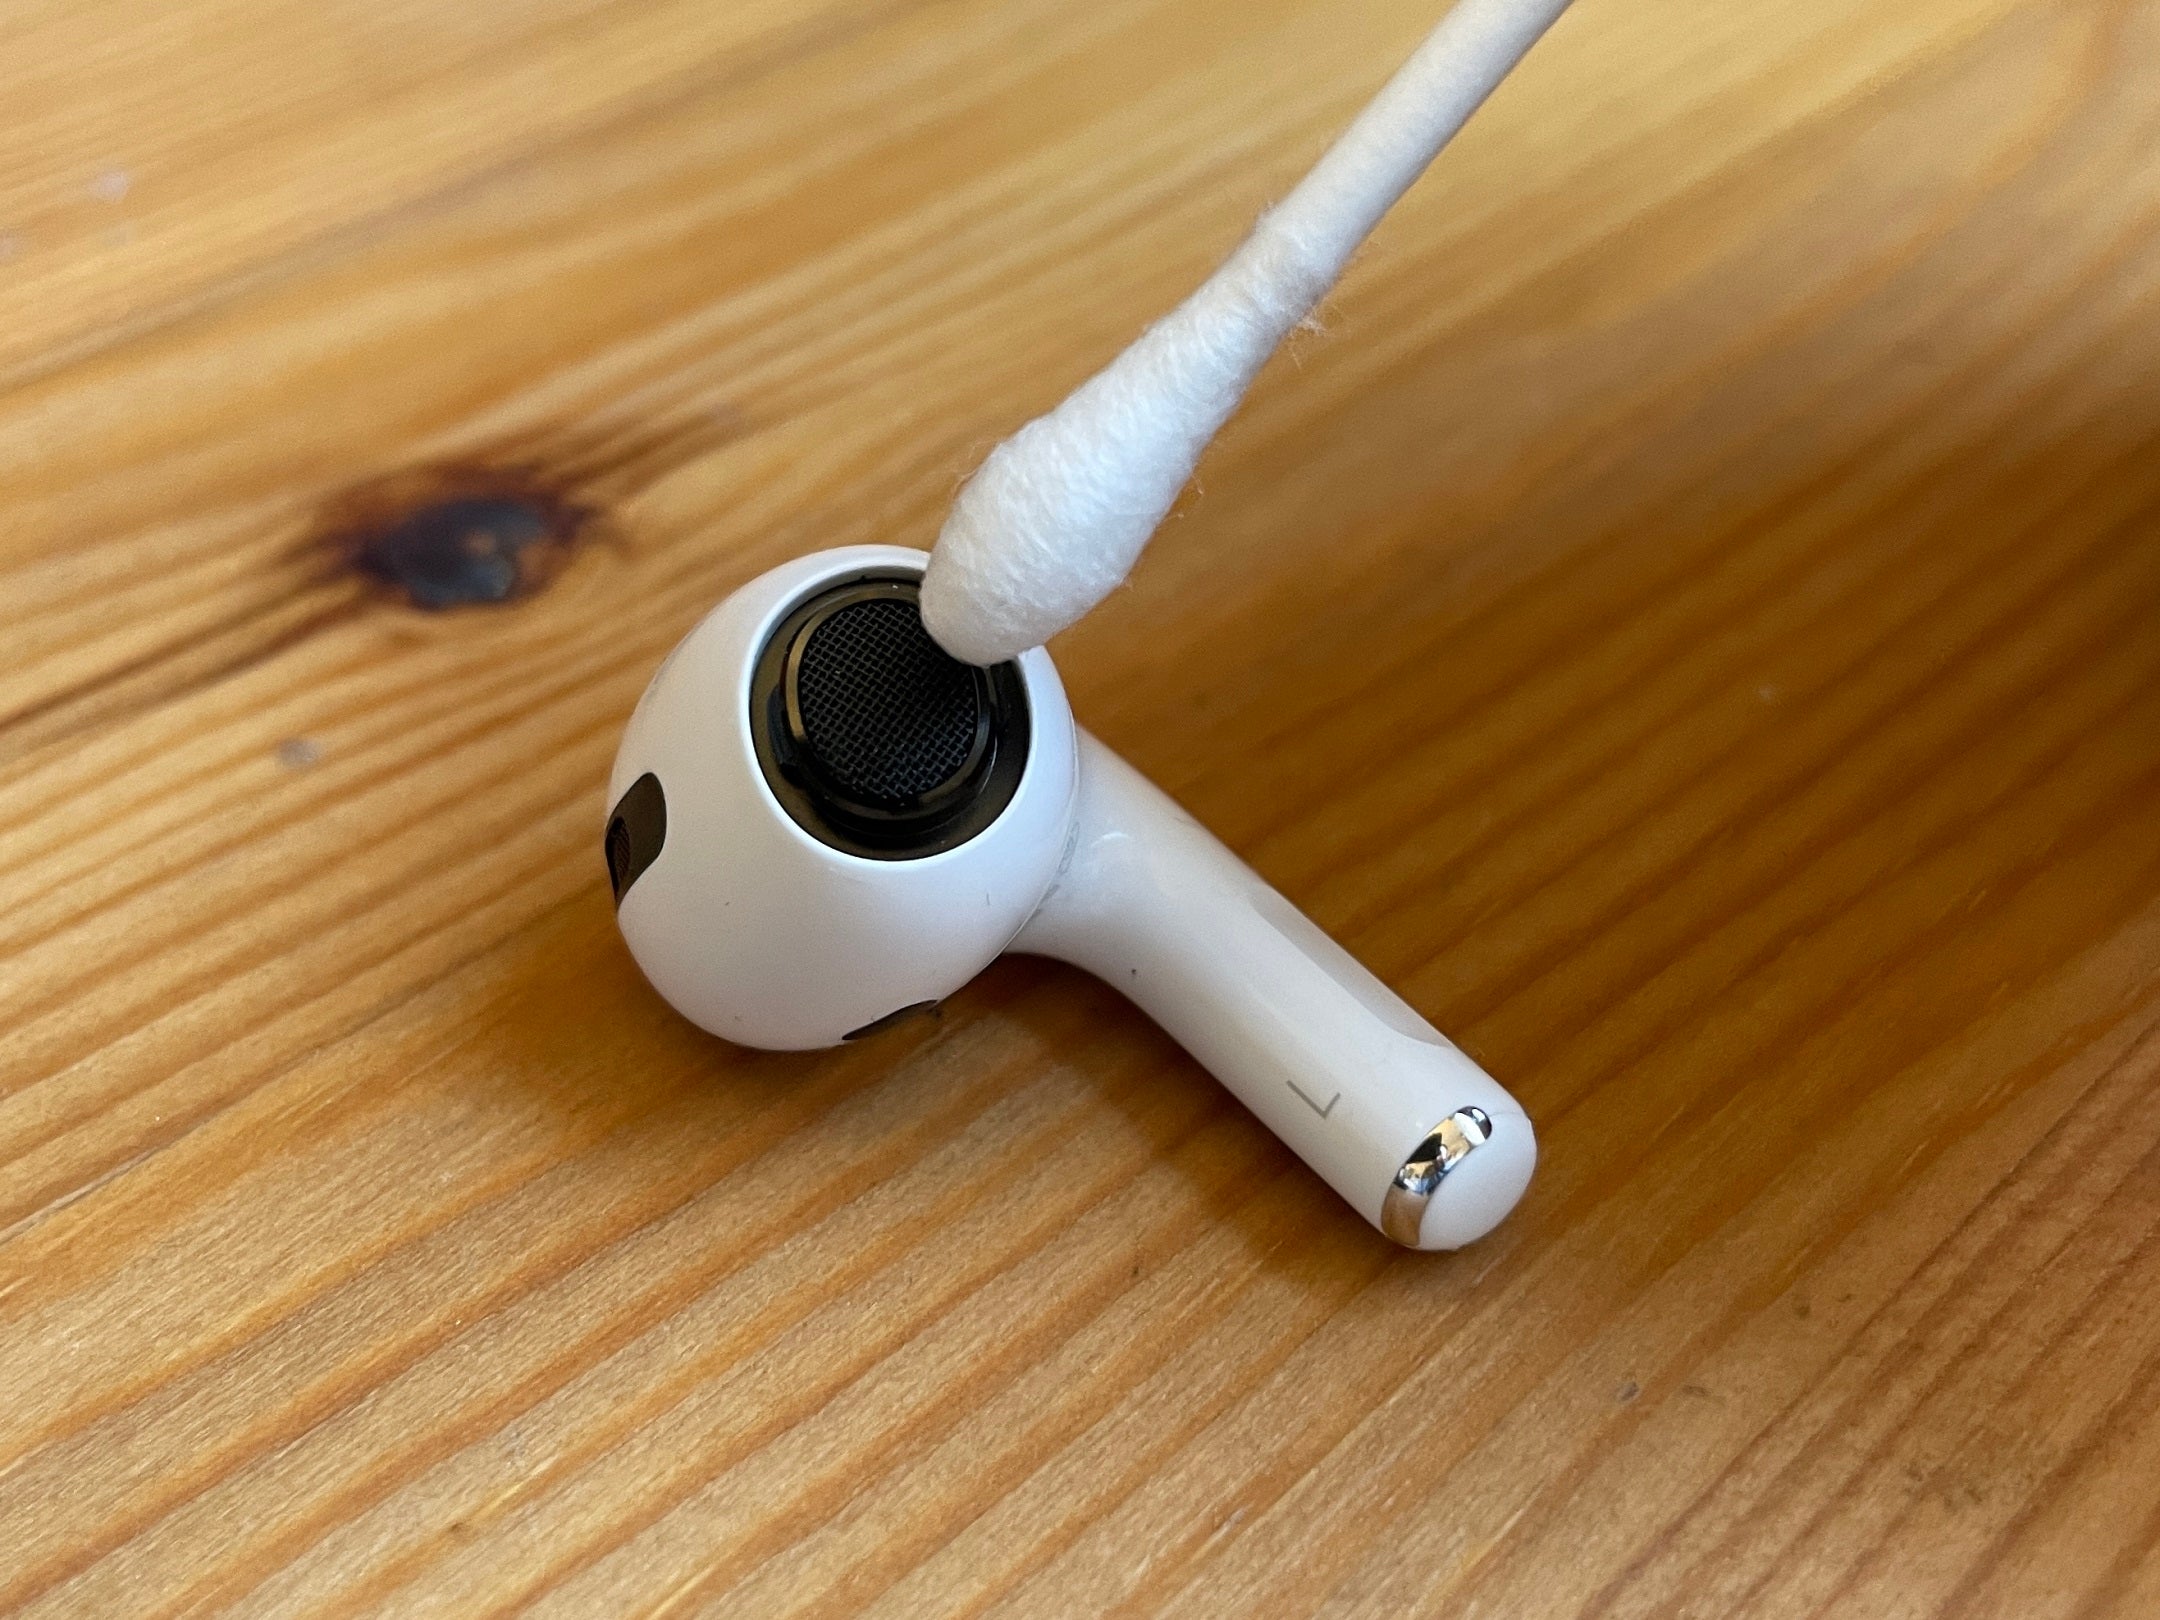
- Begin by using a cotton swab dampened with rubbing alcohol to wipe off the microphone and speaker meshes of your AirPods. This will help remove any accumulated dirt or debris.
- Remove the grime from the cracks by gently picking at it with a toothpick.
- To ensure that the charging pins on your AirPods stay clean, we recommend using a fresh cotton ball to wipe out the tips of the AirPods’ stems.
- Clean the charging pins inside the charging case by gently swabbing them with a cotton swab dampened with rubbing alcohol.
- Use a soft and lint-free cloth to wipe off any exposed surfaces of the AirPods and make sure they are thoroughly dry before returning them to the charging case.
Some contaminants, including earwax buildup, may remain in your AirPods even after a thorough cleaning. For this, you can go a bit extra on the cleaning aspect using this method.
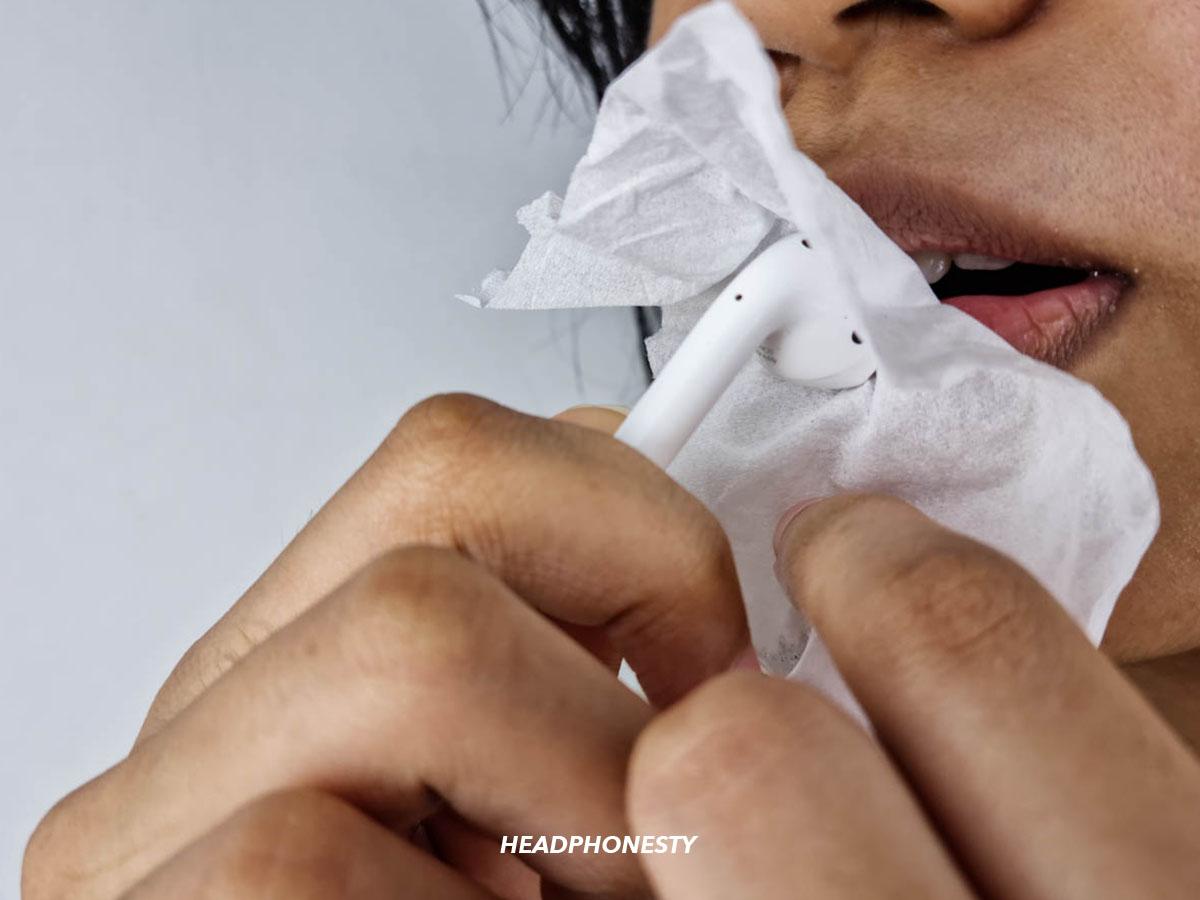
- Place a clean towel over the speaker mesh of your AirPods.
- Insert the AirPods into the towel, ensuring the speaker meshes are covered.
- Take deep breaths through the towel as this will create airflow to dislodge any earwax blocking the speakers’ mesh.
- Periodically wipe off the AirPods during this process to remove any dislodged earwax.
After completing the procedure, compare the volume levels of each AirPod to confirm they are balanced and producing equal sound.
Hardware Reset
Often, your AirPods might start glitching and cause audio issues if there is a software-related issue. One way to fix this is reset the AirPods. Resetting your AirPods can often resolve various audio issues, connectivity problems, or unexpected behavior. In a nutshell, they will be as good as new. If you need to reset your AirPods, follow these steps:
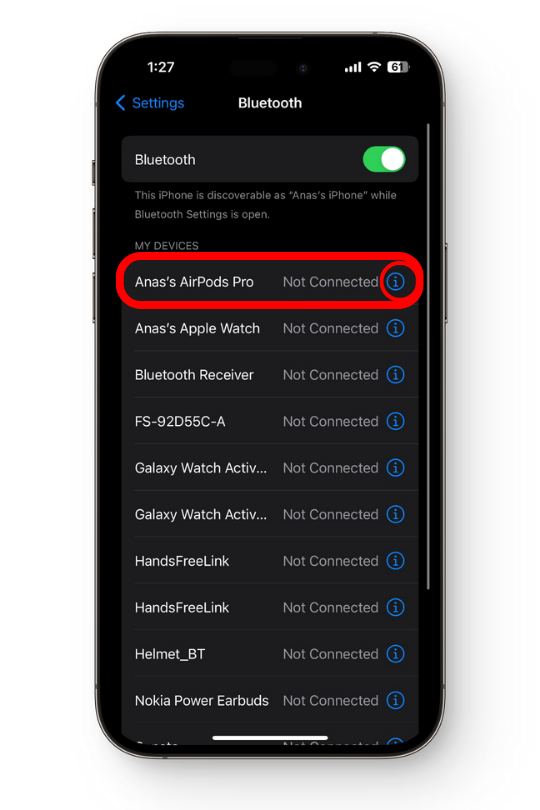
- Ensure that your iOS device has Bluetooth enabled. To do this, go to the Settings app and tap on Bluetooth.
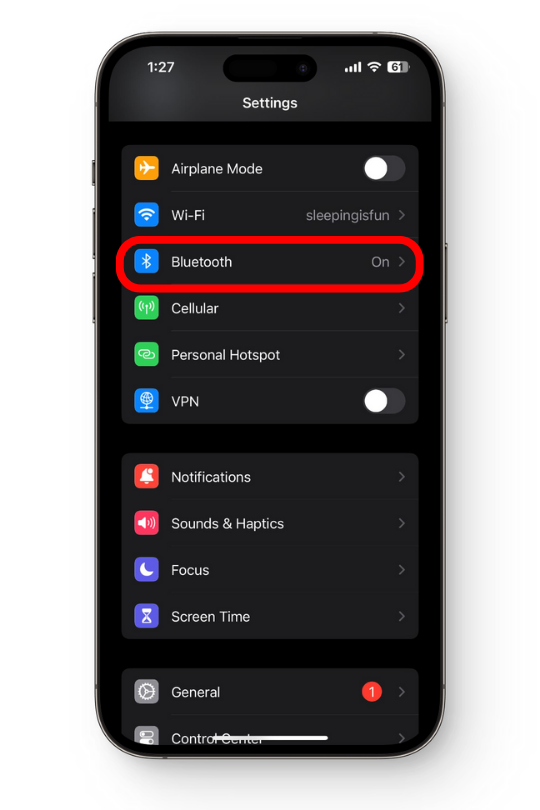
Step 1: Accessing Bluetooth Devices and Settings - Locate your AirPods in the list of connected devices by tapping on the “i” button next to their name.
Step 2: Accessing Settings of AirPods Pro - Within the AirPods settings, select the option to Forget This Device. This action will remove the AirPods from being synced with any other devices associated with your Apple ID.
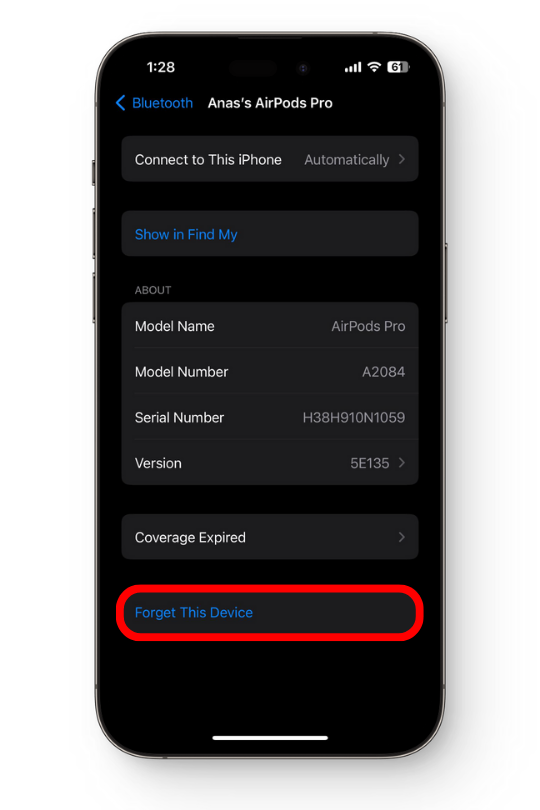
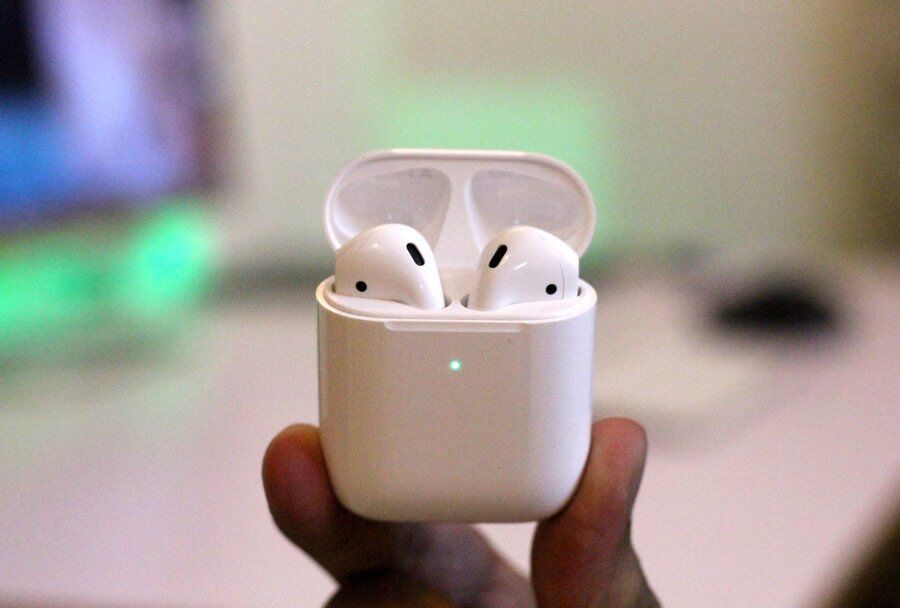
Removing AirPods Pro from List of Paired Devices - After removing the AirPods from the device, place them back into the charging case and close the lid.
- With the AirPods still inside the case, press and hold the setup button located on the back of the charging case. Hold it for about 15 seconds until the status indicator light on the front of the case flashes amber and then turns solid white. This indicates that the AirPods have been reset to factory settings.
If the issue persists even after resetting, you can try reestablishing the connection between the AirPods and your iOS device. Open the lid of the charging case near your iOS device and follow the instructions on the screen to reconnect the AirPods.
Audio File Problem
The vast majority of audio files we listen to are stereo recordings, which broadcast sound to both the left and right speakers. Sound engineers and artists often utilize various techniques to manipulate the placement of sound sources within the stereo field, creating immersive and dynamic soundscapes.
One such method, called Audio Panning, can change how far sounds come from the left and right speakers in a stereo mix.
When mixing, producers can adjust the volume of individual instruments such that they are heard more clearly from one speaker than the other. By switching your AirPods to Mono Mode, you can determine whether the imbalanced sound is a result of your music file or the AirPods themselves.
To listen to monophonic sounds on your AirPods, follow these steps:
- On your iOS device, go to the Settings app. Tap on Accessibility, usually located near the top of the list.
Step 1: Go to Accessibility from Settings Menu - Select Audio/Visual under the Hearing section.
Step 2: Access Audio/Visual Settings - Locate the option for Mono Audio and toggle the switch to enable it.
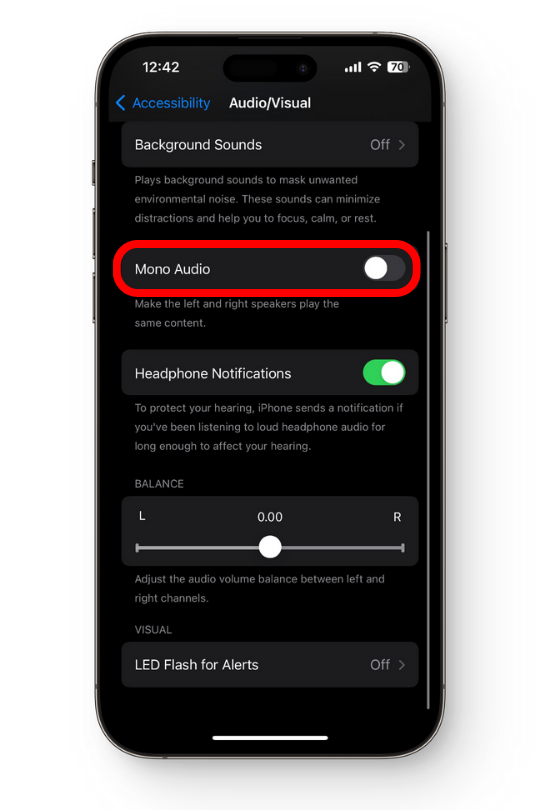
Step 3: Enabling Mono Audio
Ear Tip Fit Test
The Ear Tip Fit Test is a feature available for AirPods Pro that helps determine if you have a proper seal and fit with the ear tips. It assesses the quality of the seal in your ear canal, which is essential for optimal sound quality and active noise cancellation.
To improve noise cancellation, do the Ear Tip Fit Test with your AirPods Pro. This reduces the amount of ambient noise and sound that can be heard. You will have better hearing and it could even make your AirPods louder. The ear-tip-fitting procedure is as follows:
- Insert your AirPods Pro into your ears securely. On your iOS device, open your Bluetooth settings. Locate your AirPods Pro in the list of connected devices and tap the information (i) icon next to them. Within the AirPods Pro settings, find the option for Ear Tip Fit Test and tap on it.
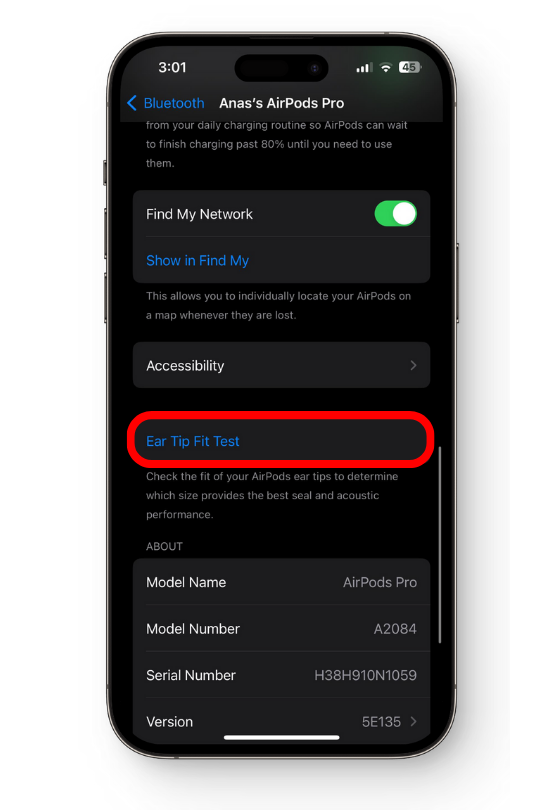
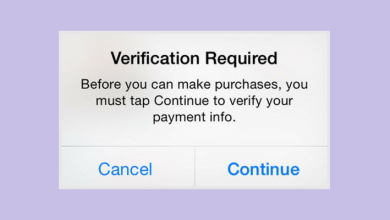
Step 1: Access Ear Tip Fit Test from AirPods Pro - Follow the on-screen prompts and tap “Continue” to initiate the test.
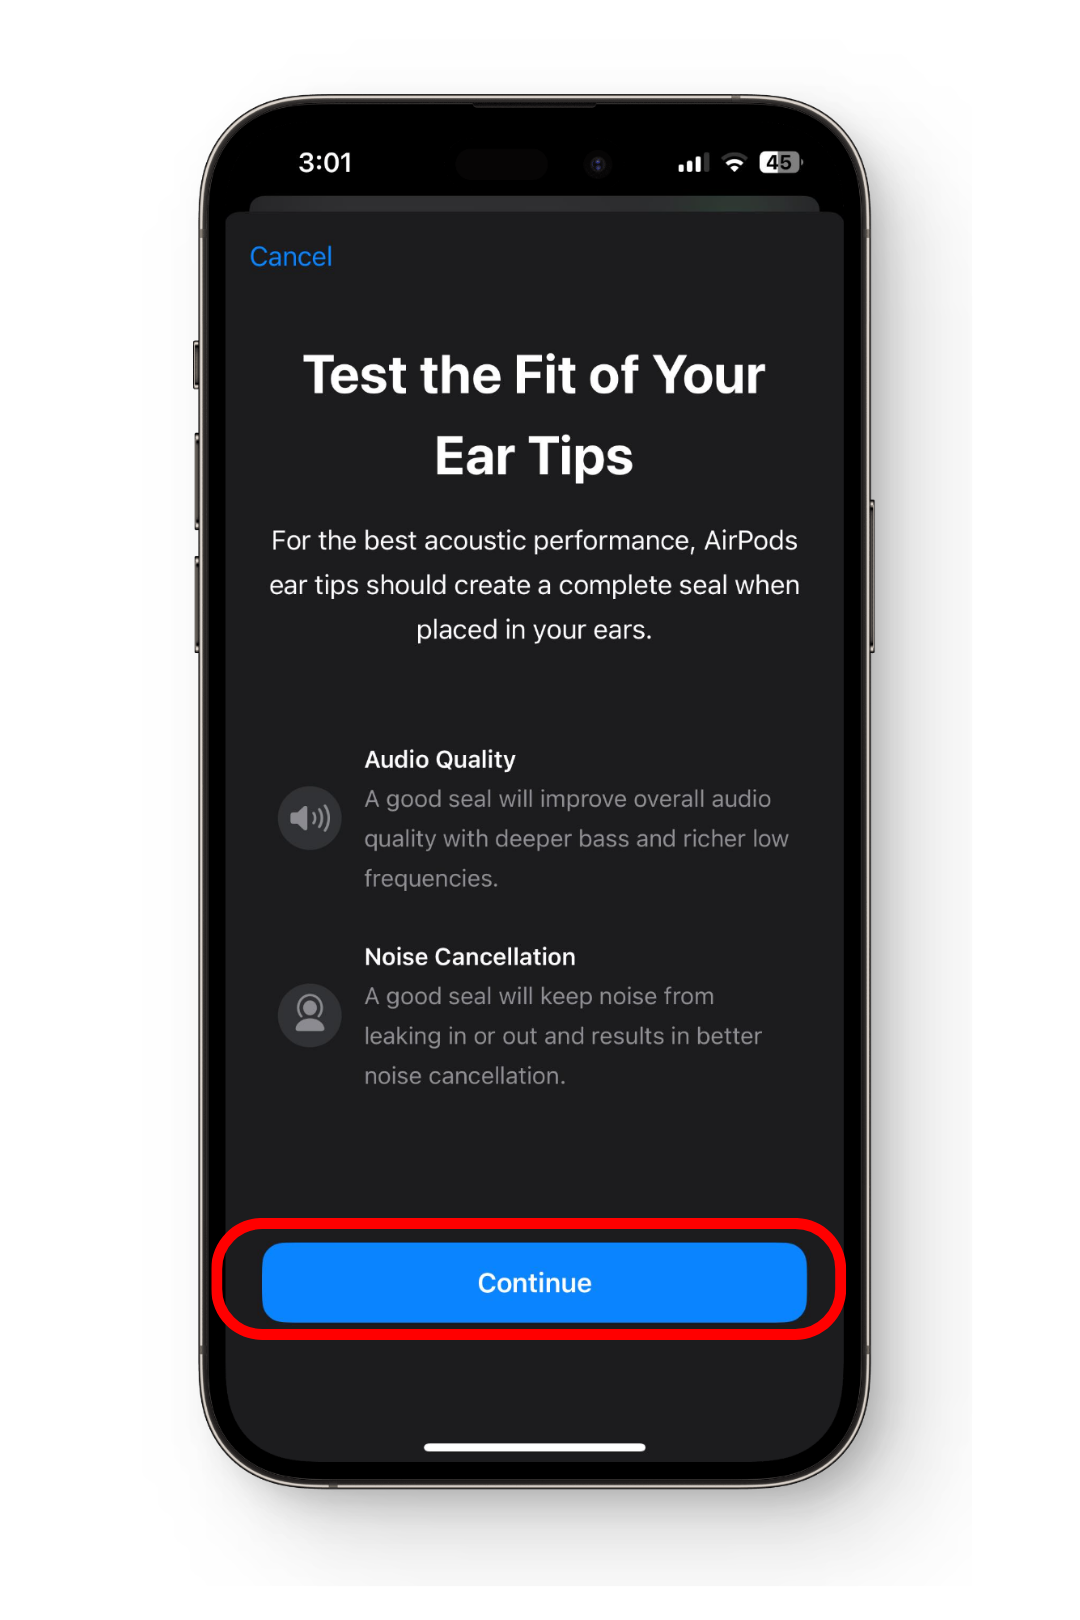
Step 2: Prompt Screen for Continuing Ear Tip Fit Test - You will be prompted that a sample sound will be played now once you tap the “Play button (▶)”. After the sample sound plays, and the test will analyze the fit of the ear tips based on the sound detected by the microphones in the AirPods Pro.
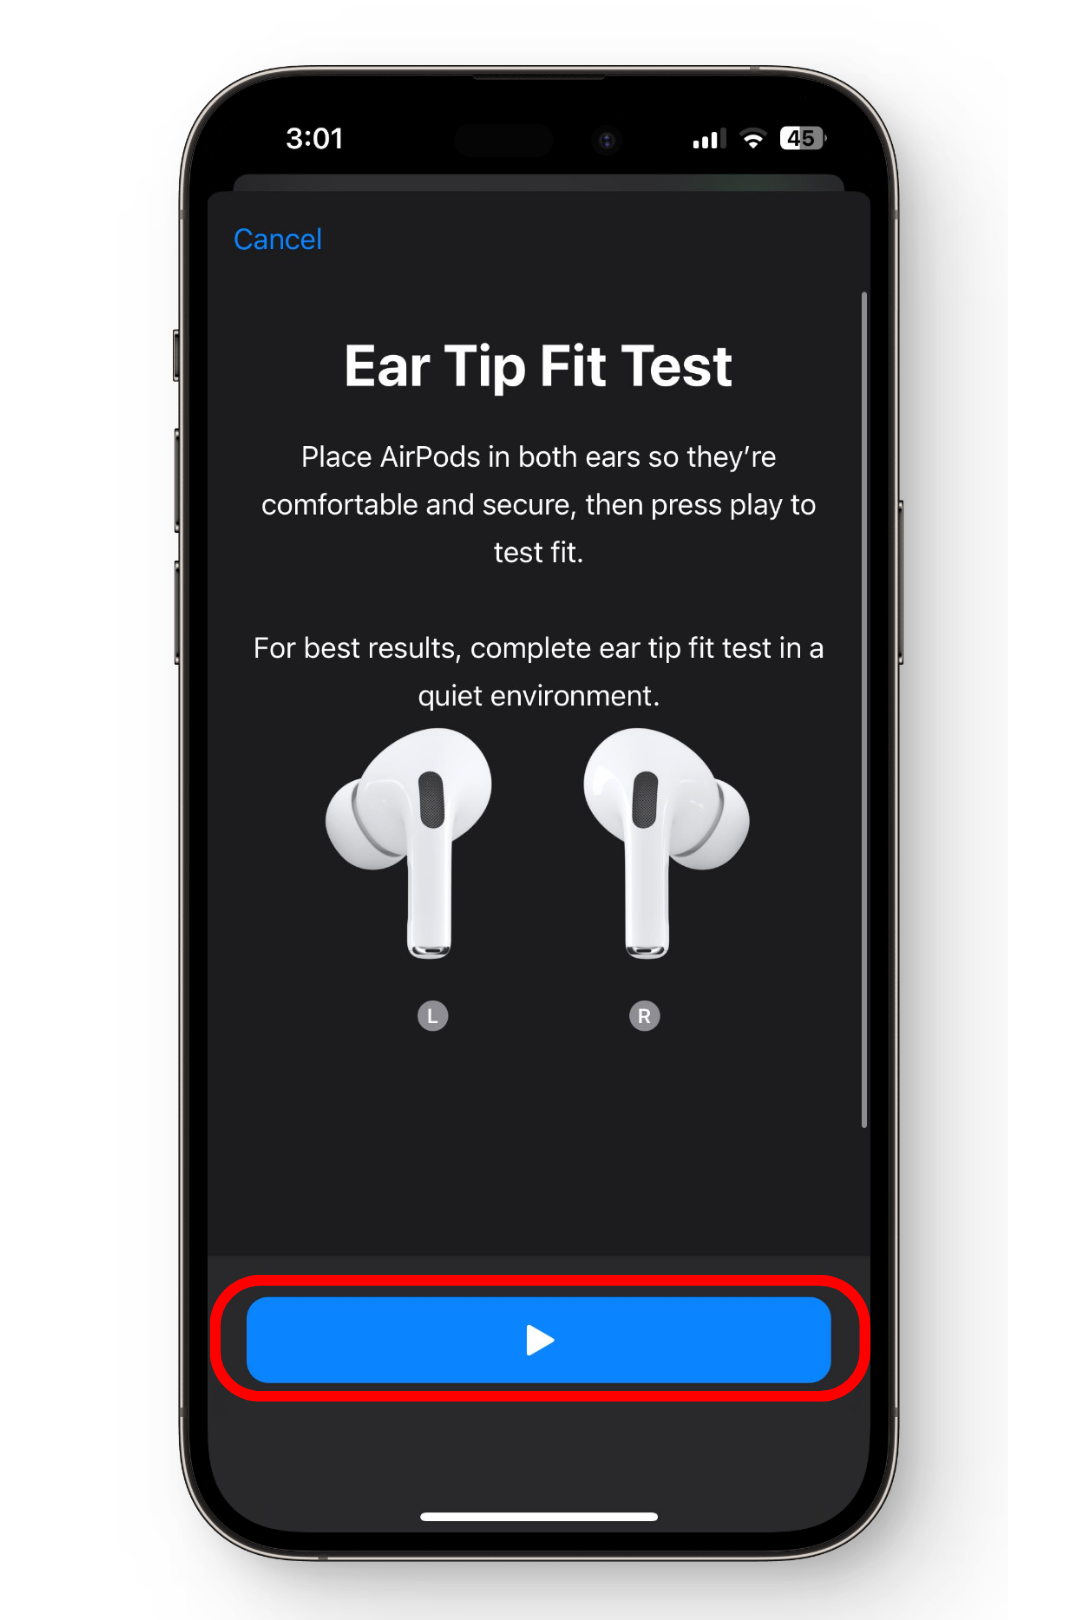
Step 3: Beginning the Ear Tip Fit Test - After the test completes, you will receive feedback on the fit, indicating whether the ear tips are providing an optimal acoustic seal or if adjustments are recommended.
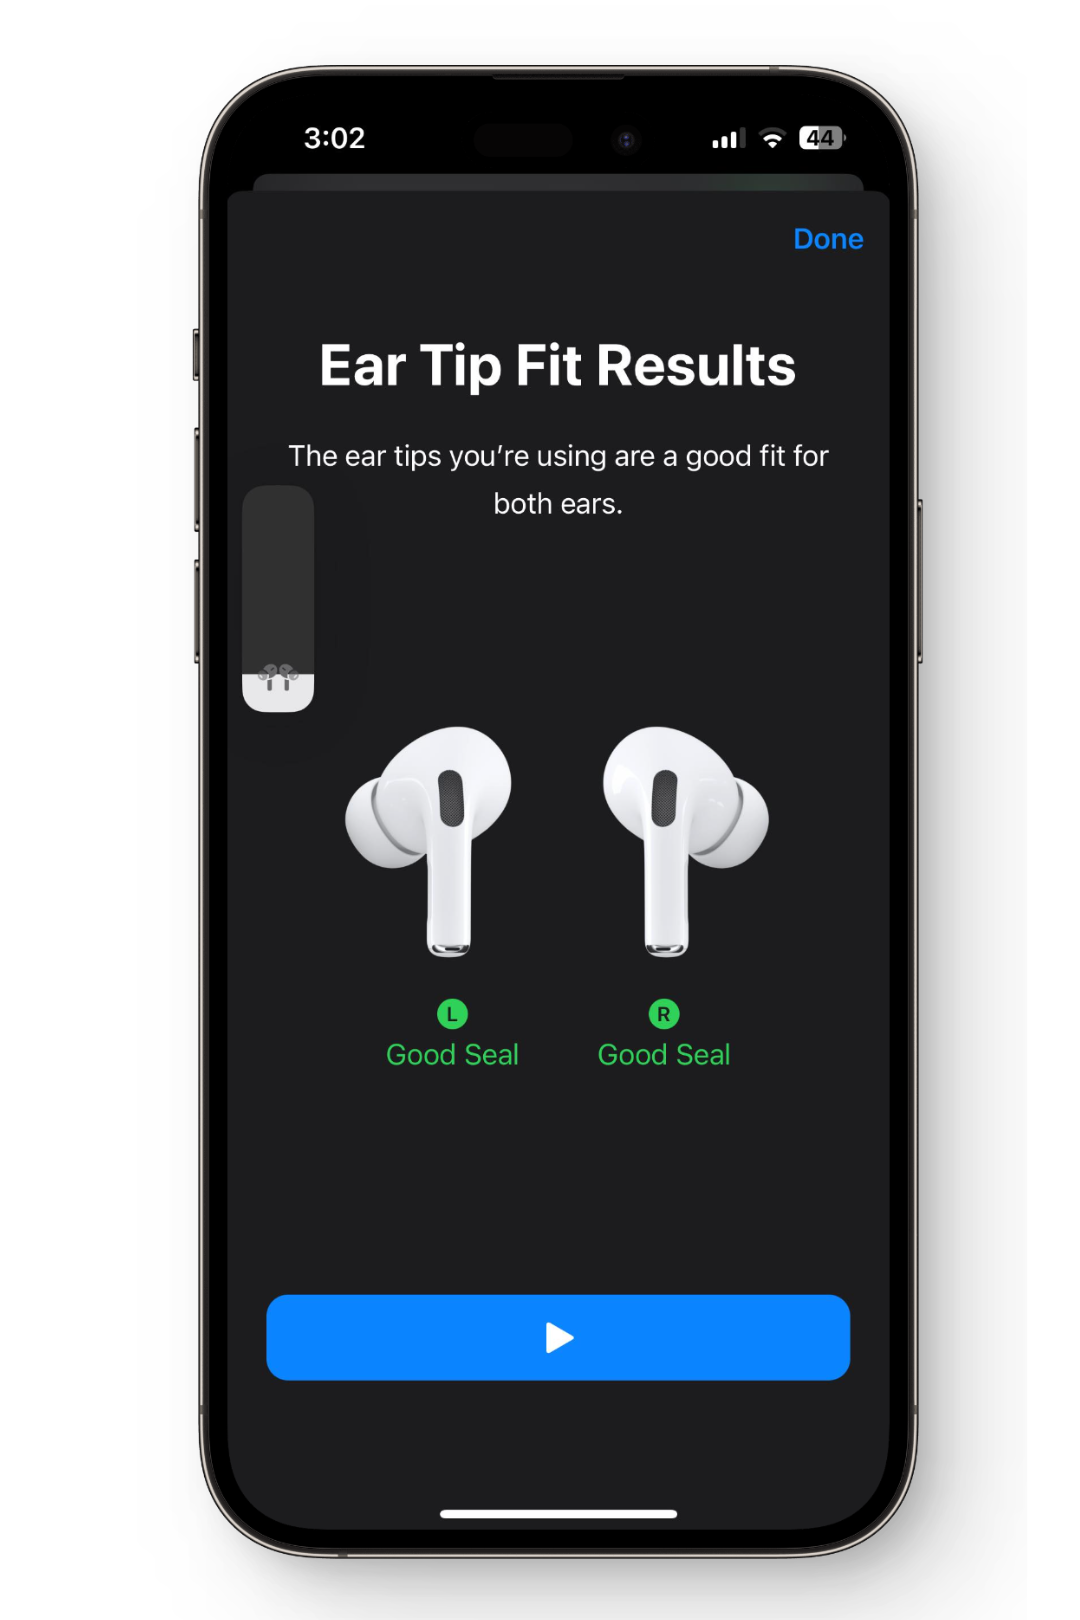
Ear Tip Fit Test Results
To acquire the optimum fit and acoustic seal, you need to modify your AirPods Pro or try a different ear tip size, depending on the results of your tests.
By performing the Ear Tip Fit Test and ensuring a proper fit, you can maximize the effectiveness of noise cancellation and minimize distractions from the surrounding environment as well. It can potentially improve the overall loudness and clarity of your AirPods Pro audio and help you fix the low volume in one AirPod.
It is important to note that the Ear Tip Fit Test is specifically designed for AirPods Pro and is not be available or applicable to other AirPods models.
Damaged Hardware
If none of the solutions seems to be working, there is a chance that one AirPod is probably damaged and cannot be fixed. Hardware damage can occur due to various reasons, such as accidental drops, exposure to moisture or liquid, or internal component failure.
Several audio issues can occur due to hardware problems. For instance, a damaged speaker driver within the AirPod could result in reduced sound output or imbalance between the left and right channels. Similarly, a damaged or malfunctioning audio amplifier or circuitry within the AirPod may lead to audio inconsistencies.
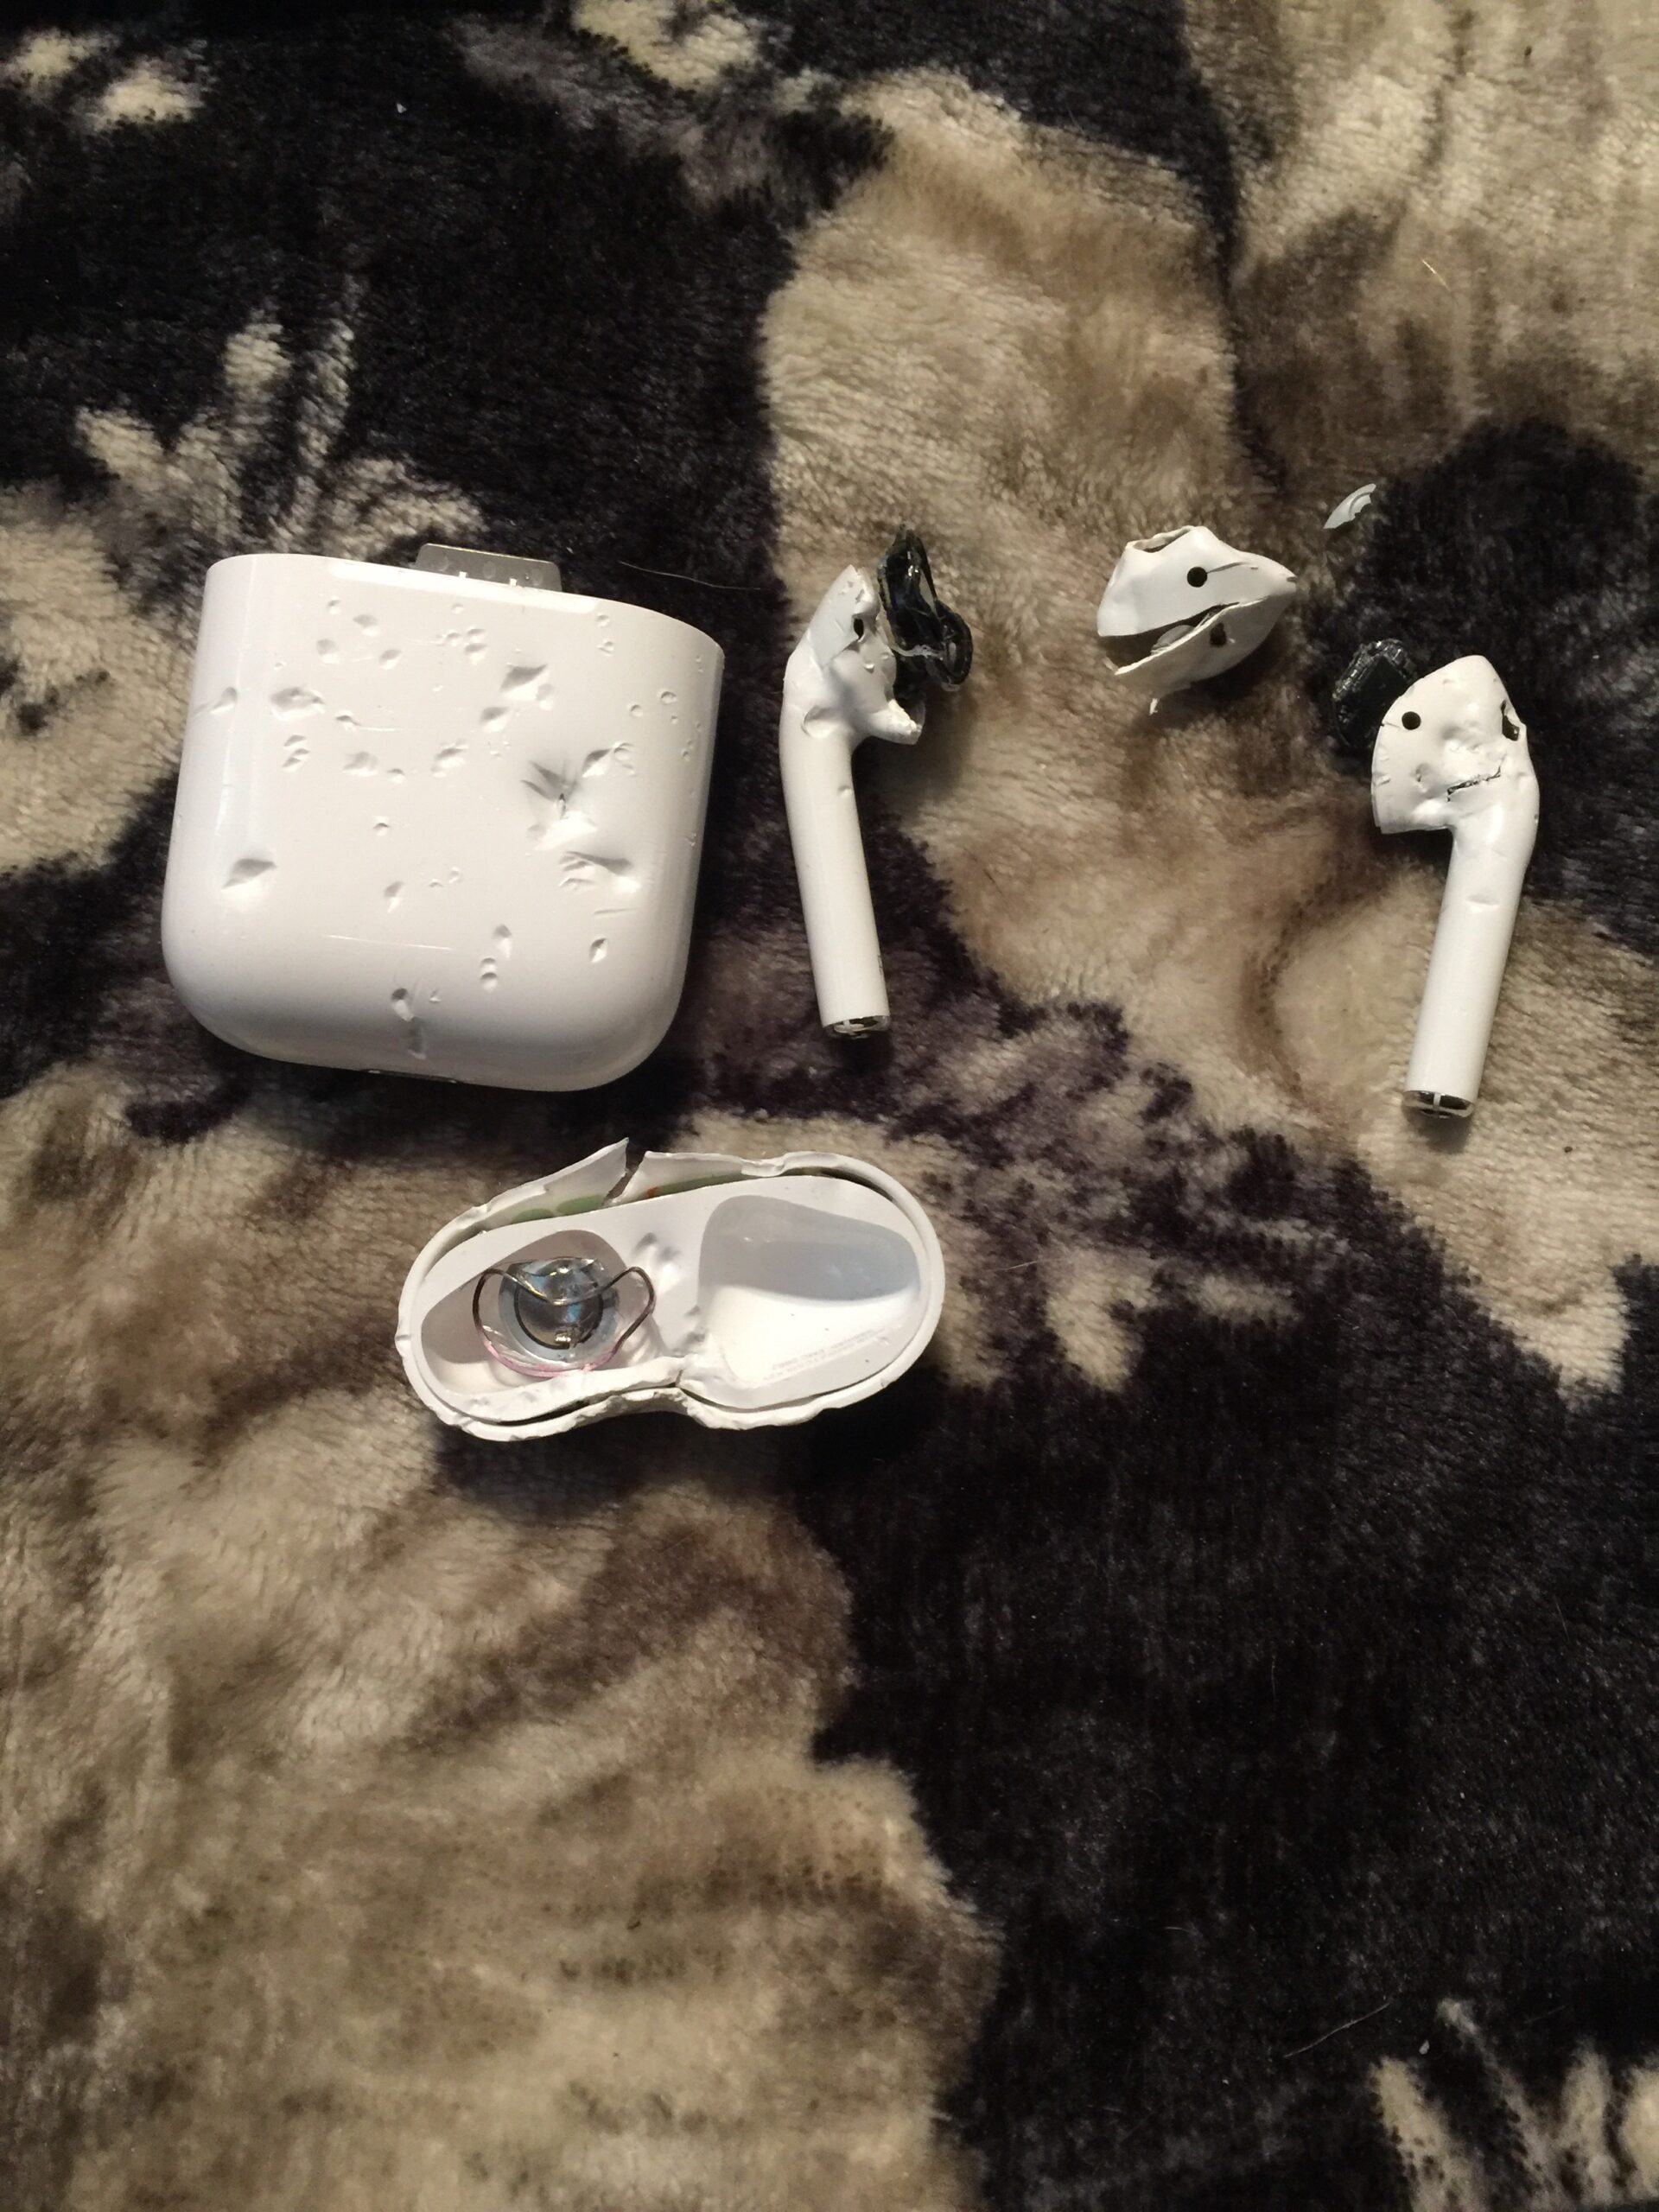
In some cases, external physical damage may be visible, such as cracks or dents on the AirPod casing or signs of liquid damage. However, in other instances, the damage may be internal and not immediately apparent.
Contacting Apple Support is the first thing you should be doing in such a case. Remember that if your AirPods are still within the warranty period, you may be eligible for a repair or replacement at no additional cost, depending on the nature of the damage.
However, Out-of-warranty repairs will incur extra charges. We also don’t recommend you get any repairs done. It is always better to buy a new pair of AirPods.
An Unorthodox Approach: Hearing Problem
An out-of-the-box approach is considering the possibility that the perception of one AirPod being quieter than the other is not actually due to a problem with the AirPods themselves, but rather an issue related to the user’s hearing.
Hearing loss or impairment can vary from person to person, and it is not uncommon for individuals to have different levels of hearing sensitivity in each ear. If you have tried out all the solutions or just got a new pair of AirPods and the issue is still persisting, it would be beneficial to consider scheduling a hearing test with a healthcare professional.
In some cases, individuals may have an underlying hearing condition, such as unilateral hearing loss or asymmetrical hearing loss, where one ear has significantly different hearing abilities compared to the other. This can cause a perceived imbalance in sound when using stereo audio devices like AirPods.
Your Otolaryngologist, an ear doctor, might suggest you for assistive hearing aids which can help in reducing the audio imbalance issue you are facing.
Conclusion
Apple AirPods are incredibly popular wireless earbuds providing convenience and quality audio to millions of users worldwide. However, sometimes, the audio imbalance can become a trouble for the users. In our extensive guide, we have covered numerous aspects of why one Airpod is quieter than other and what are some of the fixes for the problems.
Keep in mind that whether it’s adjusting settings, cleaning regularly, or seeking professional support, taking care of our AirPods can help us continue to enjoy the wireless freedom and exceptional audio experience they provide
An Airpod Quieter Than Other - FAQs
The average lifespan of Apple AirPods is typically around 2-3 years before many users consider replacing them.
Yes, cleaning your AirPods can be beneficial in addressing audio imbalance problems. Dust, dirt, or earwax accumulation can affect the sound quality and performance of the AirPods.
Yes, software updates can impact the audio performance of AirPods. Apple periodically releases software updates that include bug fixes and improvements, which can enhance the overall audio experience.
Reviewed by Huzaifa Haroon