How to Turn BitLocker On or Off for System Drive on Windows?
BitLocker encryption provides a great way of securing your whole drive. You can use it to encrypt your files. In fact, your new files will automatically be encrypted when they are copied to your drive. You can also protect the drive that has the Windows installed on it. Lastly, you can also protect the removal devices with BitLocker encryption. The good thing about BitLocker encryption is that it doesn’t require you to decrypt the files before copying them to another drive or PC. If you copy the encrypted files to another PC then they will automatically be decrypted.
BitLocker is very good at protecting your drive and operating system. It will check your system for any security issues at every startup. And if it finds anything suspicious, BitLocker will lock the drive and operating system. You will then need to unlock the drive in order to use it properly again. You have plenty of options to choose from when it comes to unlocking your drive. You can pick a PIN or a Password or an external drive with a startup key as well.
So if you are planning on using the BitLocker for your Windows, here are the steps for turning BitLocker on or off.
Tip
BitLocker is only available for Windows 10 Pro, Windows 10 Enterprise, and Windows 10 Education editions. So keep that in mind before trying to get BitLocker for your Windows version.
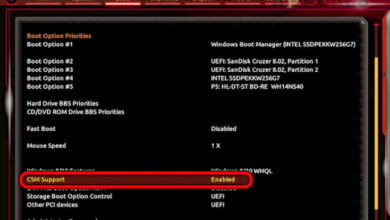
Also, ensure that you drive is in GPT layout mode and also ensure that you are using the UEFI Security Mode in Bios.
Turn On BitLocker
The good thing about BitLocker is that you don’t have to download anything from the internet. BitLocker is available in all versions of Windows (starting from Windows Vista). So, your Windows comes pre-installed with BitLocker.
Now, there are multiple ways of turning on the BitLocker depending on a couple of factors. The first thing that will affect the way you turn on your BitLocker is whether you have TPM or not. TPM, if you don’t already know, is Trusted Platform Module Chip. This chip allows systems to have hardware level security related functions. So, a device with a TPM will have a different way of turning on BitLocker when compared to the device with no TPM chip. We can go into a lot of detail for TPM but that’s not the point here. The second factor that affects how you turn on the BitLocker is how you want to unlock the operating system. But, let’s have a look to check whether you have a TPM chip or not.
Check whether you have a TPM or not via Device Manager
- Hold Windows key and press R
- Type devmgmt.msc and press Enter

- Go through the device manager list and look for the entry named Security Devices
- Double Click Security Devices
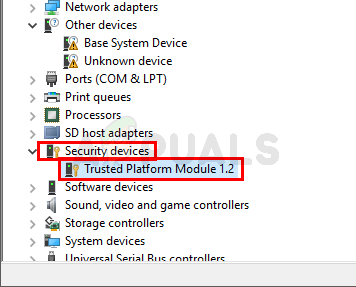
If you have a TPM chip then you should be able to see a Trusted Platform Module under Security Devices. If there is no entry named Trusted Platform Module under Security Devices then you don’t have a TPM chip
Check whether you have a TPM or not via TPM Management Console
- Hold Windows key and press R
- Type tpm.msc and press Enter

In the middle section of the TPM management console, you should be able to see the status of the TPM. If you don’t have a TPM chip then you will see a message like TPM not found or a variation of that message.

Turn on BitLocker for systems without TPM
If you don’t have a TPM chip on your system then you can turn your BitLocker on by following the steps given below. Also note that this will work if you don’t want to use the TPM (even if your system has it).
If your system isn’t using a TPM chip then you can unlock your Operating system either with a password or a USB flash drive.
To Unlock Operating System Drive at Startup with Password or USB flash drive
The steps given below should be followed if you don’t want to use the TPM chip on your board or if you don’t actually have a TPM chip.
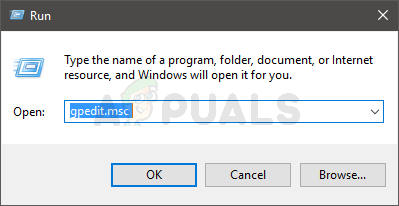
- Hold Windows key and press R
- Type gpedit.msc and press Enter

- Now, navigate to this location Computer Configuration/Administrative Templates/Windows Components/BitLocker Drive Encryption/Operating System Drives. If you don’t know how to navigate to this location then follow the steps given below
- Locate and double click Computer Configurations folder from the left pane
- Locate and double click Administrative Templates folder from the left pane
- Locate and double click Windows Components folder from the left pane
- Locate and double click BitLocker Drive Encryption folder from the left pane
- Locate and select Operating System Drives from the left pane

- Double click Require additional authentication at startup from the right pane

- Select Enable option from the top
- Check the option Allow BitLocker without a compatible TPM (requires a password or a startup key on a USB flash drive)

Once done, you will be able to unlock your OS with a Password or a USB Flash Drive at the startup. You should skip the next section and go directly to the Options for Turning on BitLocker section.
Turn on BitLocker for systems with TPM
If you have a TPM chip on your system then you have a wide range of options to unlock your OS at startup. You can choose not to use the TPM chip and unlock via a password or a USB flash drive. You can also use a PIN or a startup key to unlock your OS as well. These are the 4 options available for you. If you don’t want to use the TPM chip and want to unlock your OS with password or USB flash drive then go to the previous section named Turn on BitLocker for system without TPM. Otherwise, continue.
Note: If you don’t want to get into the settings and change anything then you can simply skip this section. This section is for the people who want to change the way they unlock the operating system. If you want your computer to automatically unlock your operating system then simply skip the next section and go directly to the Options for Turning on BitLocker section.
To Unlock Operating System Drive at Startup with Configured TPM Settings
- Hold Windows key and press R
- Type gpedit.msc and press Enter
- Now, navigate to this location Computer Configuration/Administrative Templates/Windows Components/BitLocker Drive Encryption/Operating System Drives. If you don’t know how to navigate to this location then follow the steps given below
- Locate and double click Computer Configurations folder from the left pane
- Locate and double click Administrative Templates folder from the left pane
- Locate and double click Windows Components folder from the left pane
- Locate and double click BitLocker Drive Encryption folder from the left pane
- Locate and select Operating System Drives from the left pane

- Double click Require additional authentication at startup from the right pane

- Select Enable option from the top
- Uncheck the option Allow BitLocker without a compatible TPM (requires a password or a startup key on a USB flash drive)
- Select Allow TPM option from the drop down menu of Configure TPM Startup
- Select Allow startup PIN with TPM option from the drop down menu of Configure TPM Startup PIN
- Select Allow startup key with TPM option from the drop down menu of Configure TPM startup key
- Select Allow Startup Key and PIN with TPM option from the drop down menu of Configure TPM Startup key and PIN
- Click Ok

Once done, you will be able to unlock your OS with a PIN or a security key at the startup. Now go to the Options for Turning on BitLocker section (next section).
Options for Turning on BitLocker
Turn on BitLocker via context menu
- Hold Windows key and press E
- Right click your C drive and select Turn on BitLocker

- Click Turn on BitLocker. Note: If you didn’t follow the steps in “To Unlock Operating System Drive at Startup with Configured TPM Settings” or “To Unlock Operating System Drive at Startup with Password or USB flash drive” and you have a TPM chip then you will see the window in step 8. Steps 4, 5, 6, and 7 will be skipped for you.

- No TPM or You Chose not to use TPM: If you don’t have a TPM then you will see a window with two options. The first option will be Insert a USB flash drive and the second option will be Enter a password. Insert a USB flash drive will save a recovery key on your USB flash drive. On the other hand, Enter a password option will let you set a password and you’ll use that password to unlock your Operating system.
- Select the appropriate option and proceed.
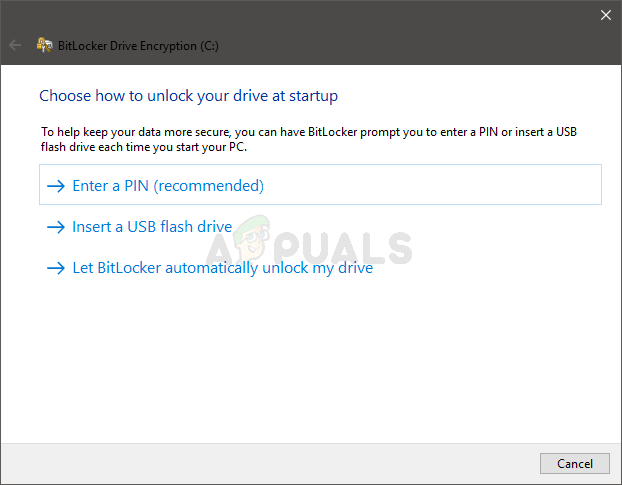
- If you have a TPM: Now, if you have a TPM chip and you followed the instructions in the section “To Unlock Operating System Drive at Startup with Configured TPM Settings” then you’ll see this window. You will have 3 options. Enter a PIN option will let you select a PIN with the help of which you’ll be able to unlock your OS. Insert a USB flash drive will save a recovery key on your USB flash drive. Let BitLocker automatically unlock my drive will unlock your OS automatically and you won’t have to do anything.
- Select the appropriate option and proceed.
- You will see a window asking you to select your recovery key backup options. Now, you will see 3 options.
- Save to your Microsoft account option will save the recovery key on your Microsoft account’s one drive. This will work if you are signed in with your Microsoft account.

- The Save to a file option will save the recovery key to a .txt file at a location of your choosing
- The Print the recovery key option will print your key via the connected printer
- In some cases, you might also see a 4th This option will be Save to a USB flash drive. You can select this option if you want to save the recovery file to your external drive.
- Once done, you’ll have to pick how much of your drive needs to be encrypted. Select the option that best suits you and click Next

- Now you’ll see a windows asking to you choose which encryption mode to use. You should select New encryption mode if your drive is fixed and will run at least Windows 10. The Compatible encryption mode is suitable for removable devices. Once you select the option, click Next

- Check the Run BitLocker system check box if you want your drive to get checked by BitLocker. This might take some time but we highly recommend this option. You can uncheck the option if you want as well.
- Once you have select (or deselected) the option, click Continue and you should be good to go.

- Your system will restart. Wait till the encryption is finished and you should be good to go.
Turn on BitLocker via Manage option
- Hold Windows key and press E
- Select the drive that you want to protect via BitLocker
- Click Manage
- Select BitLocker from the newly opened options

- Click Turn on BitLocker. Note: If you didn’t follow the steps in “To Unlock Operating System Drive at Startup with Configured TPM Settings” or “To Unlock Operating System Drive at Startup with Password or USB flash drive” and you have a TPM chip then you will see the window in step 8. Steps 4, 5, 6, and 7 will be skipped for you.

- No TPM or You Chose not to use TPM: If you don’t have a TPM then you will see a window with two options. The first option will be Insert a USB flash drive and the second option will be Enter a password. Insert a USB flash drive will save a recovery key on your USB flash drive. On the other hand, Enter a password option will let you set a password and you’ll use that password to unlock your Operating system.
- Select the appropriate option and proceed.
- If you have a TPM: Now, if you have a TPM chip and you followed the instructions in the section “To Unlock Operating System Drive at Startup with Configured TPM Settings” then you’ll see this window. You will have 3 options. Enter a PIN option will let you select a PIN with the help of which you’ll be able to unlock your OS. Insert a USB flash drive will save a recovery key on your USB flash drive. Let BitLocker automatically unlock my drive will unlock your OS automatically and you won’t have to do anything.

- Select the appropriate option and proceed.
- You will see a window asking you to select your recovery key backup options. Now, you will see 3 options.
- Save to your Microsoft account option will save the recovery key on your Microsoft account’s one drive. This will work if you are signed in with your Microsoft account.

- The Save to a file option will save the recovery key to a .txt file at a location of your choosing
- The Print the recovery key option will print your key via the connected printer
- In some cases, you might also see a 4th This option will be Save to a USB flash drive. You can select this option if you want to save the recovery file to your external drive.
- Once done, you’ll have to pick how much of your drive needs to be encrypted. Select the option that best suits you and click Next

- Now you’ll see a windows asking to you choose which encryption mode to use. You should select New encryption mode if your drive is fixed and will run at least Windows 10. The Compatible encryption mode is suitable for removable devices. Once you select the option, click Next

- Check the Run BitLocker system check box if you want your drive to get checked by BitLocker. This might take some time but we highly recommend this option. You can uncheck the option if you want as well.
- Once you have select (or deselected) the option, click Continue and you should be good to go.

- Your system will restart. Wait till the encryption is finished and you should be good to go.
Turn on BitLocker via Control Panel
- Hold Windows key and press R
- Type control panel and press Enter

- Select Small icons from the drop down menu in View by section

- Select BitLocker Drive Encryption

- Click Turn on BitLocker. Note: If you didn’t follow the steps in “To Unlock Operating System Drive at Startup with Configured TPM Settings” or “To Unlock Operating System Drive at Startup with Password or USB flash drive” and you have a TPM chip then you will see the window in step 8. Steps 4, 5, 6, and 7 will be skipped for you.

- No TPM or You Chose not to use TPM: If you don’t have a TPM then you will see a window with two options. The first option will be Insert a USB flash drive and the second option will be Enter a password. Insert a USB flash drive will save a recovery key on your USB flash drive. On the other hand, Enter a password option will let you set a password and you’ll use that password to unlock your Operating system.
- Select the appropriate option and proceed.
- If you have a TPM: Now, if you have a TPM chip and you followed the instructions in the section “To Unlock Operating System Drive at Startup with Configured TPM Settings” then you’ll see this window. You will have 3 options. Enter a PIN option will let you select a PIN with the help of which you’ll be able to unlock your OS. Insert a USB flash drive will save a recovery key on your USB flash drive. Let BitLocker automatically unlock my drive will unlock your OS automatically and you won’t have to do anything.

- Select the appropriate option and proceed.
- You will see a window asking you to select your recovery key backup options. Now, you will see 3 options.
- Save to your Microsoft account option will save the recovery key on your Microsoft account’s one drive. This will work if you are signed in with your Microsoft account.

- The Save to a file option will save the recovery key to a .txt file at a location of your choosing
- The Print the recovery key option will print your key via the connected printer
- In some cases, you might also see a 4th This option will be Save to a USB flash drive. You can select this option if you want to save the recovery file to your external drive.
- Once done, you’ll have to pick how much of your drive needs to be encrypted. Select the option that best suits you and click Next

- Now you’ll see a windows asking to you choose which encryption mode to use. You should select New encryption mode if your drive is fixed and will run at least Windows 10. The Compatible encryption mode is suitable for removable devices. Once you select the option, click Next

- Check the Run BitLocker system check box if you want your drive to get checked by BitLocker. This might take some time but we highly recommend this option. You can uncheck the option if you want as well.
- Once you have select (or deselected) the option, click Continue and you should be good to go.

- Your system will restart. Wait till the encryption is finished and you should be good to go.

Turn off BitLocker
You have 3 main options to turn off BitLocker. The options and the steps to perform those tasks are given below
Turn Off BitLocker via Command Prompt
- Press Windows key once
- Type command prompt in the Windows Start Search
- Right click command prompt and select Run as administrator

- Type manage-bde -off <drive letter> and press Enter. Note: Replace <drive letter> with the actual drive letter. Your command should look like this manage-bde -off C:


You should be able to see a message saying Decryption is in process
Turn Off BitLocker via Powershell
- Press Windows key once
- Type powershell in the Windows Start Search
- Right click Windows Powershell and select Run as administrator
- Type Disable-BitLocker -MountPoint “<drive letter>:” and press Enter. Note: Replace <drive letter> with the actual drive letter. Your command should look like this Disable-BitLocker -MountPoint “C:”
Turn Off BitLocker via BitLocker Manager
You can turn off BitLocker in 3 ways.
Turn on BitLocker via context menu:
- Hold Windows key and press E
- Right click your C drive and select Manage BitLocker

- Click C: BitLocker on in Operating system drive section

- Click Turn off BitLocker

- Click Turn off BitLocker again

- You should be able to see a new decrypting window
- Click Close once the decryption is completed
Turn on BitLocker via Manage option:
- Hold Windows key and press E
- Select the drive that you want to protect via BitLocker
- Click Manage
- Select BitLocker from the newly opened options
- Click Manage BitLocker

- Click C: BitLocker on in Operating system drive section

- Click Turn off BitLocker

- Click Turn off BitLocker again

- You should be able to see a new decrypting window
- Click Close once the decryption is completed
Turn on BitLocker via Control Panel:
- Hold Windows key and press R
- Type control panel and press Enter

- Select Small icons from the drop down menu in View by section

- Select BitLocker Drive Encryption

- Click C: BitLocker on in Operating system drive section

- Click Turn off BitLocker

- Click Turn off BitLocker again

- You should be able to see a new decrypting window
- Click Close once the decryption is completed
Once done, you should be good to go.