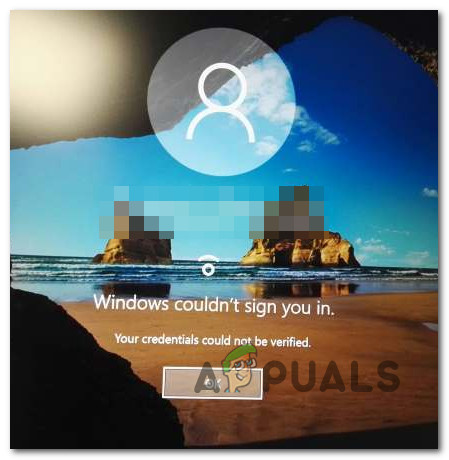
How to Fix ‘Your Credentials Could Not Be Verified’ on Windows 11?
Some Windows 11 users are reporting that whenever they try to log in with their credentials on Windows 11, they end up seeing the ‘Your Credentials Could Not Be Verified‘ error. This issue is reported to occur with every Windows 11 edition (Home, Pro, Enterprise, and N).
After investigating this issue, it turns out that there are several different scenarios that might directly or indirectly be causing the problem. Here’s a list of culprits that you should be aware of:
- Incorrect PIN – As it turns out, one of the most common instances, where this problem will occur, is when the PIN currently associated with your account is actually incorrect. To resolve this problem, you’ll need to boot up your computer in Safe Mode and reset the PIN associated with your account.
- Microsoft account glitch – As it turns out, you can also experience this problem in scenarios where you’re dealing with a Windows 11-specific glitch affecting the Microsoft account that is currently used during the sign-up procedure. To resolve this problem, you can try switching to a local account temporarily.
- Conflicting data in the NCG folder – Another potential culprit that might cause this type of folder is inconsistent data present in the NCG folder. You can fix this issue by navigating to the location of the NGC folder manually and clearing the folder before restarting your PC.
- Insufficient permission for NCG folder – According to some affected users, another scenario that is frequently reported for causing this problem is when the NCG folder doesn’t have sufficient permissions to retrieve the login data. In this case, you can resolve the problem by modifying the permissions of the NCG folder.
- Corrupted ACLs on the NGC folder – Another reason why your Windows computer might be unable to retrieve your login data is when the ACLs (Access Control Lists) associated with the NGC folder are corrupted. In this case, you can get the issue resolved by resetting the entire ACL component via an elevated Command Prompt.
- The Credential Manager service is set to Automatic – One scenario that will render your PC unable to retrieve login data is when the Credential Manager service is configured to Manual. Several affected users have reported that they got this issue resolved by changing the behavior of this service to Automatic.
- System file corruption – Under certain circumstances, you can deal with this issue in scenarios where you’re actually dealing with some kind of system file corruption that is affecting the login procedure. In this case, you can try doing SFC & DISM scans in quick succession, perform a system restore or go for a repair install or clean install if the issue persists.
1. Reset the PIN in Safe Mode
It turns out that one of the situations, where this issue will arise most frequently, is when the PIN that is currently connected to your account is actually incorrect. You’ll need to restart your computer in Safe Mode and change the PIN linked to your account in order to fix this issue.
Booting in Safe Mode is essential if you end up going for this repair method since it’s the only way you will be permitted to get past the login screen.
Note: If you have a backup password and are able to sign in to Windows 11 successfully, you may then go inside the Sign-in Options menu (under Accounts) and create a new PIN.
Here’s what you need to do to boot in Safe mode and reset the PIN that is currently triggering the ‘Your Credentials Could Not Be Verified’ error:
- Click the power symbol on the signup page where the issue first appears, then click Restart while holding down the Shift key.
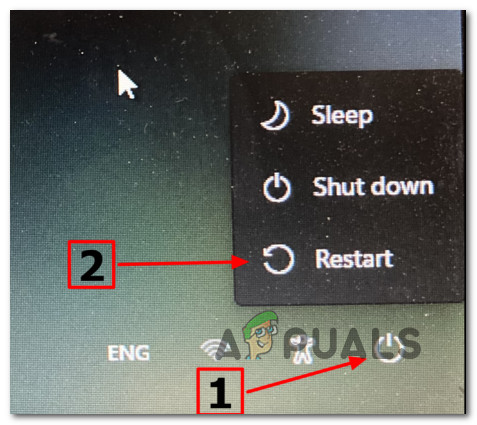
Force Windows 11 to boot in the Recovery menu Note: Please take note that doing this will require your Windows 11 PC to restart from the Recovery menu.
- To access the Advanced Options option after your computer enters the Recovery menu, select Troubleshoot on the first screen.
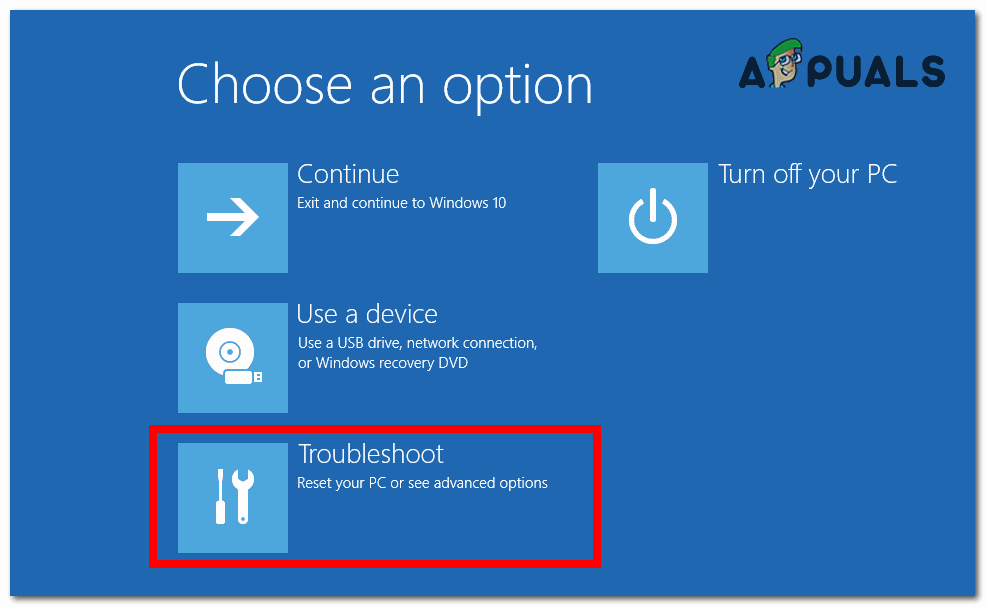
Accessing the Troubleshoot tab - Your computer will restart and go right to the Startup Settings screen after you select this option and confirm your decision.
- To make your PC start in Safe mode by force, hit the F4 key or Num 4 key inside the Startup Settings panel.
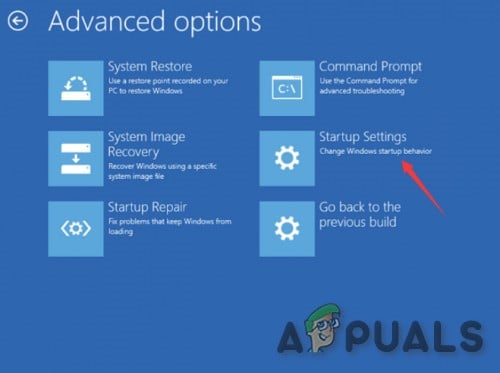
Access the Startup settings menu - Select Yes at the confirmation box, then wait until Safe Mode is launched on your Windows 11 computer.
- Once your PC boots back up, press the Windows key + R to open up a Run dialog box.
- Next, type ‘ms:settings’ and press Enter to open up the Settings menu.

Accessing the Settings menu - From the Settings menu of Windows 11, use the side menu on the left to click on Accounts, then click on Login Options from the context menu that just appeared.
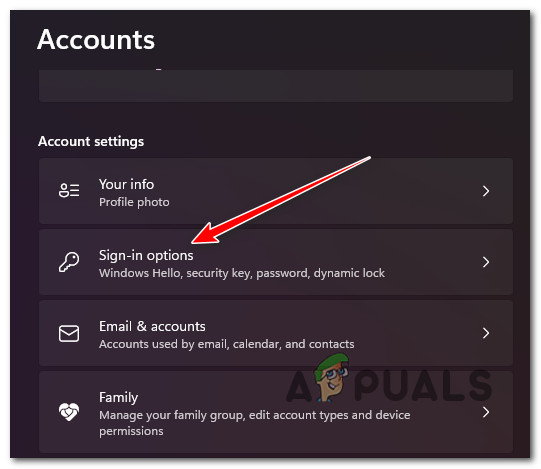
Access the Sign-In Options menu - Next, go under the PIN section and click on I forgot my pin.
- Change your PIN and password and click Ok before restarting your PC.
- At the next startup see if you’re still experiencing the same ‘Your Credentials Could Not Be Verified’ error when you attempt to log in with your newly created PIN.
If the same type of issue is still occurring, move down to the next method below.
2. Switch to a Local administrator account
It turns out that you can also encounter this issue if the Microsoft account that is currently being used during the sign-up process is affected by a bug specific to Windows 11. You might try temporarily switching to a local account to fix this issue.
Of course, in order to be able to do this, you will first need to boot in Safe Mode in order to get past the login screen. The good news is that several users that used to deal with this same problem have confirmed that the problem is now resolved.
Follow the instructions below to boot your PC in Safe Mode and make the witch to a local administrator account:
- Click the power symbol on the signup page where the issue first appears, then click Restart while holding down the Shift key.
Force Windows 11 to boot in the Recovery menu Note: Please take note that doing this will require your Windows 11 PC to restart from the Recovery menu.
- To access the Advanced Options option after your computer enters the Recovery menu, select Troubleshoot on the first screen.
Accessing the Troubleshoot tab - Your computer will restart and go right to the Startup Settings screen after you select this option and confirm your decision.
- To make your PC start in Safe mode by force, hit the F4 key or Num 4 key inside the Startup Settings panel.
Access the Startup settings menu - Select Yes at the confirmation box, then wait until Safe Mode is launched on your Windows 11 computer.
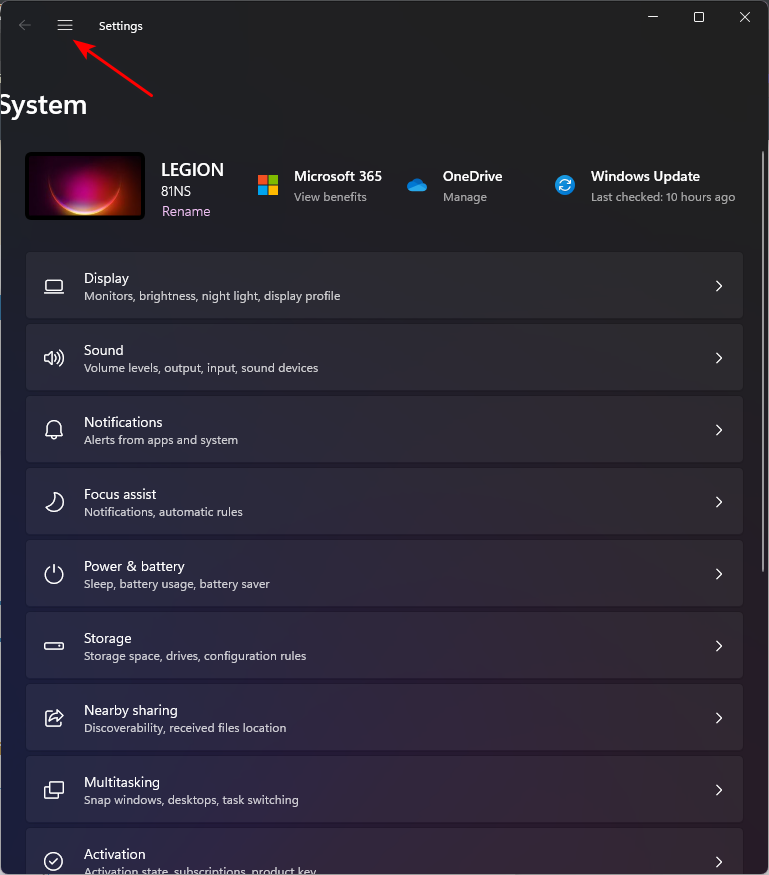
- On Windows 11, press the Windows key + I to launch the Settings app.
- When you’re in the Settings menu, click the action button in the top-left corner of the screen to open the side menu.
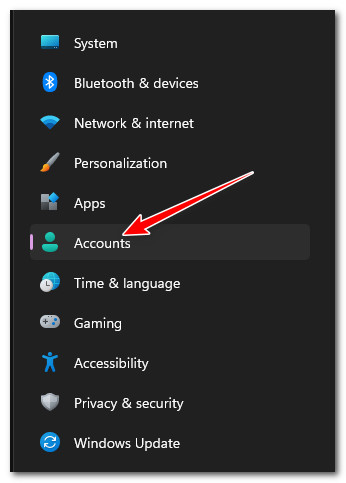
Accessing the Settings sideline menu - Next, from the list of possible choices on the sidebar menu that just opened, select Accounts.
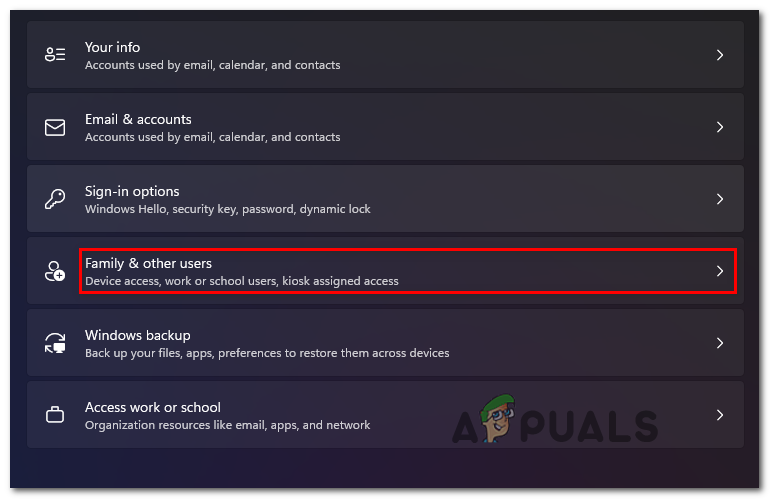
Accessing the Accounts menu - From the Accounts tab, select Family & other users from the right-hand menu.
- Click the Add account button under Other users once you’ve entered the Family & other users tab (from the same right-hand side menu).
Accessing the Other Users tab - After answering the first prompt, click the link that says I don’t have this person’s sign-in information under the field for entering an email address.
- Select Add a user without a Microsoft account from the next prompt, then wait for the following screen to display.
- After arriving at the Create a user for this PC page, begin by entering the Local account username and if you want to add an additional layer of security, a password.
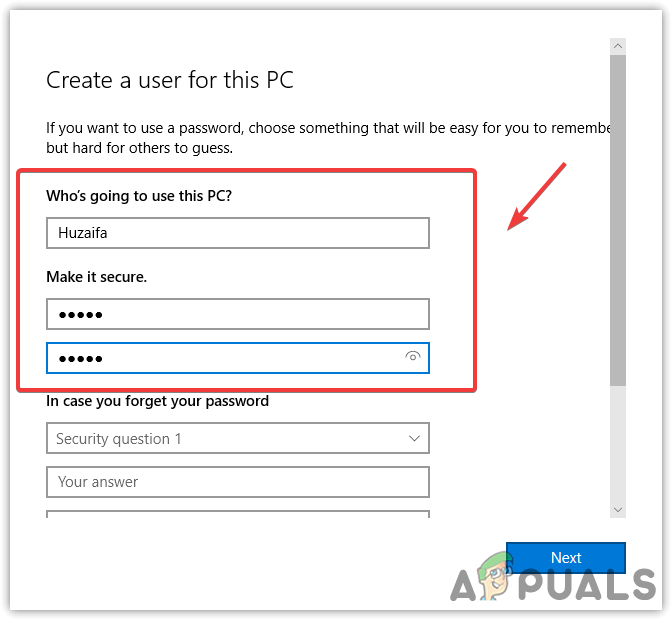
Creating a new local account - After giving the new local account a name and adding a password, click Next and wait for the account to be initialized.
Note: You will be prompted to enter a few security questions after entering your password so that you have a backup plan in case you forget it. As directed, add the security questions before continuing. - In order to complete the local account creation, click Next one more time. Under Other users, the recently established local account will become accessible (inside the Family & Other users tab).
- Now that the account has been created, reboot your PC in normal mode and sign up with the PIN that previously refused to work.
If this method didn’t allow you to fix the problem, move down to the next method below.
3. Reset the ACLs on the NGC Folder
When the Access Control Lists (ACLs) connected to the NGC folder are corrupt, your Windows machine can also be unable to access your login information. In this situation, resetting the entire ACL component through an elevated Command Prompt will fix the problem.
Several Windows 11 have confirmed that once they reset all the ACLs for the NGC folder, they were finally able to make the PIN work again.
Note: In order to follow this method, you will need to boot in safe mode.
Follow the instructions below to reset the ACLs of the NGC folder and fix the ‘Your Credentials Could Not Be Verified’ error:
- Click the power symbol on the signup page where the issue first appears, then click Restart while holding down the Shift key.
Force Windows 11 to boot in the Recovery menu Note: Please take note that doing this will require your Windows 11 PC to restart from the Recovery menu.
- To access the Advanced Options option after your computer enters the Recovery menu, select Troubleshoot on the first screen.
Accessing the Troubleshoot tab - Your computer will restart and go right to the Startup Settings screen after you select this option and confirm your decision.
- To make your PC start in Safe mode by force, hit the F4 key or Num 4 key inside the Startup Settings panel.
Access the Startup settings menu - Select Yes at the confirmation box, then wait until Safe Mode is launched on your Windows 11 computer.
- Once your PC successfully booted in Safe Mode, press the Windows key + R to open up a Run dialog box.
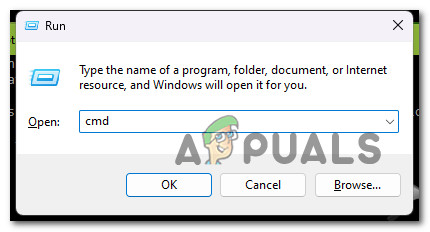
- Next, type ‘cmd’ inside the dialog box, then press Ctrl + Shift + Enter to open up an elevated Command Prompt with admin access.
Open an elevated Command Prompt window - At the User Account Control, click Yes to grant admin access.
- Once you’re inside the elevated Command Prompt, paste or type the following command and press Enter to reset the ACLs of the NGC folder:
icacls C:\Windows\ServiceProfiles\LocalService\AppData\Local\Microsoft\Ngc /T /Q /C /RESET
- Once this command has been successfully processed, close the elevated CMD prompt and restart your PC to see
- if the problem is now resolved.
If the same kind of issue is still occurring, move down to the next method below.
4. Granting the necessary permissions on the NGC folder
Another situation that is frequently cited as producing this issue, according to some affected customers, is when the NCG folder lacks the permissions necessary to get the login information. In this instance, you can fix the issue by changing the NCG folder’s permissions.
There are a lot of affected users confirming that altering the permissions finally allowed them to log in with their previously established PIN without getting the same ‘Your Credentials Could Not Be Verified‘ error.
Follow the instructions below to grant the necessary permissions to the NGC folder:
- To launch File Explorer, press Win key + E.
- Then, select View > Show/hide and tick Hidden objects.
- Navigate to the following location if Windows is installed on the C: drive:
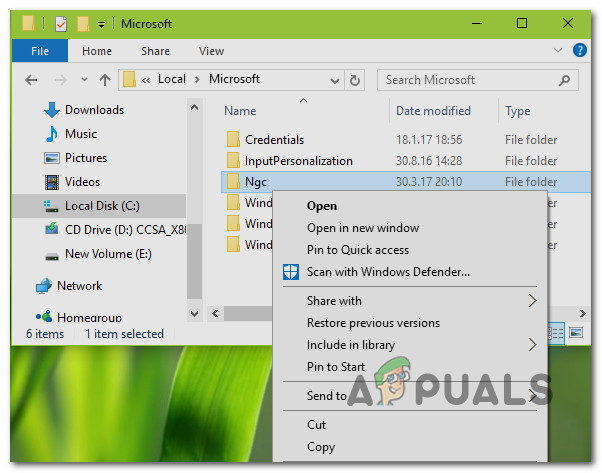
C:\Windows\ServiceProfiles\LocalService\AppData\Local\Microsoft
- Windows folder Next, choose Properties by performing a right-click on the Ngc folder.
Accessing the Properties screen of the NGC folder - On the property sheet, click the Advanced button under the Security tab.
- Next, go to the Advanced Security Settings for Ngc box and select the Change link next to Owner. Utilize the procedures listed here to take control of the Ngc folder.
- You must select Replace owner on subcontainers and objects after assuming ownership, and you must replace all permission entries for child objects with inheritable permission entries from this object. Click Change Permissions after that.
- Next, press the Add button.
- Next, click Select a principlal in the Permission entry for Ngc.
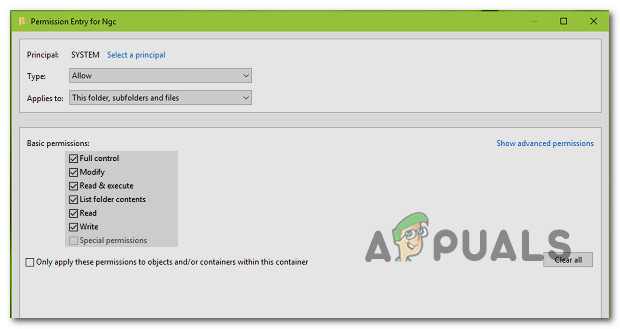
Selecting a principal - Click Check Names after entering SYSTEM as the object name. then press OK. Then back to above shown window, check Full control under Basic permissions. Select OK.
After giving yourself complete control, you should assess the situation. By now, it ought to be resolved. If the same problem is still occurring, move down to the next method below.
5. Clear the NGC folder
Inconsistent data found in the NCG folder is another potential offender that could be the source of this kind of folder. This problem can be resolved by manually finding the NGC folder’s location and emptying it before restarting your computer.
There is a ton of information about Windows Hello PIN setting in the NGC folder. If the corrupted files in this folder are the cause of your issue, all you need to do is empty the NGC folder. Your operating system will be forced to produce fresh, healthy files as a result, which won’t have the same issue.
Note: Information pertaining to the current sign-in options on your PC, such as PIN, password, and retina, as well as any other sign-in method, is kept in the NGC folder. But bear in mind that you will need to boot in Safe Mode (without networking) and remove the NGC folder’s contents in order to enforce this procedure.
For detailed instructions on how to do this, go to the list below:
- Click the power symbol on the signup page where the issue first appears, then click Restart while holding down the Shift key.
Force Windows 11 to boot in the Recovery menu Note: Please take note that doing this will require your Windows 11 PC to restart from the Recovery menu.
- To access the Advanced Options option after your computer enters the Recovery menu, select Troubleshoot on the first screen.
Accessing the Troubleshoot tab - Your computer will restart and go right to the Startup Settings screen after you select this option and confirm your decision.
- To make your PC start in Safe mode by force, hit the F4 key or Num 4 key inside the Startup Settings panel.
Access the Startup settings menu - When the boot process is finished in Safe Mode, launch File Explorer and go to the following location:
C:\Windows\ServiceProfiles\LocalService\AppData\Local\Microsoft
- Simply choose Delete from the context menu when you right-click the NGC folder in the desired location.
- Restart your computer normally after erasing the NGC folder, and you should be able to sign in without using a PIN. Note: After that, the NGC folder will be rebuilt so that you can create a new PIN.
- Try logging back in by booting normally and see if you’re still experiencing the same ‘Your Credentials Could Not Be Verified’ error.
Continue to the method below in the event that the issue is still not resolved.
6. Change the Behaviour of Credential Manager to Automatic
When the Credential Manager service is set to Manual, one situation that prevents your PC from retrieving login data occurs. A number of impacted users have stated that switching this service’s behavior to Automatic helped them address their problems.
Several affected users have confirmed that once they did this, they we’re finally able to log in without experiencing the same ‘Your Credentials Could Not Be Verified’ error.
Important: You can only follow this method if you boot in Safe Mode first.
Here’s how to do this:
- Click the power symbol on the signup page where the issue first appears, then click Restart while holding down the Shift key.
Force Windows 11 to boot in the Recovery menu Note: Please take note that doing this will require your Windows 11 PC to restart from the Recovery menu.
- To access the Advanced Options option after your computer enters the Recovery menu, select Troubleshoot on the first screen.
Accessing the Troubleshoot tab - Your computer will restart and go right to the Startup Settings screen after you select this option and confirm your decision.
- To make your PC start in Safe mode by force, hit the F4 key or Num 4 key inside the Startup Settings panel.
Access the Startup settings menu - Select Yes at the confirmation box, then wait until Safe Mode is launched on your Windows 11 computer.
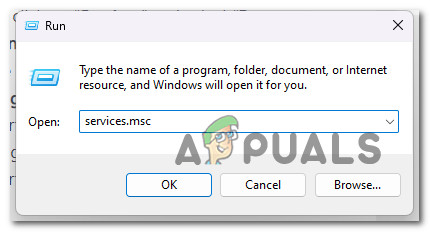
- Press Windows key + R to open up a Run dialog box.
- Next, type ‘services.msc’ and press Ctrl + Shift + Enter to open up the Services screen with admin access.
Accessing the services screen - Once you’re inside the Services screen, scroll down and locate the Credential Manager service.
- After you manage to find it, right-click on it and choose Properties from the context menu.
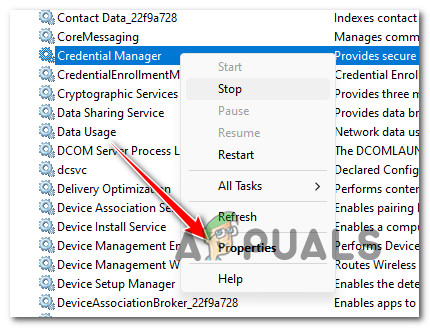
Accessing the Properties screen of Credentials Manager - Inside the Properties screen of Credentials Manager, go to the General tab, then change the Startup type to Automatic before clicking Apply.
- Reboot your PC once you’ve made this change and see if you are able to log in normally.
If the problem is still not fixed, move down to the next method below.
7. Deploy DISM and SFC scans
If you’ve reached this step without finding a solution, your Windows computer probably has some kind of system file corruption with a login component.
Launching SFC (System File Checker) and DISM (Deployment Image Servicing and Management), two built-in tools that can handle the most typical causes of system file corruption, should be the next step.
Note: Despite the fact that SFC and DISM are nearly identical, resolving the corruption issue is more likely if they are executed immediately after one another.
It should be noted that DISM receives files from Windows Update in order to replace corrupt counterparts, but SFC gathers healthy system files from a local location.
You may check for system file corruption by running an SFC scan from an elevated CMD prompt.
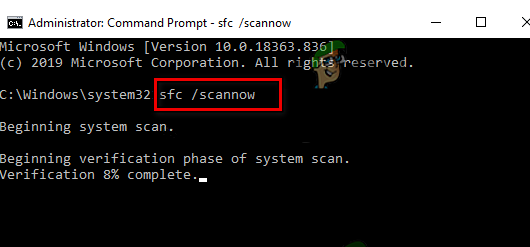
It is best to continue with this process even if the tool seems to have frozen in mid-use (or prematurely quit the CMD window). After the transaction is complete, you will finally receive the success notification.
Restarting your computer will end the DISM scan. Run a DISM scan after the subsequent startup has finished.
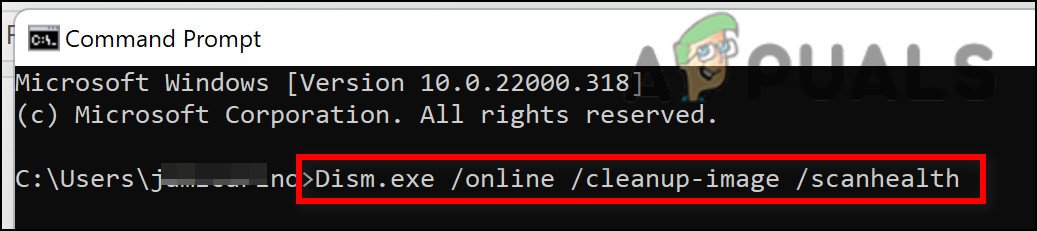
IMPORTANT: Verify your Internet connection’s strength before beginning this step.
After correctly completing the DISM command, restart your computer to verify if the issue has been resolved.
Continue to the method below in the event that the issue is still not resolved.
8. Use System Restore
This tool allows you to restore your entire Windows installation to a stable state where the problem never occurred in order to fix significant errors. Your operating system must have previously taken a snapshot that can be used to roll back the Windows installation to a previous time in order to employ this remedy, though.
However, Windows should be set up to frequently save System Restore Snapshots if you haven’t changed the default behavior (after every installed Windows update).
Important: Be warned that this approach would essentially reverse any changes made after the snapshot was first created before attempting it. After the snapshot was taken, any user preferences, game downloads, or software installations will be gone.
Use the following instructions to see how to restore your system if you decide to do so:
- Accessing the Recovery Menu is the first action. When your computer starts up, hit F11 or the key designated by the maker of your motherboard.
- After the Recovery Menu has appeared on your screen, you must click with the mouse or use the keyboard arrows to pick the System Restore area.
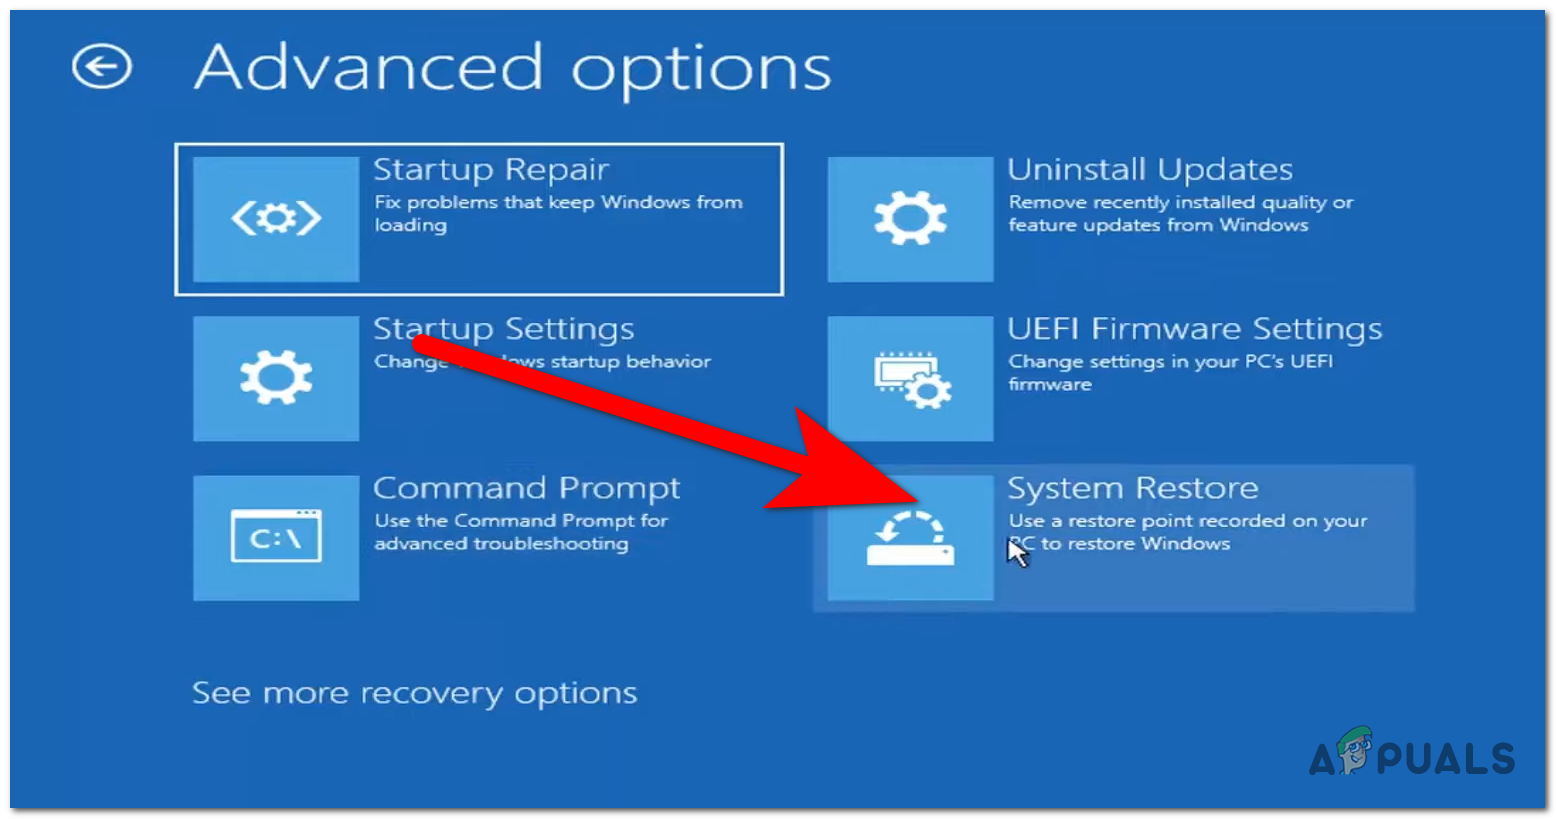
Access the System Restore menu - This will open the System Restore window for you. To proceed, click Next. Then, click the most recent restoration point that shows on your computer.
- To begin the System Restore procedure after completing this step, select Finish. To proceed with the choice, you will need to confirm it.
- Depending on your PC, the process will take a few minutes to complete.
- After your system has been restored to the most recent recovery point, test the computer to see whether Windows 11 still won’t boot.
Continue to the next method below if your computer still won’t allow you to get past the initial login screen.
9. Perform a clean install or repair install
The only option left for you if none of the aforementioned methods have worked for you is to completely replace all of the affected system file dependencies with healthy substitutes.
Your only options at this stage are to carry out a clean install or a repair install (in-place upgrade).
If you have the choice, we urge you to choose an in-place update (repair installation) if you run into trouble:
- Repair install (in-place upgrade) – During a repair install, only the system files will be modified (while keeping your personal files, user preferences apps & games).
- Clean install – This option may be the best if only a few kernel processes are affected, but it has the drawback of erasing all user data from the OS disk. You should be warned, though, that if you do this, all of your personal information will be deleted.


