How to Fix Windows 10/11 Won’t Install or Download Updates?
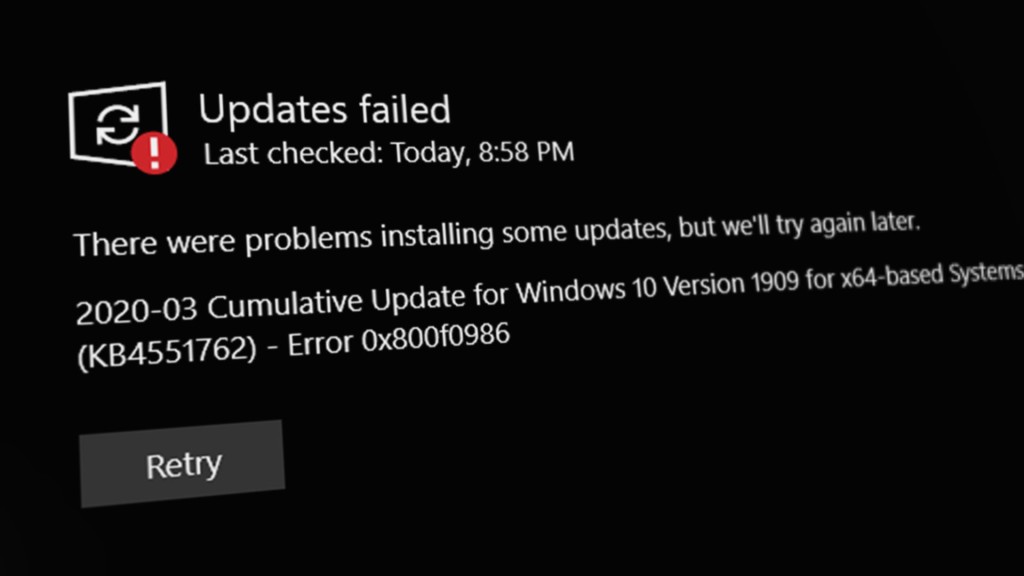
Microsoft releases a multitude of cumulative updates for Windows 10 and 11 each month. These updates are typically automatically downloaded and installed through Windows Update. However, users may occasionally encounter various errors during the update process. For each potential error, there are tried and tested solutions suggested by users who have experienced similar issues.
Understanding why Windows Update errors occur is crucial to resolving them. Your error could come from one of the following causes:
- Incorrect or Corrupted Registry: An inaccurately modified or corrupt registry entry for wuauserv can lead to update errors since this key is responsible for downloading, detecting, and installing Windows updates.
- Windows Update Service Not Working: If the Windows Update service is disabled or stopped, this can prevent updates from being installed.
- Corrupted Software Distribution Folder: If the contents of the Software Distribution folder become corrupted, you’re likely to encounter errors since this folder stores temporary files required for installing Windows updates.
- Corrupt System Files: Corrupted system files are another common cause of issues, as they are crucial for the update process. Follow the instructions provided below to repair any corrupted files.
It’s important to note that the causes of Windows Update errors are varied and could include additional factors such as network issues, hardware and software incompatibility, specific bugs within an update, or other system conflicts. Identifying the exact cause of a Windows Update error in your specific case may require a systematic approach to troubleshooting.
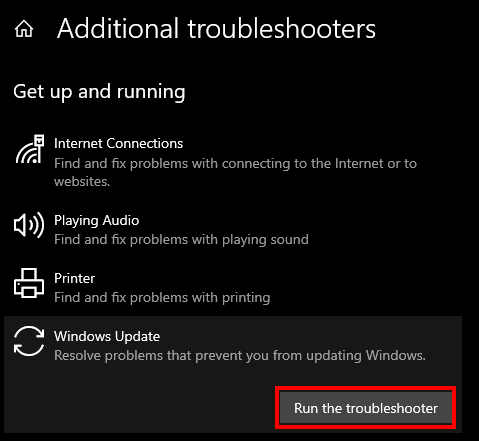
1. Use the Windows Update Troubleshooter
The Windows Update Troubleshooter serves as your first line of defense against update-related issues. When activated, it scans for conflicts within the update process and employs automated fixes for various common glitches, such as configuration errors or network connectivity problems. This built-in utility can save you from manually diagnosing and resolving the roots of update failures.
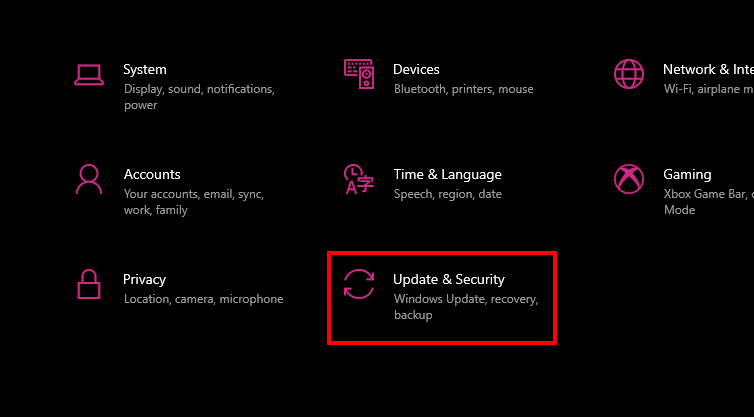
- Navigate to Settings by pressing Windows + I, select Update & Security, and click Troubleshoot.
- Click on Additional troubleshooters, locate Windows Update, and select Run the troubleshooter.
- The troubleshooter will start detecting problems. Follow any on-screen instructions to permit the utility to attempt fixes for identified issues.
- After the troubleshooter completes its process, reboot your computer to allow any changes to take effect. Then, check to see if you can now proceed with Windows updates.
2. Restart Windows Update Service
The Windows Update Service organizes the entire process of checking, downloading, and installing updates. At times, this service might encounter a glitch or become unresponsive. When you restart this service, it can clear out any temporary issues that were preventing updates from being initialized or carried through successfully.
By making sure the service is active and set to start automatically, you maintain the system’s ability to keep itself up-to-date without any issues.
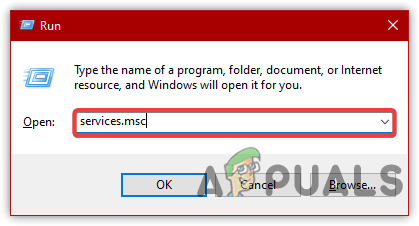
- Press Windows + R to open the Run dialog.
- Type services.msc and click OK.
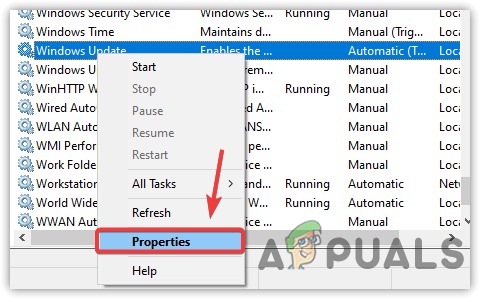
Opening Services Window - Press W on the keyboard to quickly navigate to the Windows Update service.
- Right-click Windows Update Service and select Properties.
Navigating to Service Properties - Set the startup type to Automatic from the drop-down menu.
- Click Apply, then Start if the service is not already running.
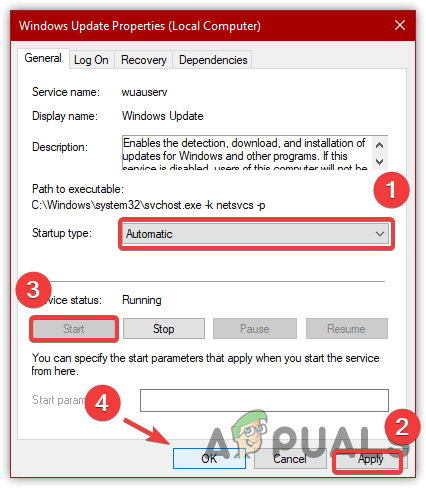
Restarting Windows Update Service - Finally, click OK and verify whether the error has been resolved.
3. Reset Windows Update Registry Keys
When the Windows Update registry keys are misconfigured or damaged, they can effect the update process. By resetting the registry back to its default settings, you essentially clear any errors or corruptions that have occurred within these critical system components, paving the way for smoother and error-free updates. This can be a key move to restore the Windows Update service’s capacity to download and install updates as intended.
- Download the registry file from here to reset Windows Update registry values.
- Right-click the downloaded file and select Run as administrator.

Running Windows Registry File - Click Yes on the prompt to confirm the changes.
- After the process is complete, verify whether the error has been resolved.
4. Turn OFF Metered Connection
The Metered Connection feature, while helpful in conserving bandwidth, might prevent Windows from downloading updates to manage data usage more efficiently. By deactivating this setting, you allow your system to freely download the necessary update files without restrictions, potentially eliminating any update-related errors caused by limited connectivity.
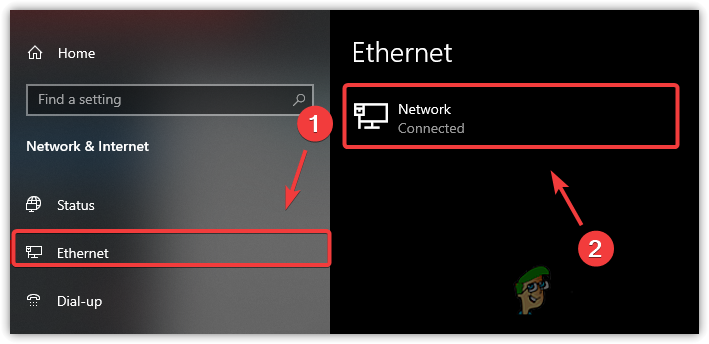
- Right-click the Start Menu and select Settings.
- Navigate to Network & Internet and choose either Ethernet or Wi-Fi from the sidebar.
Navigating to Network Properties - Scroll down and toggle off the Metered Connection if enabled.
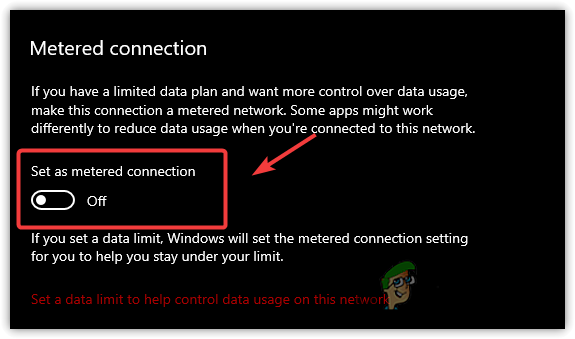
Turning Off Metered Connection - Try updating Windows again and check if the issue persists.
5. Clear and Rename Software Distribution Folder
Clearing and renaming the Software Distribution folder serves an essential purpose in the Windows update cycle. This directory is where Windows stores update files temporarily before they are installed. Sometimes, these files can become corrupted, which might cause update processes to fail.
By deleting the existing files and renaming the folder, you’re allowing Windows to create a fresh folder on the next update attempt. This fresh start can often eliminate the errors associated with corrupted update files, paving the way for a successful update installation.
- Open the Start Menu and type Command Prompt.
- Right-click it and select Run as Administrator.
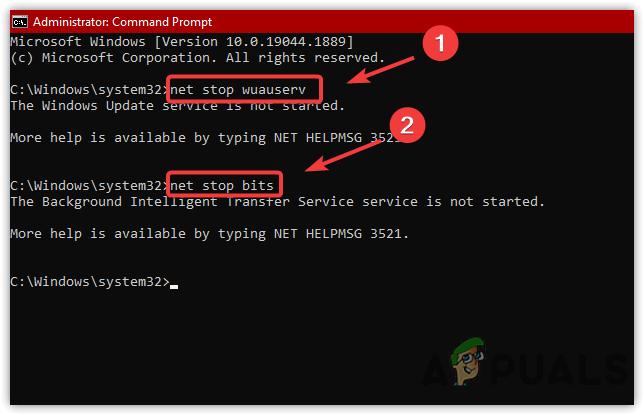
- Copy and paste the following commands into the terminal and press Enter:
net stop wuauserv
net stop bits
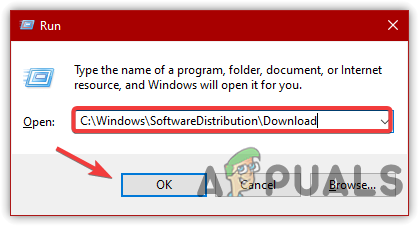
Stopping Windows Update Services - Press Windows + R, type in the following path, and hit Enter:
C:\Windows\SoftwareDistribution
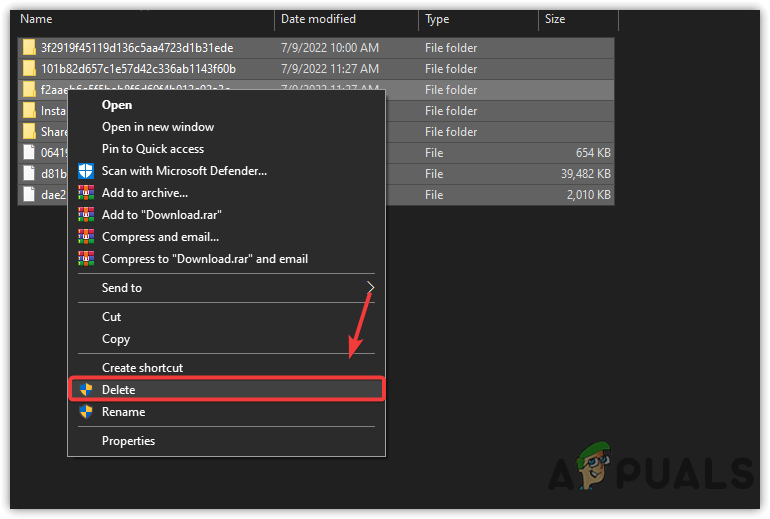
Navigating to the Software Distribution Folder - Delete all files within this folder.
Deleting Software Distribution Files - Return to the terminal and enter the following command to rename the folder:
rename C:\Windows\SoftwareDistribution SoftwareDistribution.bak
- Restart the stopped services with the following commands:
net start wuauserv
net start bits
- Try updating Windows to see if the error has been fixed.
6. Clear Temporary Files
Freeing up space on your device is a key troubleshooting step. Temporary files can accumulate over time and consume valuable disk space, which Windows update processes require. By performing a disk cleanup and removing these unnecessary files, you create the necessary room for the update files to download and install, potentially fixing update errors caused by insufficient storage.
- Press Win + E to open File Explorer.
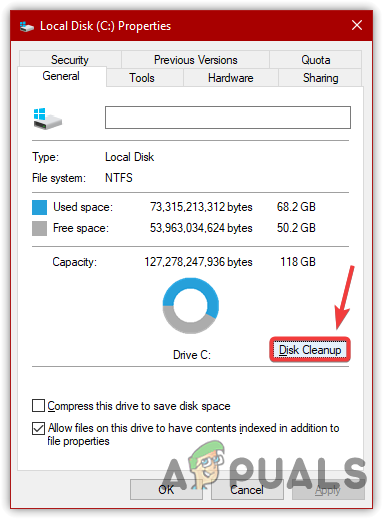
- Click on This PC, right-click the Windows drive, and select Properties.
- Click on Disk Cleanup.
Disk Cleanup - Check all categories under Files to delete.

Removing Temporary Files - Click OK and then Delete Files.
- Recheck for the error once this step is completed.
7. Perform DISM and SFC Commands
The use of DISM (Deployment Image Servicing and Management) and SFC (System File Checker) commands provides a powerful fix for Windows update problems. DISM works by servicing the Windows image on your computer, which includes the Windows Recovery Environment, Windows Setup, and Windows PE. When it detects and repairs corruption, this can indirectly fix update issues related to system integrity.
Afterwards, the SFC command scans and replaces corrupted or missing protected system files. If these files are at the heart of the Windows Update problems you’re experiencing, running these commands often serves as an effective digital first-aid to get your updates back on track.
- Search for Command Prompt from the Start Menu.
- Open it as an administrator and input the following commands:
DISM /Online /Cleanup-Image /RestoreHealth
sfc /scannow
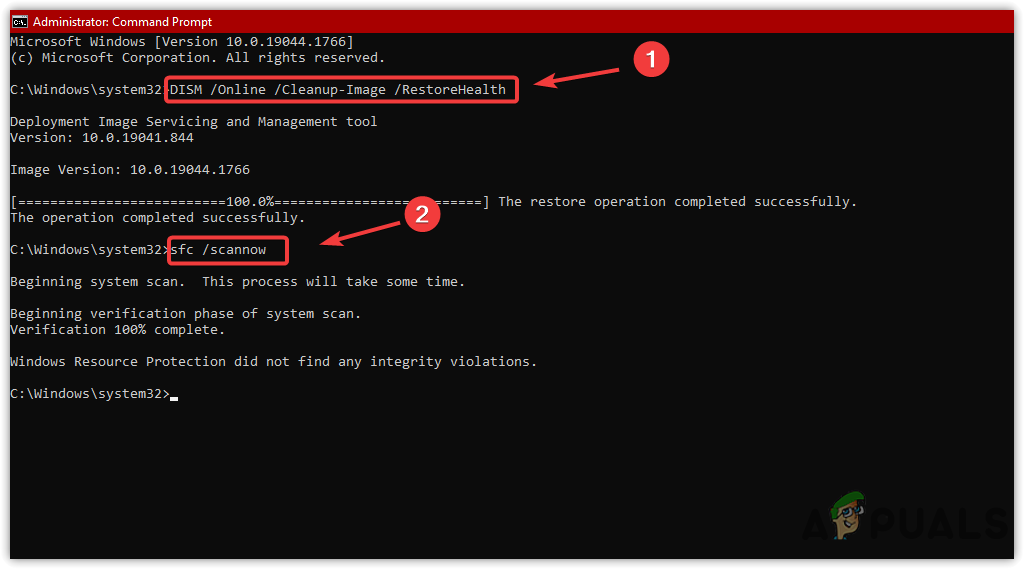
Repairing System Files - Once the scans are finished, reboot your computer and check if the error has been resolved.
8. Download Windows Updates via Update Assistant
Utilizing the Windows Update Assistant avoids potential complications by offering a streamlined approach. This dedicated tool directly downloads and installs the latest updates. It basically acts as a moderator, simplifying the process and potentially bypassing errors that the standard update process might hit. By using this assistant, you target the update process head-on, making sure you receive the latest version of Windows with minimal fuss.
- Download and run the Windows Update Assistant.
- Click Update Now and wait for the updates to be downloaded.
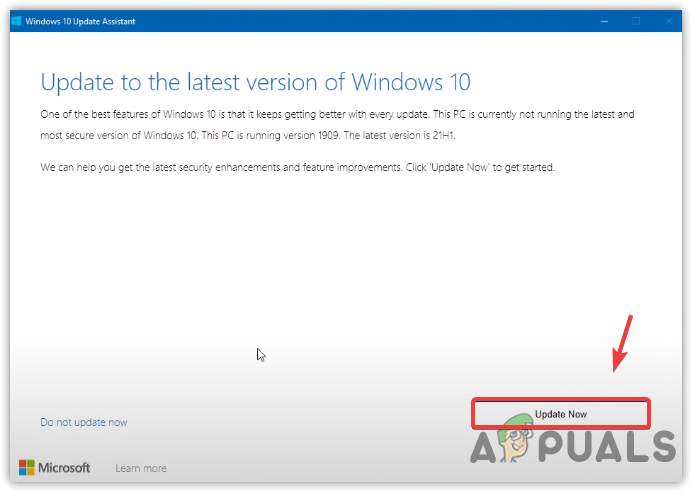
Upgrading Windows - Upon completion, Windows will automatically proceed with the upgrade.
9. Download Windows Updates via Microsoft Catalog
When automatic or traditional methods fail, downloading updates directly from the Microsoft Update Catalog provides an alternative route. This avoids potential glitches in Windows Update by letting you search and install specific updates yourself, making sure you get the necessary patches without the usual update mechanism’s issues.
- Visit the Microsoft Update Catalog and search for the update by its name.
- Click the appropriate Download button for the update.
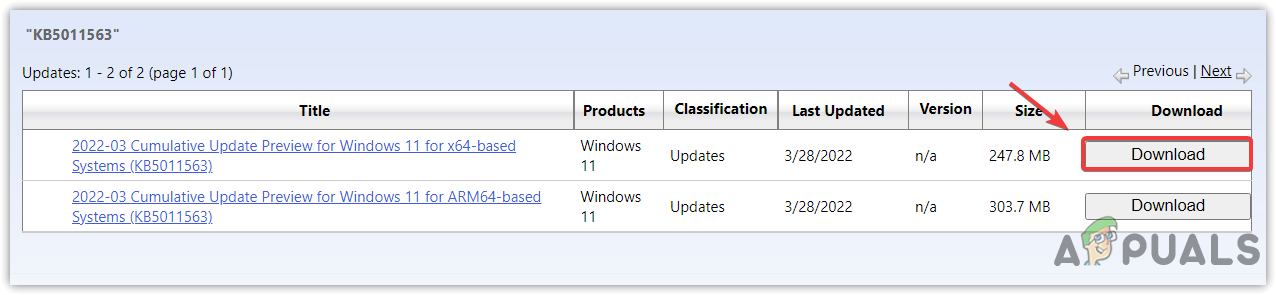
Downloading the Windows update - Follow the link provided to download the file.
- Once the download is complete, run the update file to proceed with the installation.