Fix: Windows Update Error 0x80070490
The error 0x80070490 is a status code signaling a corrupted file or process in the System Component Store or in Component-Based Servicing (CBS). The two services have the responsibility of running and overseeing all Windows-related update operations. Any damage or corruption within their files might render the Windows Update component inoperable.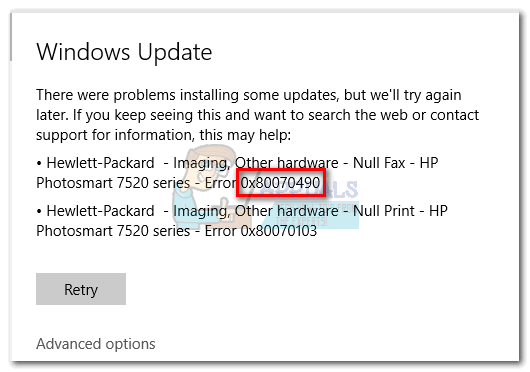
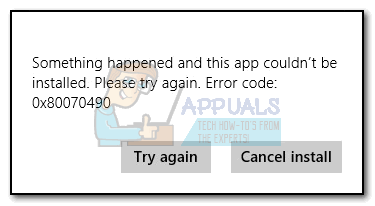
Error 0x80070490 is mostly encountered when applying a system update via WU (Windows Update) or when updating an app downloaded from the Microsoft Store. The issue is also known to appear when upgrading from Windows 7 and Windows 8.1 to Windows 10. Some users have reported seeing the error 0x80070490 when trying to purchase an application or game from the Microsoft Store.
The causes that might trigger the 0x80070490 are multiple, but here’s a quick list of the most common culprits:
- 3rd-party Antivirus is creating a conflict that is preventing the update from installing.
- Corrupted files in Component-Based Servicing (CBS) or in System Component Store.
- Some services required by WU are manually disabled.
- Corruption within the Registry files.
Now that we know the causes, let’s get to the fixing part. Below you have a collection of methods that users found effective in fixing the 0x80070490 error. Please follow each method in order until you encounter a fix that works for your situation. Let’s begin.
Note: If you have not received this error in relation to Windows Updates, you can still follow the methods below as they might fix the issue. But keep in mind that the sole aim of this guide is dedicated to solving the error 0x80070490 in relation to Windows Updates and failing updates from apps downloaded via the Microsoft Store. The error code 0x80070490 can also be encountered on Xbox consoles, but the methods below will obviously not work on the gaming console.
Method 1: Disabling 3rd party antivirus suites
Before you start troubleshooting with the methods below, it’s important to crosscheck for a software conflict. WU (Windows Update) is designed to work with the built-in security solution (Windows Defender). If you have a 3rd party antivirus suite installed, make sure the built-in solution is disabled in order to avoid software conflicts.
Note: If you don’t have an external antivirus, go straight to Method 2.
But even if Windows Defender is disabled, some external anti-malware suites aren’t quick to grant the necessary permissions for the updates to complete. To make sure this is not an issue caused by your antivirus, disable the real-time protection and the firewall from it. Then, restart your machine and attempt to apply the update again.
If the update completes successfully, you’ll need to reinstall your 3rd party antivirus or look for a better option. If you encounter the same 0x80070490 error, move down to Method 2.
Method 2: Repairing WU with the Windows Repair suite
Windows Repair is a freemium all-in-one repair tool that is known to fix a large majority of common windows problems, including problems associated with Windows Update. It’s compatible with every recent Windows version and will automate a lot of troubleshooting steps for you.
The repair strategy for WU works extremely well and can be deployed from the free version of Windows Repair. Here’s a quick guide on how to repair Windows Update services with Windows Repair:
- Download & Install Windows Repair from this link (here).
- Open Windows Repair, select the Repair – Main tab and click on Open Repairs.
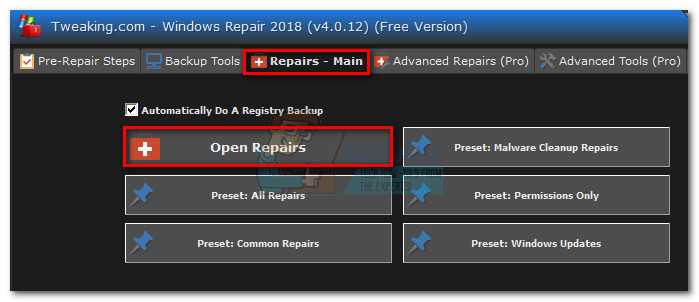
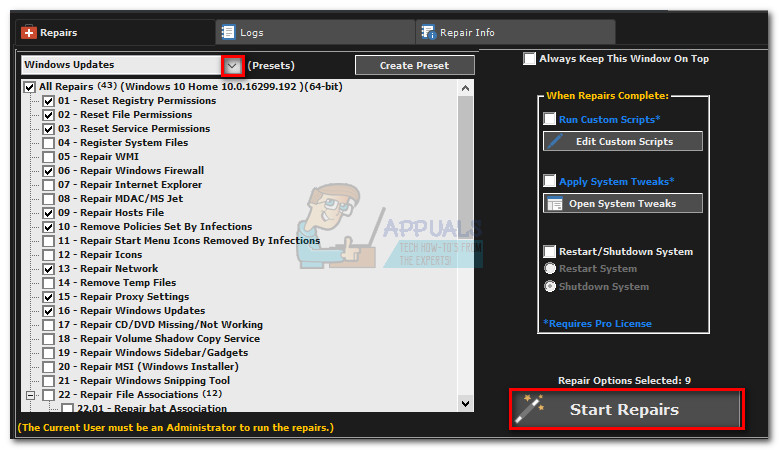
- In the Repairs window, use the drop-down menu under Repairs to select the Windows Updates preset. Once the repair strategies are selected, click the Start Repairs button and wait for the process to complete.
- Restart your computer and see if you see the same error message when you apply the Windows update. If you’re still seeing the 0x80070490 error, move down to Method 3.
Method 3: Run a System File Checker Scan
Fortunately, Windows has a solid built-in tool that is usually helpful in resolving corruption problems related to the 0x80070490 error. The System File Checker will perform a registry scan and attempt to repair any corrupt registry files. The System File Checker is accessible via the Command prompt, but the command will onl work if the user has administrative privileges. Here’s a quick guide on how to run a System File Checker scan:
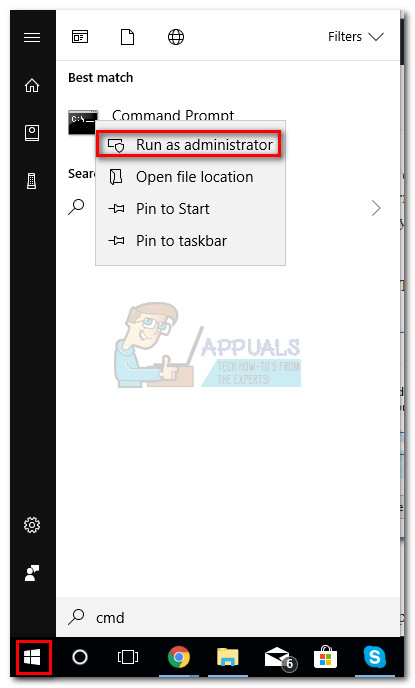
- Click the Start bar in the bottom left corner and search for “cmd“. Then, right-click on Command Prompt and select Run as administrator.
- In Command Prompt, type “sfc /scannow” and hit Enter. This will trigger a system-wide search that will scan for corrupted files. Sit tight and wait for the process to complete as it might take over 20 minutes.

- After System File Checker has finished scanning, check if it says that the CBS store is corrupted. If it is indeed corrupted, then paste the Dism command below and hit Enter:
Dism /Online /Cleanup-Image /RestoreHealth
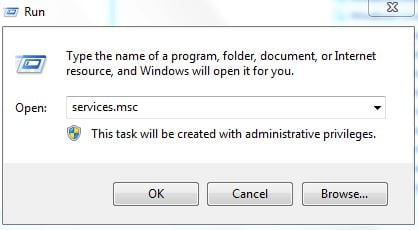
Note: If you don’t see any mention of corruption in the CBS, it’s not necessary to run the Dism command as it will not yield any results. Instead, continue with the steps below. - When you see a indicated that the clean up is finished, you can close Command Prompt. Then, press Windows key + R to open a Run window. Type “services.msc” and hit Enter to open the Services window.
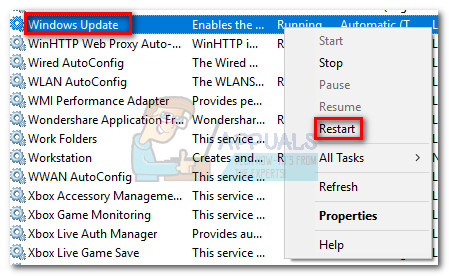
- In the Services window, locate the Windows Update entry, right-click on it and select Restart. Once the service is restarted, repeat the procedure with Windows Module Installer.
- Once you’ve restarted both services, try to update again and see if you still encounter the 0x80070490 error. If the error is still there, move to Method 4.
Method 4: Manually Resetting WU Components
If the methods above have been unsuccessful, we have one more procedure to try before going to the last resort (a system restore). Manually resetting the Windows Update Components is a quite lengthy process, but it’s usually successful in removing any undiscovered damaged files that are preventing updates from taking place.
This procedure involves manually disabling key WU services using Command Prompt. Afterwards, we’ll rename the SoftwareDistribution and Catroot2 folders in order to force Windows to recreate the necessary update components.
Note: The catroot2 and SoftwareDistibution folders are required by the Windows Update process. Whenever you update through Windows update, the catroot2 folder is responsible for storing signatures of the Windows Update package. Renaming the catroot2 folder will force Windows to create a new folder and remove any corrupted files from the updating process.
Finally, we’ll re-enable the update services and hope that the issue is dealt with. Here’s a quick guide through the whole thing:
- Click the Start bar in the bottom left corner and search for “cmd“. Then, right-click on Command Prompt and select Run as administrator.
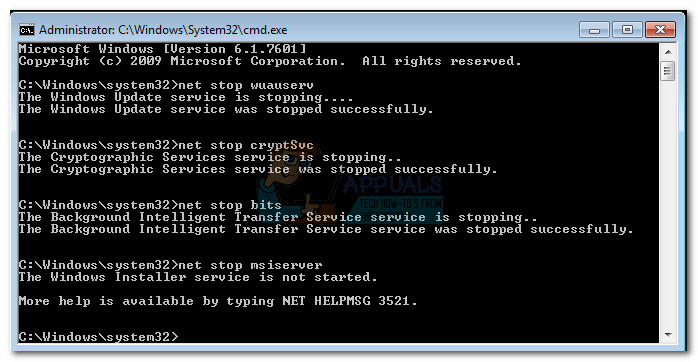
- In the elevated Command Prompt, we’re going to stop the BITS, Cryptographic, MSI Installer and Windows Update services one by one. TO do this, type (or paste) the commands below into Command prompt and press Enter after each one:
net stop wuauserv
net stop cryptSvc
net stop bits
net stop msiserver
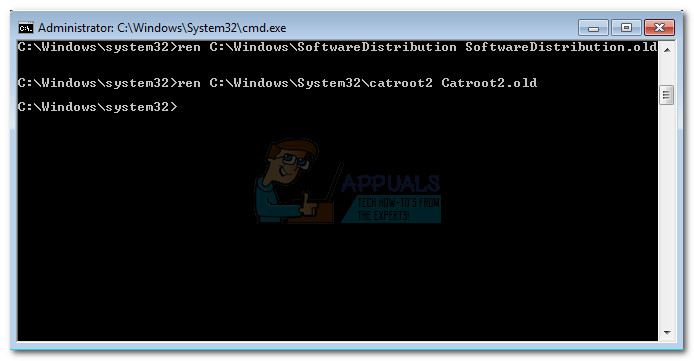
- With the services disabled, let’s rename the Catroo2 and SoftwareDistribution folders. The quickest way to do it is also via the Command Prompt. Paste the following commands into your elevated Command Prompt window and press Enter after each one:
ren C:\Windows\SoftwareDistribution SoftwareDistribution.old
ren C:\Windows\System32\catroot2 Catroot2.old
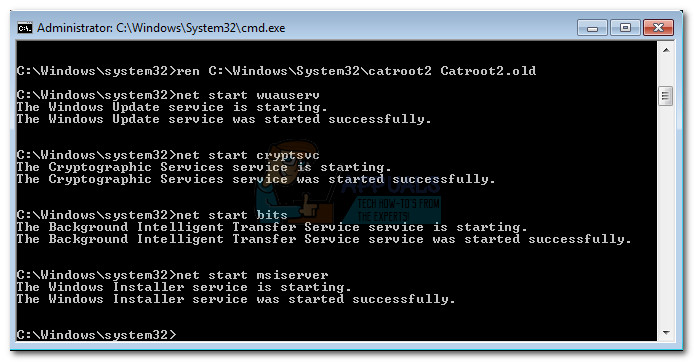
- Now, it’s time to restart the services that we previously disabled. Type the following commands in Command Prompt and press Enter after each one:
net start wuauserv
net start cryptSvc
net start bits
net start msiserver
- That’s it. Close Command Prompt, restart your machine and try to perform the update again. If it’s failing with the same 0x80070490 error, move down to the final method.
Method 5: Doing a System restore
If none of the methods above have managed to eliminate the 0x80070490 error, let’s try restoring Windows to a previous version, from when Windows Update was functioning properly.
System Restore is a recovery tool that allows you to reverse certain changes that were made to your operating system. Think of it as an “undo” feature for the most important parts of Windows. If the program in question was previously functioning properly the steps below should eliminate any registry errors and other OS changes that might have caused the 0xe06d7363 error.
Here’s a quick guide to doing a system restore to a previous point:
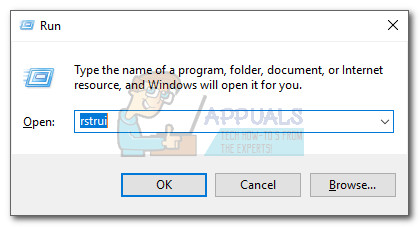
- Press Windows key + R to open a Run command. Type rstrui and hit Enter to open System Restore.
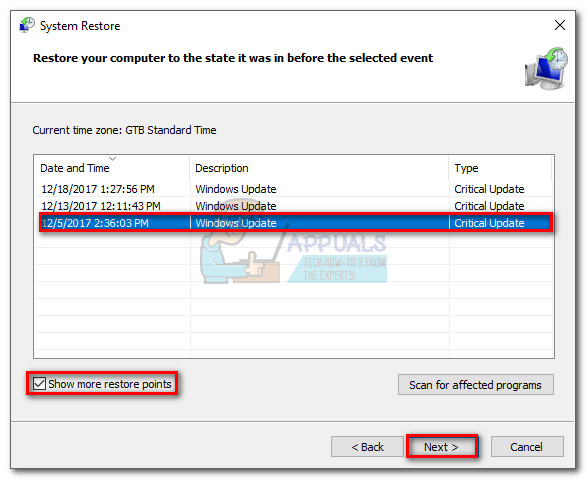
- Hit Next in the first window and then check the box next to Show more restore points. Select a restore point prior to when the application started malfunctioning and click the Next button.
- Hit Finish and then click Yes at the next prompt to start the restore process. When the restore is complete, your PC will automatically restart. Upon the reboot, your OS will be restored to the previously selected version and the error 0xe06d7363 should be removed.
