Fix: Voice Chat Not Working in COD: Modern Warfare
A lot of Call of Duty: Modern Warfare and Warzone players are reporting that the voice chat component is not working for them regardless of the headset that there using. This problem is reported to occur on PC, Xbox, and Playstation consoles.
After investigating this particular issue, it turns out that there are several potential culprits that might end up causing the issue on your PC or Console. Here’s a list of scenarios that you should investigate if you’re currently experiencing this issue:
- Microphone Recording Threshold is too High – According to many affected users, one of the most common scenarios where you will face this issue is a scenario where the current Open Mic Recording Threshold is set to a high level. If this scenario is applicable, you can fix this issue by setting the Open Mic Recording Threshold level to Minimum from the Voice Chat audio settings.
- Crossplay chat is disabled on Xbox One – If you are playing the game on Xbox One, the first thing you should do is ensure that the privacy settings are configured to allow crossplay VOIP. Unless you do this, you won’t be able to chat with games on different platforms. To avoid this issue, you must follow a series of instructions to set up a crossplay chat for your headset.
- Mic and Headset are not set as default communication devices – As it turns out if your microphone and/or the default playback device that you’re currently utilizing when playing Call of Duty: Modern Warfare or Call of Duty: Warzone is not set as default communication devices, you can anticipate having to deal with this problem. You can fix this issue by accessing the Sound settings of your Windows installation and setting both the recording and the playback to the headset you’re actively using when playing Call of Duty.
- Inconsistent data in dv_options.ini file – In certain circumstances, you can expect to deal with this issue if the game installation contains inconsistent data stored in the dv_options.ini files. In this case, you can fix the issue by modifying the dv_options.ini file and deleting the conflicting game files.
- Conflicting audio driver – As it turns out, you can expect to deal with this issue in scenarios where you are actively using the Realtek MSI driver which is known to cause a lot of audio issues with Call of Duty Modern Warfare and Call of Duty Warfare. In this case, simply uninstall the dedicated Realtek MSI driver in order to force your PC to use the generic driver.
Now that we went over every potential reason why you might experience this problem, let’s go over a series of fixes that other affected COD players have successfully used to get to the bottom of this issue.
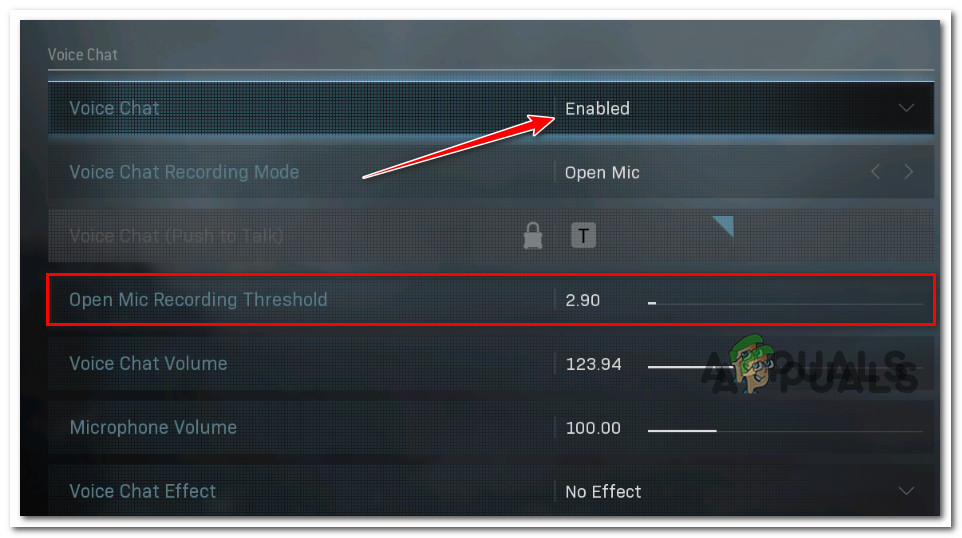
1. Set Mic Recording Threshold to Minimum
Many users who have experienced this problem claim that one of the most typical situations, where you will truly experience this problem, is one in which the current Open Mic Recording Threshold is set to a high level. If this situation applies, you can resolve the problem by lowering the Open Mic Recording Threshold level in the Voice Chat audio settings to Minimum.
Important information for PC users: If the push-to-talk setting under the Audio Menu is set to “ON,” be sure you know exactly which button to click to activate your microphone.
If you are having trouble being heard in the Call of Duty: Modern Warfare or Call of Duty: Warzone conversation yet your headset’s microphone is functioning properly with other gadgets, Xbox Party Chat, or other programs (on a PC), please take the following steps:
1. Open COD: Warzone or COD: Modern Warfare from your gaming platform of choice.
2. Go to the Options Menu in the game itself.
3. Select “Audio” from the menu that just appeared.
4. Select “Enabled” for voice chat.
5. Lower the Open Mic Recording Threshold. If you set this too high, other players might not be able to hear you speak.
6. Save those modifications, then try to start a game and see if the voice chat component is now working normally.
2. Enable Crossplay Chat (Xbox One Only)
The first thing you need to do if you’re playing the game on an Xbox One is making sure the privacy settings are set to allow cross-play VOIP. You won’t be able to communicate with games on various platforms unless you do this. You must adhere to a set of instructions to set up crossplay chat for your headset in order to avoid this problem.
For games that support crossplay, the Xbox chat settings can be adjusted to enable talking between consoles. Please complete the following to set up your headset for conversation with players using other consoles for those games:
- As instructed in the headset’s Quick Start or User Guide, set up the headset for use and make sure it’s paired with your Xbox One console and working properly.
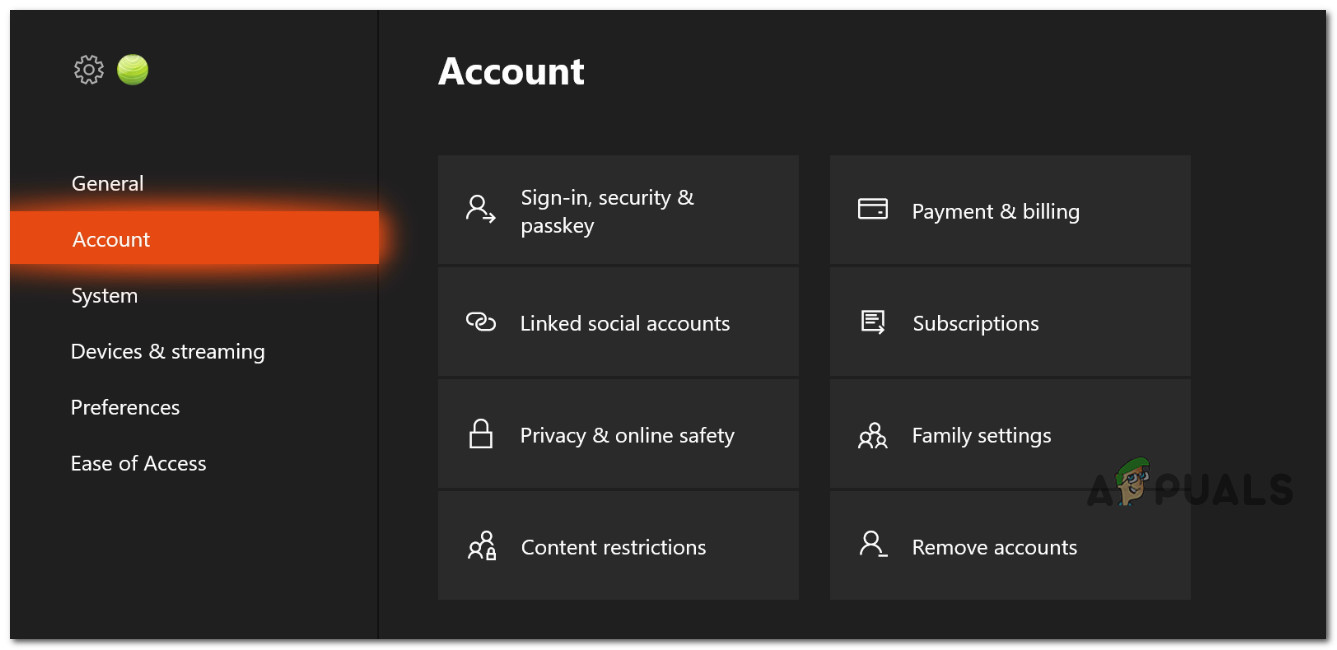
- Next, use the controller’s Xbox button to bring up the context menu and Select Settings from the System (gear symbol).
- From the menu that just came up, select Account Privacy and Online Safety under Account.
Access the Account menu - Once you’re inside the Account Privacy & online safety, access the Xbox Live Privacy menu.
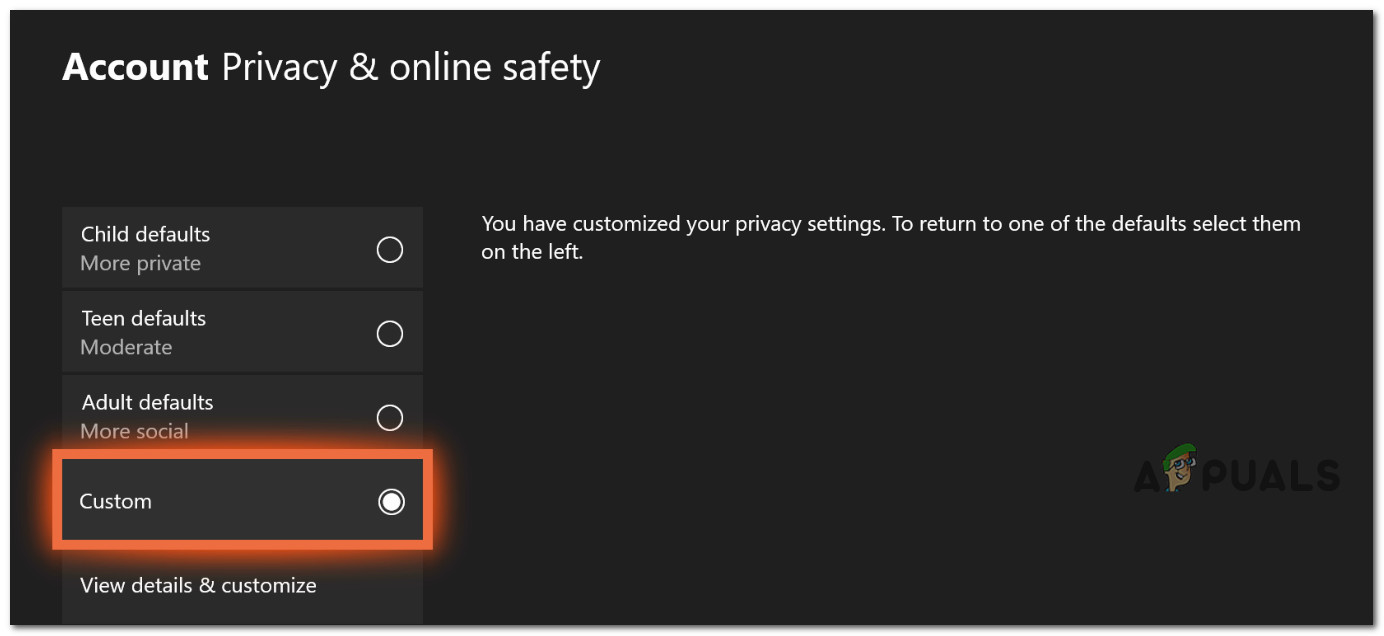
- From the next menu, select Custom once you see the list of various privacy presets.
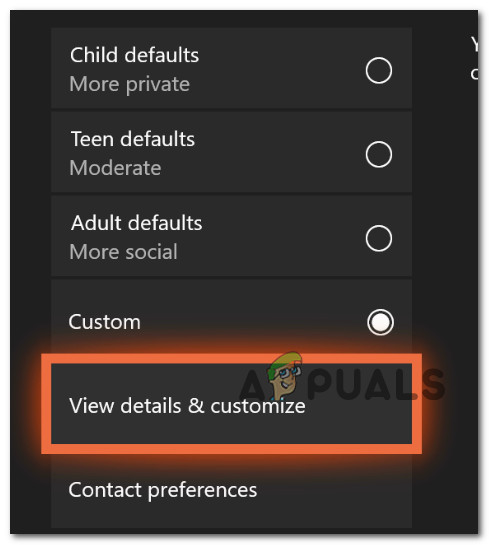
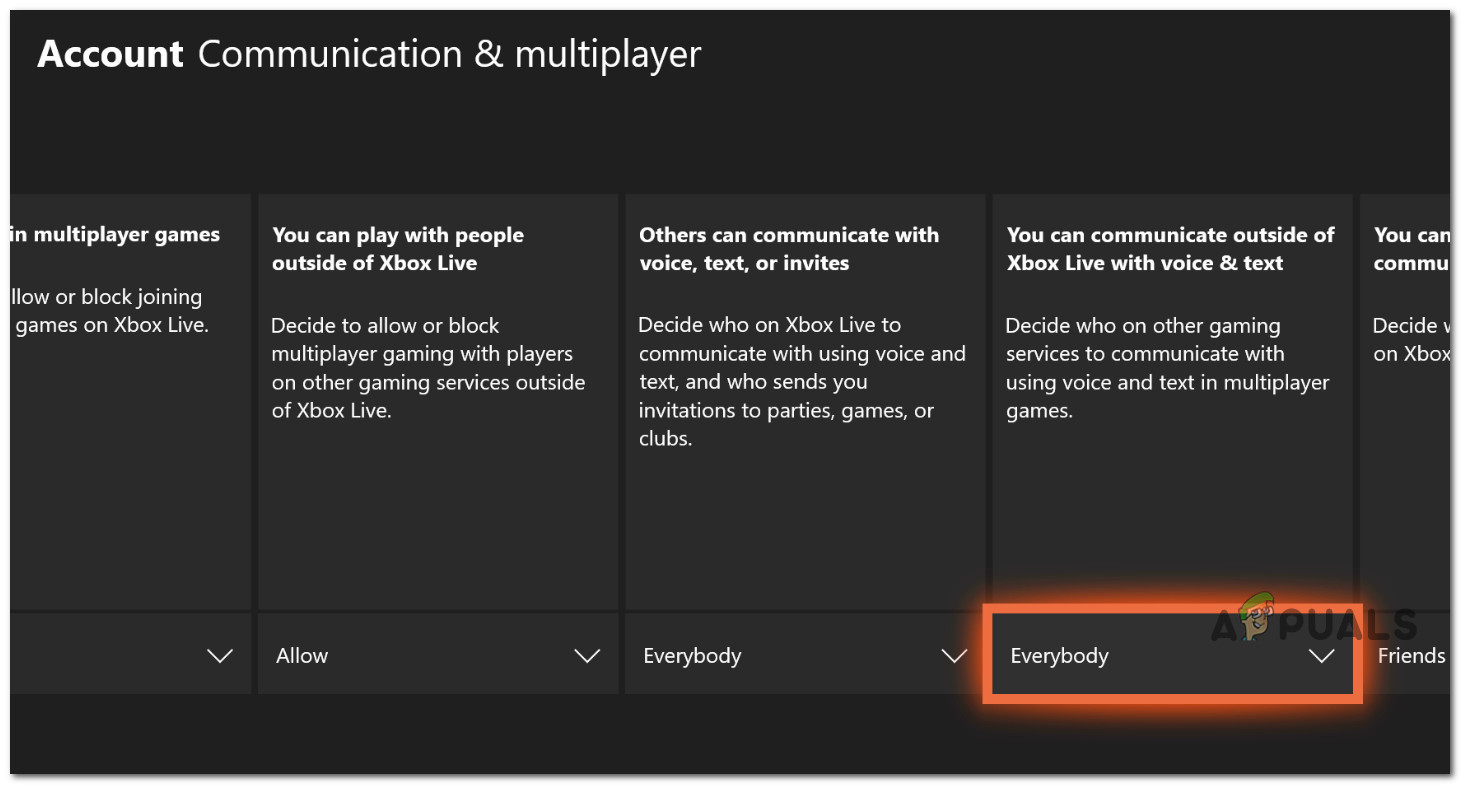
Selecting a Custom Preset - Once you’ve selected a custom preset, choose Communication & Multiplayer, then View Details and Customize.
View details and customize - Once you’re finally inside the Account Communication & multiplayer pane, make sure you set the You Can Communicate Outside of Xbox Live to Everybody before saving your changes.
Allow communications outside Xbox Live - Once you’ve made this change, reboot your console, launch Call of Duty Once again, and see if the issue is now fixed.
If the problem is still not fixed, move down to the next potential fix below.
3. Set Mic and Headphones as default communication devices (PC ONLY)
As it turns out, you can expect to deal with this issue in a scenario where your microphone and/or the default playback device that you’re currently using when playing Call of Duty Modern Warfare or Call of Duty Warzone are not set as default communication devices.
Several affected users that we’re also dealing with this issue have confirmed that the issue went away completely after they adjusted both the mic and headphones to the default communication device from the Settings menu of their Windows installation.
If you’re experiencing this issue on PC and you haven’t tried this yet, follow the instructions below:
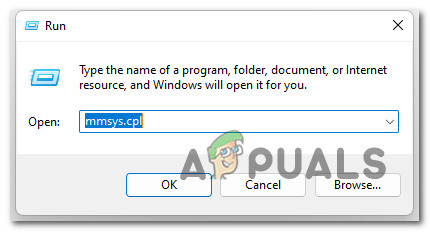
- To bring up the Run dialog box, press Windows key + R. The Sound menu will then appear when you type “mmsys.cpl” and click Enter on the traditional Control Panel menu.
Accessing the Sound Srttings Note: If the User Account Control (UAC) asks you to provide admin access, select Yes.
- After entering the Sound menu, choose the Playback tab from the menu at the top. Then, right-click the playback device on which you hear crackling sounds and select Set as default device.
- Next, select Set as the default communication device from the context menu when you right-click the same playback device.
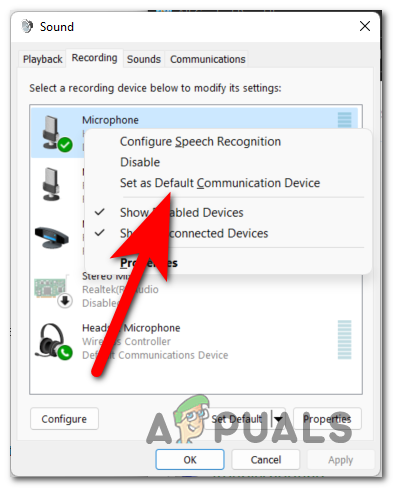
Set microphone as the Default communication device - After making this adjustment for the Microphone, access the Playback tab at the top of the window and repeat the steps above with the headset that you plan on using when playing Call of Duty.
- Restart your computer and check to see if the issue has been resolved after the subsequent startup.
If the same kind of problem is still occurring, move down to the next method below.
4. Edit adv_options.ini file
If the game installation has inconsistent data contained in the dv options.ini files, you may occasionally have to deal with this problem. In this situation, you can resolve the problem by making changes to the dv options.ini file and removing the incompatible game files.
Several affected users have confirmed that they we’re able to fix the issue by navigating to the location where you installed the game and delete every other file inside the players folder except for the adv-options.ini file.
Follow the instructions below for step by step instructions on how to do this:
- Open File Explorer and navigate to the location of the game.
- Once you’re inside the game installation folder, double-click on the players folder and delete everything except the except the adv_options.ini file.
- Next, right-click on the adv_options.ini file and choose Open With > Notepad from the context menu that just appeared.
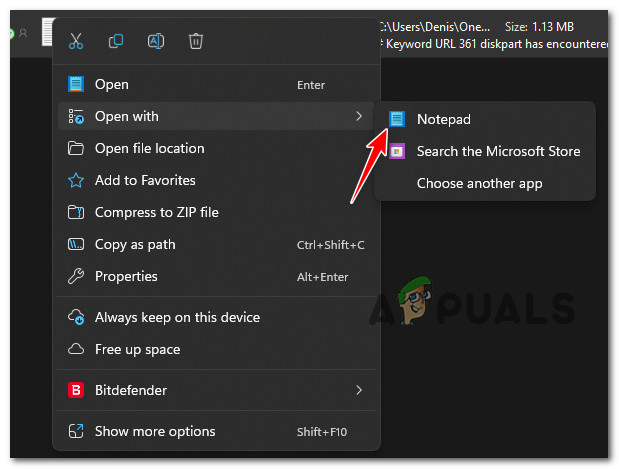
Open with Notepad - Once you’re successfully opened the adv_options.ini file in Notepad, change [configcloudstorageenabled = 1] to 0 and save the modifications.
- Start the game, configure your settings, then immediately close the game once again.
- Restart the game once again and you should be goot to go.
Note: Make sure you went back through all of your settings and put them to what you want or had.
If the problem is still not fixed, move down to the next method below.
5. Uninstall Realtek MSI driver
It turns out that you can anticipate having to deal with this problem if you are actively using the Realtek MSI driver, which is notorious for causing numerous audio problems with Call of Duty: Modern Warfare and Call of Duty: Warfare.
Simply delete the specific Realtek MSI driver in this situation to make your PC use the generic driver.
Here’s how to remove your existing audio driver and make Windows install a replacement:
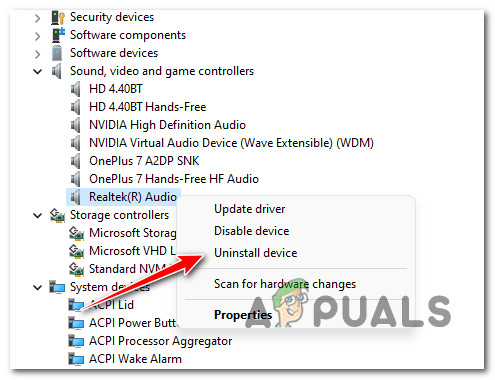
- To bring up the Run dialog box, press Windows key + R. Next, launch Device Manager by typing “devmgmt.msc” and press Enter.

Device Manager - To grant admin access, select Yes at the User Account Control.
- After entering Device Manager, expand the drop-down selection for Game controllers, sound controllers, and video controllers.
- After that, from the context menu that just opened, select Uninstall device when you right-click on your audio driver.
Uninstall the audio device drive - Restart your computer. Your computer will identify the missing audio driver and install a generic replacement at the next startup.