How to do a USB Passthrough in Hyper-V
Virtualization technology has become so common that it is way more around than we actually think it is. At this point, it is hard to imagine the internet without having the features and affordability that virtualization has to offer. Even though we are able to save a ton of money and the hurdle of managing physical hardware, we still have to, sometimes, connect external devices like USBs, etc. to your machines.
If you are familiar with VMware, you will realize after going through this article that the process is way simpler and easy in VMware. It has been quite a while since they offered the USB passthrough feature. The main problem with that, I guess, is that you can’t connect the USB device to more than one virtual machine at a time. Nonetheless, that is not how things work in Hyper-V. The process of performing a USB passthrough in Hyper-V is a bit different. Before we get into the details, let us first establish a basic understanding of USB passthrough.
USB passthrough is basically the ability that lets you access a USB drive from a virtual machine. Now, this USB drive can either be attached to the computer from which you are actually accessing the virtual machine or it can also be plugged into the Hyper-V host. These two scenarios raise two different ways of performing the passthrough. We’ll be covering both of them.
Server-side USB Passthrough
Server-side or host USB passthrough refers to the USB being plugged to the Hyper-V host. The process of accessing the USB may not be as seamless as VMware but in all reality, it is not that tough either. Plus, with the instructions that we are going to provide, it will be easier than ever. So, with that said, let us get started.
- First of all, plug in the USB device that you wish to use.
- Once you plug in the device, you will realize that the host operating system recognizes the attached drive. However, the issue here is that the USB drive can be used by only OS at a time. To overcome this, what we have to do is take the USB drive offline in order to make it inaccessible to the host operating system. After that, it can be accessed by any virtual machine you like.
- For this, open up the Run dialog box by pressing the Windows key + R. Once opened, type in the diskmgmt.msc command and press Enter. This will open up the Disk Management window.
- Now, we have to take the USB offline. To do this, right-click on the disk and then click on the Offline option. Note that you have to right-click on the disk itself and not the drive letter. For reference, check the picture attached.
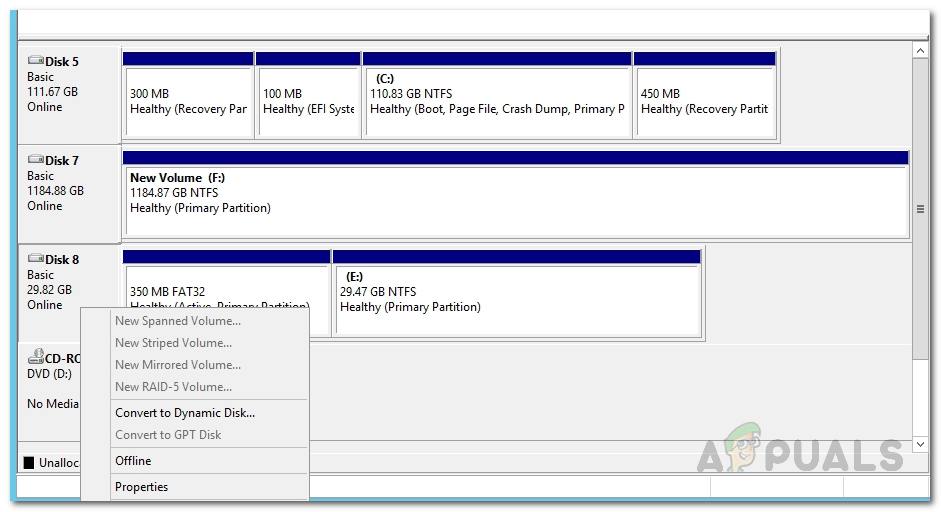
Disk Management Console - The problem with Disk Management Console is that it does not show the offline option for all USB devices and thus if you have a small USB storage drive, you might not get an offline option. In such a case, you won’t be able to use passthrough.
- Once the USB drive is offline, go ahead and open up the Hyper-V Manager.
- Right-click the virtual machine that needs to access the USB drive and go to Settings.
- On the Add Hardware tab, select SCSI Controller from the list and then click the Add button.
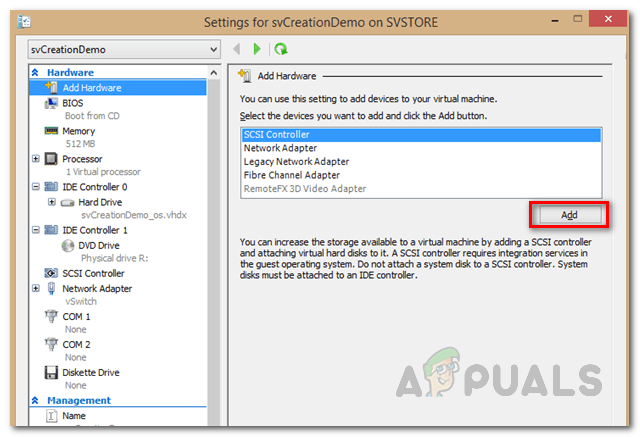
Adding Hardware - Choose the Physical Hard Disk option on the following screens and then choose the USB drive that you have attached.
- Once done, click the Apply button and then hit OK.
- The USB drive should now be available to the specific virtual machine. In case you do not see the USB drive listed in the VM, you can go back to the Disk Management Console and from there, give the USB device a drive letter.
Client-side USB Passthrough
Now that we are done with the server-side passthrough, we can move on to client-side passthrough. There are actually two ways of doing the client-side pass through and we’ll be covering both of them. The first one is through the Remote Desktop session and the second one depends on the Enhanced Session Mode. Let us get started.
Method 1: USB Passthrough with Remote Desktop Connection
To do a USB passthrough with the help of Remote Desktop Connection, follow the instructions provided down below.
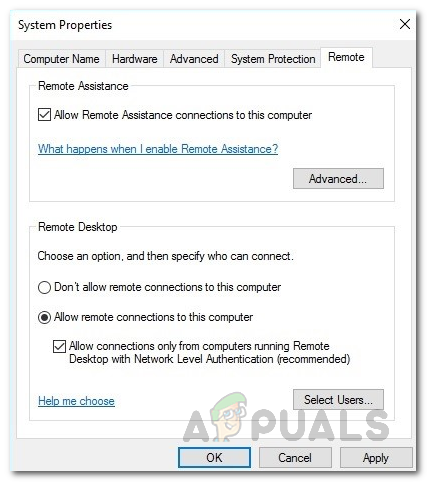
- First of all, you have to enable remote desktop connections on the virtual machine. To do this, connect to your virtual machine and make your way to the Remote System Settings via Control Panel > System and Security > Allow Remote Access.
- Tick the Allow Remote Assistance connections to this computer box. In addition, make sure to check the Allow remote connections to this computer option is also selected. Finally, click Apply and then hit OK.
Allowing Remote Connections - Now, you have to connect to this machine remotely. For this, open up the RDP client by typing mstsc.exe in the Run dialog box.
- Click on the Show options option to be able to view the additional settings. Switch to the Local Resources tab and then click on the More button.
- Check the Other supported Plug and Play devices option and then hit OK.
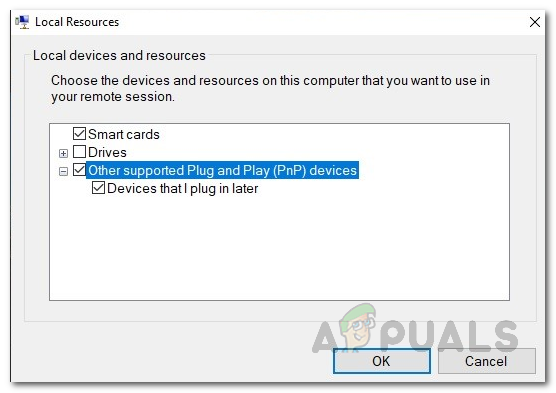
Virtual Machine Local Resources - Finally, click the Connect button to start your remote desktop session.
Method 2: Using Enhanced Session Mode
If you do not know Enhanced Session mode, it basically is a feature that helps in redirecting the local resources and devices to the virtual machine. If your system is running Windows 10 or Windows 8.1, you already have this mode enabled by default. In case your Hyper-V host is running Windows Server 2012 or Windows Server 2016, you will have to manually enable it.
Follow the instructions below to perform the USB passthrough:
- First of all, on your Hyper-V host, open up the Hyper-V Manager.
- There, right-click on the virtual machine that you want to use and then select Hyper-V Settings from the drop-down menu.
- In both the Server and User sections, go to the Enhanced Sessions Mode Policy tab and check the Allow enhanced session mode option.
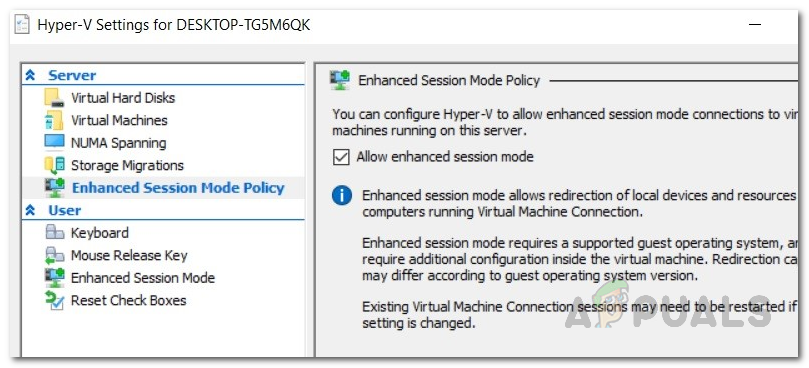
Hyper-V VM Settings - Then, click Apply and then hit the OK button to save the changes.
- Now, what you will have to do is select the local resources that you wish to use. This includes local drives, printers, USB devices, and more.
- To do this, start the virtual machine from the Hyper-V Manager window by double-clicking its name.
- A configuration window will show up before you are able to log in. On this window, click the Show Options option to see additional options.
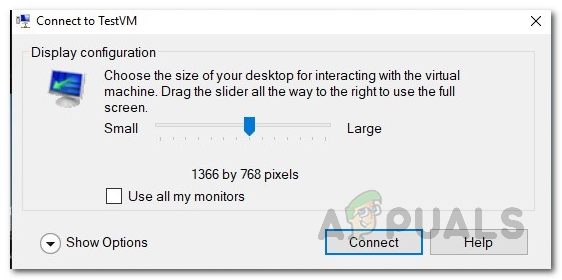
Connecting to VM - Switch to the Local Resources tab and then click the More button.
- To allow the virtual machine to access a local USB device, you will have to check the Other Supported Plug and Play devices option. Then, click the OK button.
- To save these settings for future use, you can check the Save my settings for future connections to this virtual machine box.
- Finally, click Connect to log into your virtual machine.