How to Solve the Operating System Version Is Incompatible with Startup Repair?
Although Windows 10 is the most recent iteration of the Windows Operating System, it is far from the most perfect one. Windows 10 users all across the globe have been plagued by tons of different problems, one of them being the dreadful “This Operating System version is incompatible with Startup Repair” loop. This is a problem where an affected user’s Windows 10 computer tries to boot up, detects one or more issues, tries to fix the issue(s) using Startup Repair, is unable to fix the issue(s) because that copy of Windows 10 – for a reason that still hasn’t been uncovered – is incompatible with Startup Repair, reboots and the same cycle repeats itself all over again.
Users affected by this issue find that their computer is completely unable to boot and does not even go through to the Welcome screen. Affected users’ SrtTrail.txt log files state that “This Operating System is incompatible with Startup Repair” – hence the name of this issue. In most all cases, this problem only affects Windows 10 users who have recently upgraded to the latest version of Windows from Windows 7, 8 or 8.1.
Since their computer simply refuses to boot up entirely and gets stuck in a “This Operating System version is incompatible with Startup Repair” loop every single time, most of the people affected by this issue believe that the only way to fix it is to reinstall Windows 10 from scratch. While reinstalling Windows 10 certainly resolves the problem, it means that you are going to have to start all over again and is an unnecessarily harsh resolution for a problem that can be fixed by simply disabling driver signature enforcement and then rebooting your computer. Yes, that’s right! The actual solution to this problem is pretty simple, especially compared to the Windows 10 reinstallation alternative.
To disable driver signature enforcement, you are going to have to access Windows 10’s Advanced Repair Options. You have a couple of different options when it comes to how you can get to Windows 10’s Advanced Repair Options screen, and here are the simplest and most effective ones:
Option 1: Mash Shift + F8 while your computer boots up
There is a chance that you might be able to access Windows 10’s Advanced Repair Options without any outside help by simply pressing and holding Shift and then mashing the F8 key repeatedly while your computer boots up. You might have to restart your computer and repeat this process 4-5 times in order for it to work. If this method works, you will be taken to a Recovery screen where you can click on See advanced repair options to access Windows 10’s Advanced Repair Options. However, be warned – this little trick only works on a small portion of all Windows 10 computers as most of them (especially newer ones) do not support it.
Option 2: Use a Windows 10 installation media
If Option 1 didn’t work for you or if you simply prefer an option that is guaranteed to work, you can also get to the Advanced Repair Options screen using a Windows 10 installation CD, DVD or USB. If you don’t have a Windows 10 installation media handy, use this article to create a bootable Windows 10 installation USB. Here’s how you can use a Windows 10 installation media to access Windows 10’s Advanced Repair Options:
Insert your Windows 10 installation media into the computer.
Restart the computer. While the computer is booting up, access its BIOS settings (the instructions for which vary depending on the manufacturer of the computer’s motherboard but are almost always displayed on the first screen you see when your computer boots up) and change its boot order in the Boot tab to boot from your installation media instead of the hard drive.
Save the changes and exit the BIOS.
If prompted to do so, press any key to boot from your installation media.
Select your preferred time zone, language and keyboard layout and then click on Next.
When you reach a screen with an Install now button at its center, locate and click on Repair your computer in the bottom left corner of the window. Once you do so, you will be taken to Windows 10’s Advanced Repair Options
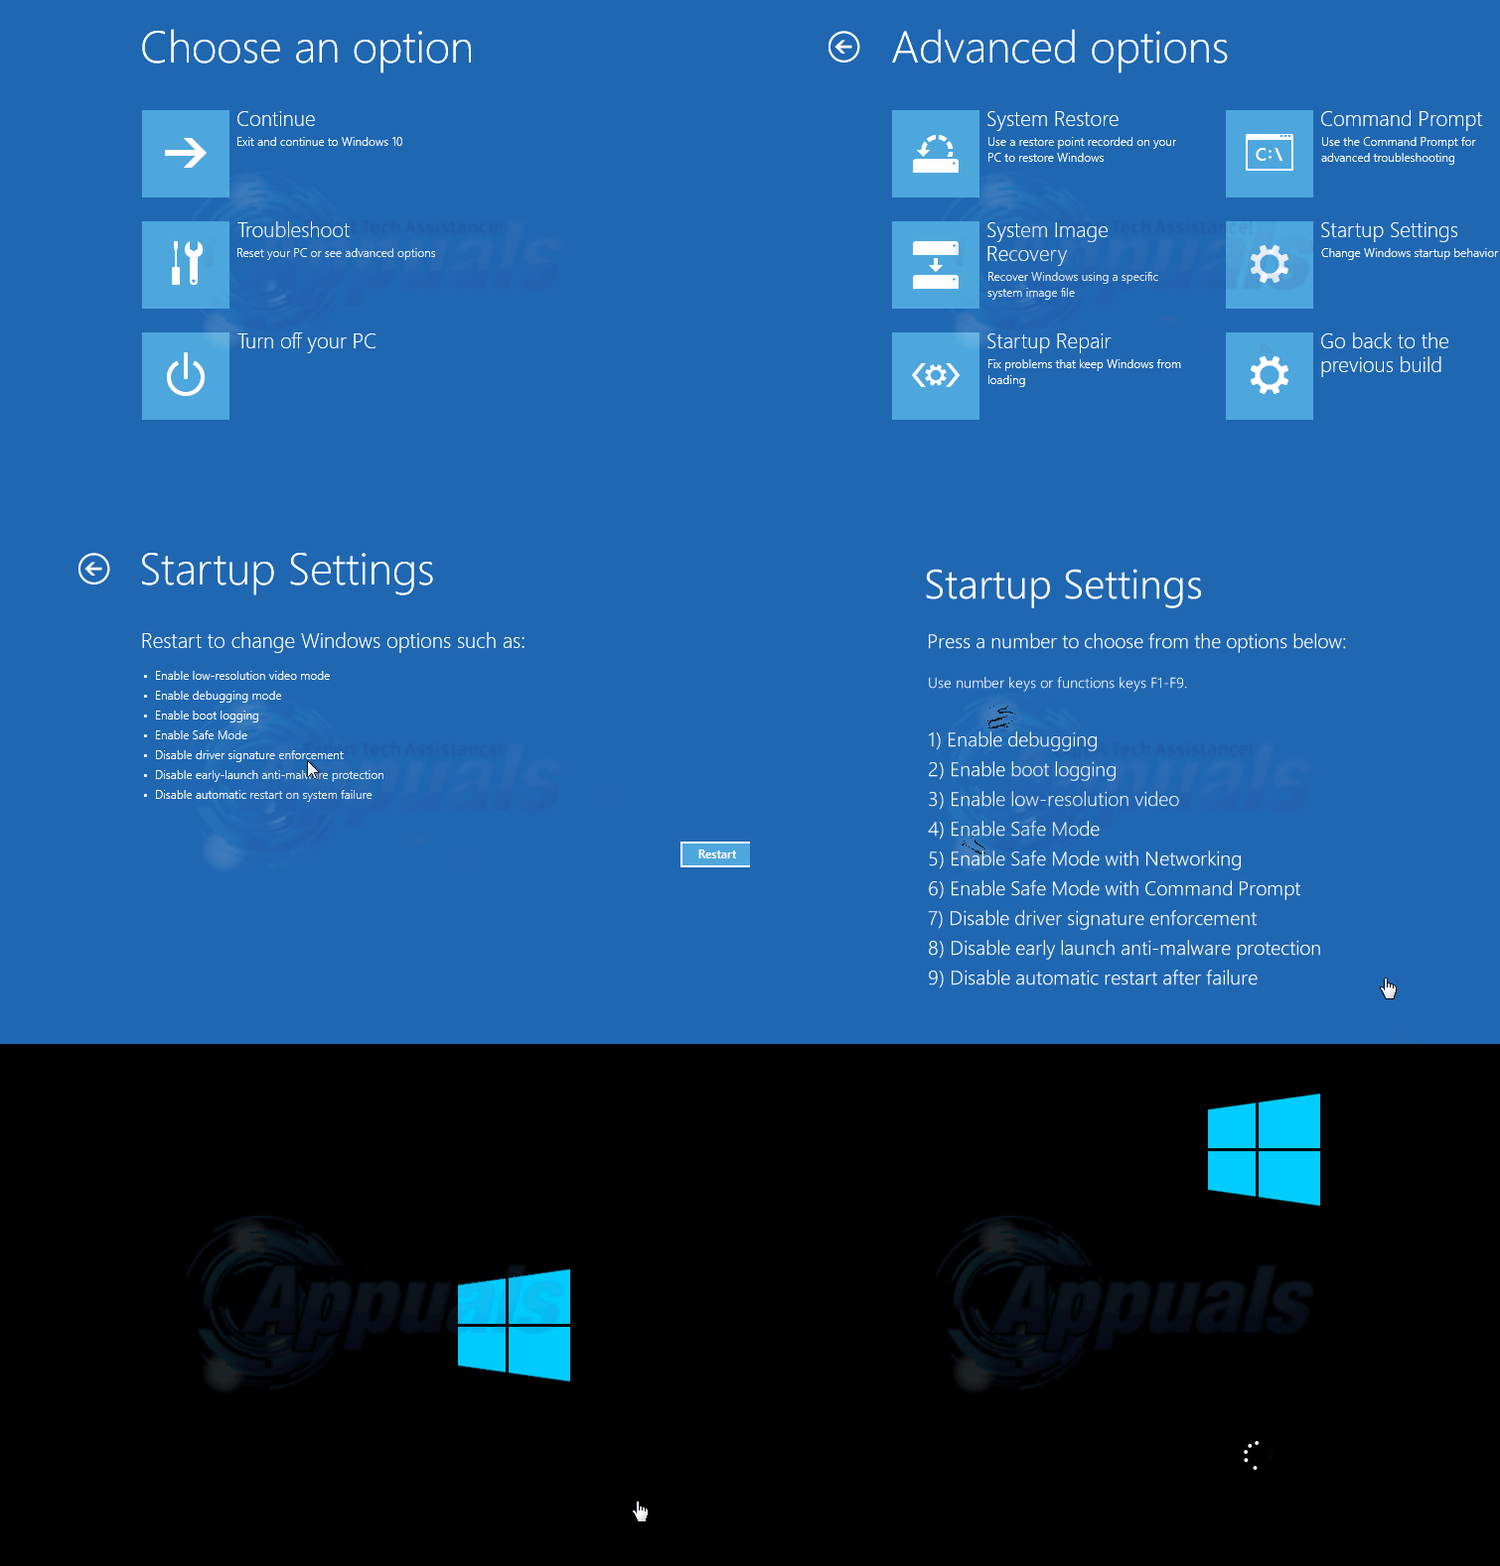
Once you reach the Advanced Repair Options screen, you are more than halfway there! To actually disable driver signature enforcement using the Advanced Repair Options, you need to:
On the Choose an option screen, click on Troubleshoot.
Click on Advanced options.
Click on Windows Startup Settings.
Click on Restart. Your computer will now restart – allow it to do so.
When your computer boots up, you will see an Advanced Boot Options On this screen, use the arrow keys to highlight the Disable Driver Signature Enforcement option and press Enter to select it. Your computer should now boot up as it is supposed to and not get stuck in a “This Operating System version is incompatible with Startup Repair” loop.
