How to Take Screenshots from the Linux Command Line
Like with most things in the GNU/Linux environment, there’s a way to take a screenshot from the command line. There are a few different primary reasons users would like to do this. One is to have further control over how the screenshot is taken, especially when dealing with timing. Another is to make screenshot galleries out of video files. Users used to heavy keyboard activity might also find this method fastest.
Depending on your goals and distribution, you might find there are several different ways to go about what you’re trying to do. Once again, this is indicative of how Linux’s developers go about things. The good news is that many of these tools should already be present in your existing installation.
Method 1: Taking a Screenshot with scrot
The most basic way of taking a screenshot from the command is simply by typing scrot and pushing enter. You don’t even have to be in a proper terminal emulator window for this to work. If you hold down Alt and F2 or the Windows or Super key and R to get a run dialog box, then you can simply type scrot and push enter. This will take a screenshot of everything on the desktop and place it in a file inside of your home directory. You can access it with a graphical file manager or by typing cd ~ and then ls at the command line. Since it would take a screenshot of a terminal window you issue it at as well, you may wish to use the command line served from the run box more often than a terminal window for this method.
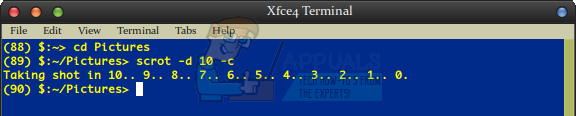
You can set a delay to get things ready before taking it. Type scrot -d 10 and push enter to wait 10 seconds before taking the screenshot. This should give you ample time to configure whatever program you’re taking a screenshot of. You may also wish to set a file name after this command, which scrot will use when naming the file in your home directory.
Add the -c switch to the command to create a countdown. For instance, scrot -d 10 -c will count the seconds down until taking the screenshot. This can help you plan ahead when you need to get everything ready before scrot takes a shot.
A vast majority of modern desktop environments link scrot or another command line-based screenshot utility to the Print Screen (Prt Sc) key on your keyboard. You may just have to push Prt Sc to take a screenshot of everything or push Alt+Prt Sc to take one of the active window with the scrot utility. A very few keyboard layouts have a separate SysRq key not attached to the Prt Sc key, and this key might also work to take screenshots of the current window.
If you invoke scrot with -s after it, then you’ll be able to draw an area on the screen with your mouse pointer. You’ll end up with a screenshot of that specific area and nothing else.
While this can be useful, some screenshots taken in this manner can look odd and unusually cropped.
Method 2: Using the Xfce4 Graphical Screenshooter
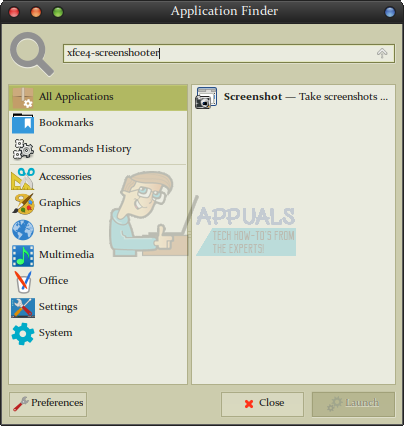
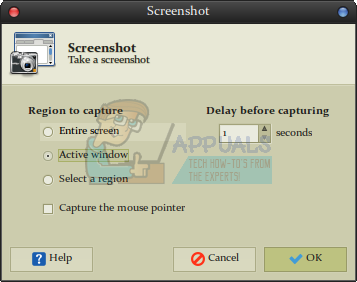
Debian-Xfce, Xubuntu and other Xfce4 users have a command called xfce4-screenshoter they seen when they push Prt Sc, and it’s possible to invoke this from the command line. Merely type xfce4-screenshooter at a terminal or at the Application Finder brought up when you push Alt+F2 or Super+R and you’ll receive a dialog box that allows you to select the type of screenshot you’d prefer to take.
Click on Select a Region and push OK to highlight a region of the screen or select Enter Screen or Active Window for a more traditional screenshot user experience.
Method 3: Extract Frames With ffmpeg
You can use the ffmpeg program to make a full gallery of screenshots out of a video file. If you don’t already have ffmpeg, then you’ll need to install it with sudo apt-get install ffmpeg if you’re on Debian, Ubuntu or Mint based distributions. This should also work for most users of Debian on the Raspberry Pi platform. Users of Fedora or Red Hat will need to issue yum install rpmbuild as root to install the package. Arch users can choose between the ffmpeg-git or ffmpeg-full packages. Most users will want to use the ffmpeg-git version.
Once you’ve installed the package, use the cd command to move to the destination of your video file so you can use ffmpeg to make a gallery. Once there, issue ffmpeg -i myMovie.avi -r 1 -f image2 shots_%06.jpg, having replaced the command with the name of your film file. The number in the shots_%06.jpg file name indicates how many trailing zeros you need to arrange the screenshots in a list while the number after 1 indicates the frame rate. You can play around with these to some degree to get a better feel for what sort of screenshots you’d like to capture.
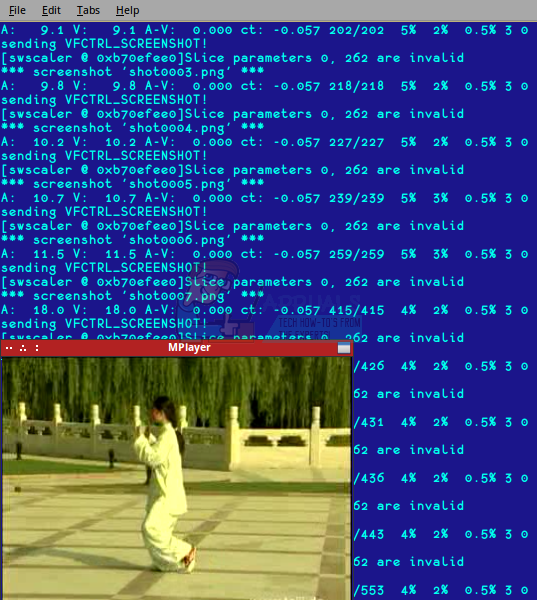
Method 4: Using mplayer at the Command Line
You can also invoke mplayer from the command line, which Lubuntu, LXLE and Trisquel Mini-Linux users should already have. Those who don’t have it can use sudo apt-get install mplayer to install it. Type mplayer -vf screenshot and the name of your video file to pop up a small player window. Push the s key each time you’d like to take a screenshot and you’ll get a message about whether or not it worked. The terminal window remains valid the entire time to continue outputting messages about the screenshots you’re taking.
You can also use:
mplayer -nosound -frames ## -vo png:z=9 myVideo.avi
Replace the filename with the name of your video and ## with the number of frames you’d like photographed automatically. You could also replace png with another image format like jpg or gif89a if you’d like, but png generally offers the best image quality.