FIX: Steps to fix iPhone 6 Error 4013
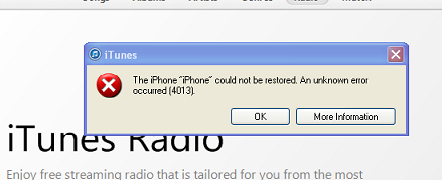
Despite the iPhone 6 featuring the latest technology in the realm of smartphones, it occasionally displays an error (4013) that prevents users from upgrading to the latest software version using iTunes.
This guide is also applicable to iPhone 4 and 5.
Error 4013 is associated with the hardware and is not related to the software of the phone. However, like all things digital, fixing this issue may require some frustration and effort. Every problem can be solved with some meticulous help. There are various methods available.
Arguably, they worked for many users, but not everyone. All these methods are recommended to be tried in an ordered way, making it easier to overcome the problem. If all else fails, take your iPhone to the nearest Apple outlet.
Method 1: Replace Your USB Port
As stated above, Error 4013 is a hardware problem – a damaged USB port or faulty USB cable. Try changing the USB port. Next, change your USB cable. Using the original accessory is highly recommended.
If both failed, try upgrading from a different computer with the latest version of iTunes already installed on it.
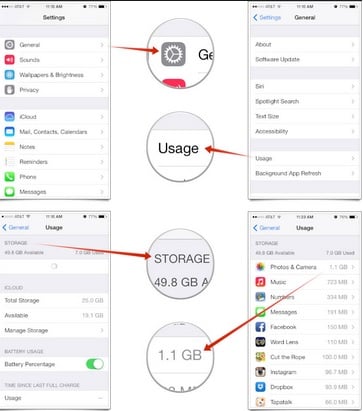
Method 2: Clear some space.
Error 4013 could be caused by insufficient space for the update to install on your device. Try going to Settings > General > Usage and clear some memory.
Method 3: Recover and Restore
In case error 4013 occurs when updating the firmware without doing a clean restore (even after changing the cables), well, only in such circumstances should this method be considered. This procedure is recommended as the last thing to try, but it’s quite easy to accomplish right away.
- Connect your iPhone 6 to the computer and open up the iTunes utility.
2. Make a backup of all your useful data, or it will be erased.
3. Upon finishing the backup, disconnect your iPhone and turn off iTunes.
4. To open Recovery Mode, hold the Power and Home buttons simultaneously until a black screen appears.
5. Now, open iTunes on the PC.
6. Connect your iPhone; iTunes will indicate, “Device is connected in recovery mode.
7. Now, follow the simple instructions and restore your device. As a result, your data will be wiped out.
8. Restore your data from the backup you made earlier.