How to Fix SPLwow64.exe Error on Windows
Some Windows users are seeing a SPLwow64.exe error prompt whenever they attempt to deploy a certain action on their computer. For some users, this issue occurs when they attempt to execute a printing job, while others report that they see this type of error popup with every program that they attempt to open. This issue is confirmed to occur on Windows 7, Windows 8.1, and Windows 10.

What is Splwow64.exe?
This Windows native process is used to translate the print driver model of a 64-bit operating system and a 32-bit program. Issues associated with this executable are typically reported to occur if the executable is not closed automatically once the job is finished.
After investigating this particular issue, it turns out that there are several different causes that might be responsible for causing this particular issue. Here’s a list of potential culprits:
- Client-Side Rendering is Enabled – As some users have reported, it’s not uncommon to encounter this issue when running the 32-bit version executable of your Xerox printer on a 64-bit Windows version. To resolve the issue in this case, you need to disable client-side rendering from your Printer Settings.
- Corrupted Printer Environment keys – There are certain circumstances where you can expect to see the issue popping up due to some type of corruption that is affecting a series of subkeys belonging to the Printer Environment. In this case, you can fix the issue by using Registry Editor to delete the problematic subkeys.
- Generic Printer glitch – If you are experiencing this problem on Windows 10 after installing a pending Windows update, chances are you’re dealing with a generic glitch that can be resolved by running the Printer Troubleshooter and applying the recommended fix.
- Corrupted printer port – Under certain circumstances, you might see this error occurring due to an improper or corrupted printer port that ends up affecting the connection. Users encountering the same type of issue have confirmed that the issue was resolved after they have effectively reinstalled every associated printer port.
- Outdated Xerox Global Print driver – If you are using a Xerox printer or scanner, there’s a chance you’re seeing this error pop-up due to an outdated Xerox Global Print driver. In this case, you should be able to fix the issue by installing the latest version of the Xerox Global Print Driver.
Now that you know every potential instance that might trigger this error, here’s a list of methods that other affected users have successfully used to fix the error popup associated with the SPLwow64 executable.
Method 1: Disabling Client-Side Rendering
Even though this issue is not limited to Xerox printers, it’s very common among users trying to run the 32-bit version of this executable on a 64-bit environment. If you’re encountering this issue because the Splwow64.exe is not automatically closed once the printing job is finished, you should be able to fix the problem by disabling the client-side rendering feature inside your printer’s Properties screen.
This method was used by a lot of affected users and the majority of them have reported that once they have disabled the Render print jobs on client computers feature from the Sharing tab of their printer Settings, the error pop up went away permanently.
If this looks like it could be applicable to your particular scenario, follow the instructions below to disable client-side rendering from the settings menu of your printer:
- Press Windows key + R to open up a Run dialog box. Next, type ‘ms-settings:printers‘ inside the text box and press Enter to open up the Printers & Scanners tab of the Settings app.

Accessing the Printers tab - Once you’re inside the Printers & Scanners tab, move over to the right-hand side section and click on the printer that you suspect might trigger this issue. Then, from the context menu that appeared, click on Manage.

Manage the Printer settings - Once you’re inside the Settings screen of your printer, click on the Printer Properties hyperlink from the list of available options.

Opening the Printer’s Properties screen - Inside the Properties screen of your Printer, access the sharing tab and uncheck the box associated with Render print jobs on client computers before clicking Apply to save the changes.

Disabling Client-Side Rendering - Now that you have effectively disabled client-side rendering, restart your computer and repeat the action that was previously triggering the error.
In case the same problem is still occurring, move down to the next potential fix below.
Method 2: Deleting the Printer’s environment Registry Key Drivers
If the first method was ineffective in your case, the next thing you should do is delete a couple of problematic registry keys that might hold conflicting data that is triggering this SPLwow64.exe error popup.
Several affected users dealing with the same kind of issue have reported that they were finally able to fix this problem by navigating to the HKEY_LOCAL_MACHINE\SYSTEM\CurrentControlSet\Control\Print\Environments\Windows x64\Drivers inside Registry Editor and deleting a couple of sub-keys prior to stopping the printer spooler and deleting the associated files.
If you haven’t tried this method yet, follow the instructions below:
- Press Windows key + R to open up a Run dialog box. Next, type ‘regedit’ inside the text box and press Enter to open up Registry Editor. If you’re prompted by the UAC (User Account Control), click Yes to grant admin access.

Opening the Registry Editor Utility - Once you’re inside the Registry Editor, follow the instructions below to navigate to the following location:
HKEY_LOCAL_MACHINE\SYSTEM\CurrentControlSet\Control\Print\Environments\Windows x64\Drivers
- Once you’re inside the correct location, look for the Version-3 subkey and click on it once to select it.
- Once the Version-3 subkey is selected, go ahead and delete every sub-key inside Version-3 by right-clicking on it and choosing Delete from the context menu that just appeared.

Deleting every subkey - Once every relevant sub-key is deleted, close the elevated Registry Edition prompt and press Windows key + R to open up another Run dialog box. This type, type ‘cmd’ and press Ctrl + Shift + Enter to open up an elevated Command Prompt.

Opening an elevated Command Prompt Note: When you’re prompted by the UAC (User Account Control), click Yes to grant admin access.
- Once you’re inside the elevated CMD prompt, type the following command and press Enter to effectively disable the Print Spooler service:
net stop spooler
- Leave the elevated CMD in the background and open a Windows Explorer (File Explorer) prompt. Next, navigate to the following location and delete everything inside the Printers folder:
C:\WINDOWS\system32\spool\printers\
- Next, navigate to the following location and delete every file and sub-folder located inside the folder named 3:
C:\WINDOWS\system32\spool\drivers\x64\3
- Once you’ve cleared both locations, return to the elevated CMD prompt, type the following command, and press Enter to effectively restart the print spooler service:
net start spooler
- Restart your computer and see if the problem is now fixed.
In case the same problem is still occurring, move down to the next potential fix below.
Method 3: Running the Printer Troubleshooter
If none of the methods above have worked for you and you’re experiencing the issue on Windows 10, you should proceed by running the built-in printer troubleshooter included with Windows 10 and applying the recommended fix (if one is found).
As some affected users have reported, if this issue is somehow caused by the printer spooler service or printer dependency, this utility might hold an automated fix capable of fixing the issue. Keep in mind that Microsoft regularly updates these troubleshooters with new automated fixes to tackle various situations where this issue might appear.
If you’re still encountering SPLwow64.exe errors when performing some printer related tasks, follow the instructions below to run the Printer Troubleshooter and apply the recommended fix:
- Open up a Run dialog box by pressing the Windows key + R keys at the same time. Once you’re inside the text box, type ‘ms-settings:troubleshoot’ and press Enter to open up the Troubleshooting tab of the Settings app in Windows 10.

Opening the Troubleshooting tab - Once you’re inside the Troubleshooting tab, scroll down to the right-hand side and click on the Printer icon (under the Get up and running section).

Accessing the Printer Troubleshoot Utility - From the context menu that just appeared, click on the Run the Troubleshooter button.
- After the utility is opened, select your printer from the list of available options, then wait for the initial scan to complete.
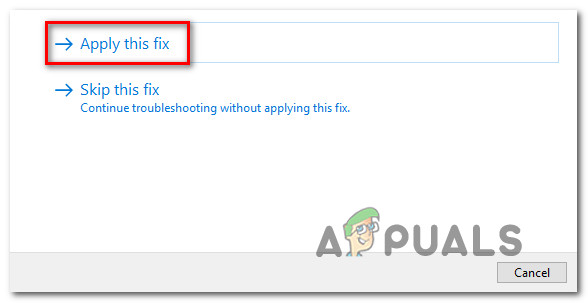
- If a viable repair strategy is identified, click on the Apply this Fix utility to deploy the fix.
Applying the recommended fix Note: Depending on the type of fix that gets recommended, you might need to follow a series of additional manual steps.
- Once the recommended fix has been successfully deployed, restart your computer and wait for the next startup to complete. After your computer boots back up, repeat the action that was previously causing the SPLwow64.exe error and see if the problem is now fixed.
In case the same issue is still occurring, move down to Method 4 below.
Method 4: Reinstalling every Printer Port
If none of the methods above have worked for you, it’s also possible to encounter this type of issue due to an improper/corrupted printer port that is affecting the connection between your computer and the machine – This is only applicable if your printer is not connected over a wireless network.
Several affected users dealing with the same issue have managed to get the issue resolved by using Device Manager to delete every port created for this particular printer and reinstalling healthy new equivalents (either generic or dedicated).
In case you don’t know how to do this by yourself, we’ve created a step-by-step guide that will walk you through the entire process:
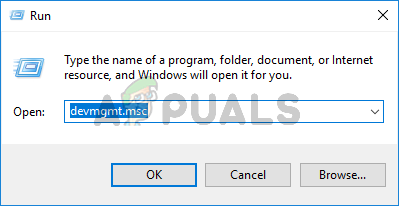
- Open up a Run dialog box by pressing Windows key + R. Once inside, type ‘devmgmt.msc’ and press Enter to open up Device Manager. If you’re prompted by the UAC (User Account Control), click Yes to grant admin access.
Type devmgmt.msc and Press Enter to Open Device Manager - Once you’re inside Device Manager, scroll down through the list of installed devices and expand the menu associated with Print queues.
- Next, right-click on every installed printer driver that you found under Print Queues, then choose Uninstall from the newly appeared context menu.

Uninstalling every printer port - Once you have successfully managed to uninstall every printer port, go ahead and expand the drop-down menu of Universal Serial Bus controllers. Once you do this, scroll down through the list of items and uninstall every Printer port by right-clicking on every entry and choosing Uninstall from the context menu.

Uninstalling every print port - After you manage to uninstall every relevant printer port from your computer, simply reboot your computer. During the next startup system, your OS will detect that you’re missing some key printer drivers and install generic equivalents to make the printer usable again.
Note: If you want, you can always install the dedicated printer drivers from your manufacturer’s website. - Repeat the action that was previously causing the SPLwow64.exe error and see if the problem is now fixed.
In case this problem is still occurring, move down to the next potential fix below.
Method 5: Updating the Xerox Global Print driver (if applicable)
Keep in mind that according to the market share, chances are SPLwow64.exe is primarily used by the Xerox Global Print driver that’s being used by a variety of printers and scanners. In case you are still seeing these types of SPLwow64.exe error pop-ups and none of the other instructions above have worked for you, chances are you are dealing with an outdated driver.
Keep in mind that a couple of years ago, there was a surge of users encountering this issue due to a bad driver update that broke the functionality of this global driver on Windows 10. During that time, Xerox managed to resolve the issue swiftly by releasing a hotfix via a new iteration of that driver.
If the reason why you are encountering this issue is a broken Xerox Global Print driver, follow the instructions below to install the latest version using the official channels:
- Open your default browser and visit the download page of the Global Print driver.
- Once you’re inside, select the correct Platform and Language to find the correct driver compatible with your OS. Then, check the box associated with I agree to the Terms and Conditions and click on the Download button.

Downloading the global print driver - Once the download is complete, wait for the operation to complete, then extract the contents of the archive inside an easy to access the folder.
- After the extraction is complete, right-click on the .ini file then click Install before following the instructions to complete the installation of the latest driver version.
- Restart your computer and see if the SPLwow64.exe error has stopped occurring.