Pointer Keeps Flickering on Windows 11? Here’s how to fix
On the new operating system, users have been experiencing an issue where the mouse or the pointer keeps flickering on the screen. This problem can usually be associated with your display or mouse drivers that are installed on your computer. As per user reports, the problem only surfaces on Windows 11 machines as the pointer was working just fine on the previous operating system. This can sometimes happen when your drivers go bad during the upgrade phase and you just have to reinstall them to resolve the issue. However, regardless of the cause of the problem, we will be showing you how to get it fixed in this article with quite ease so just follow through.

As it turns out, when the pointer on your screen is accompanied by a blue circle, this usually refers to a program running in the background. Now, by default, there are tons of services and even apps that may be running in the background when you are using your operating system in order to ensure a smooth experience. However, when a new program in the background is executing, you will see the blue circle on the screen. Just like how it comes up when you start an application which signifies that the processor is processing it. The problem in question can be due to a number of reasons some of which we slightly touched on above. However, in order to get a better understanding, let us first go through the possible list of causes in more detail before jumping into the different methods that you can use to resolve the issue. With that said, let us get started.
- Windows Explorer — One of the reasons that the problem in question may occur is when something is wrong with the Windows Explorer process. In such a scenario, you can easily resolve the issue by simply restarting the Windows Explorer process.
- Display Drivers — Another reason for the issue in question can be the display drivers that are installed on your computer. This can happen when the drivers are damaged or not operating properly in which case you will have to reinstall the drivers to resolve the issue.
- Mouse Drivers — As it turns out, just like your display drivers, if the drivers installed on your computer for the mouse controller have gone bad as well, it will result in such issues or sometimes even worse. In such a scenario, you will have to reinstall these as well.
- Third-Party Applications — Finally, another cause of the problem in question can be the third-party applications that you have installed on your computer. While this may sound a bit weird, several applications have actually caused the issue for some users in which case they had to remove them in order to resolve the problem.
Now that we have gone through the possible list of causes of the problem in question, we can finally get started and show you the different methods that you can implement to get the issue resolved. So, without further ado, let us jump right into it.
Restart Windows Explorer
As it turns out, the first thing that you should do when you encounter the problem in question is to go ahead and restart the Windows Explorer process on your computer. Windows Explorer is responsible for managing all your files as well as your desktop. Therefore, if an error is to occur with Windows Explorer, you will stumble upon the issue mentioned.
If this case is applicable, the problem can be easily resolved by simply restarting the Windows Explorer process on your computer through the Task Manager window. To do this, follow the instructions given down below:
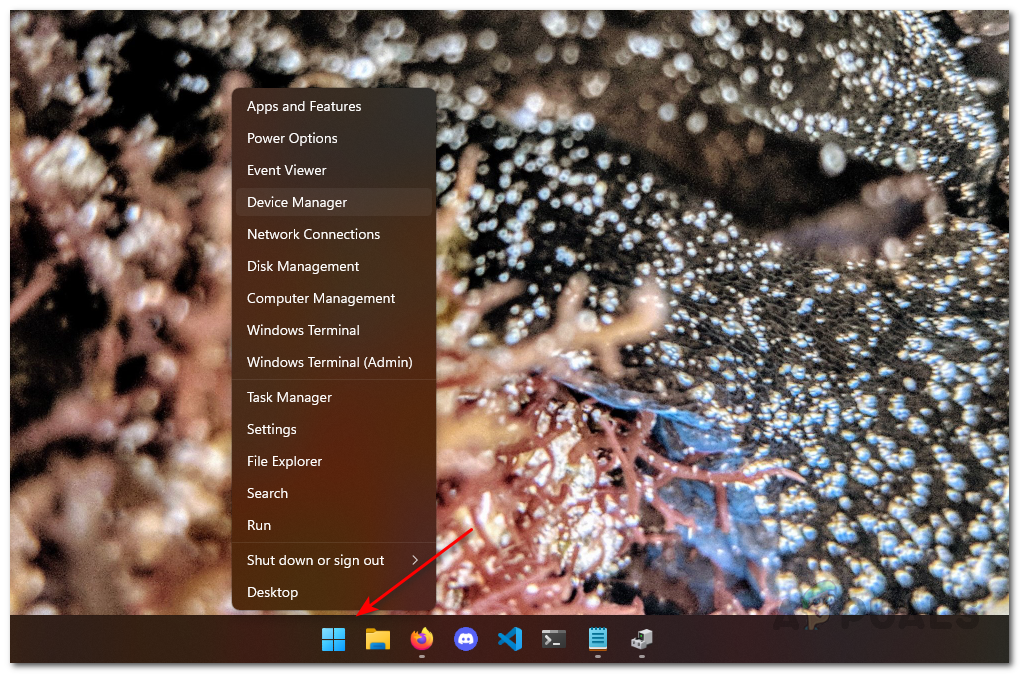
- First of all, open up the Task Manager window. To do that, right-click on the Windows icon on your taskbar and then click Task Manager from the menu that appears.

Opening up Task Manager - Once the Task Manager window is open, in the Processes tab, look for Windows Explorer.

Windows Explorer Process - Right-click on the process and from the drop-down menu, click the Restart option.

Restarting Windows Explorer Process - Wait for the Windows Explorer to restart successfully. After that, see if the problem still exists.
Reconnect Display
In some cases, the problem may appear when your display is not properly connected to the computer. This applies to laptops that have a detachable screen or your desktop PCs. In the case of desktop computers, the problem can be due to the HDMI or DisplayPort cable that is connected to your mother.
If this scenario is applicable to you, then you should try unplugging the cable from your cable and then plugging it back in. This has been reported by some users who were facing a similar issue. In the case of laptops, if the screen is detachable, undock the screen from your laptop and then dock it again. See if that helps fix the problem for you.
In addition to that, in some cases, the problem can also arise due to a bad cable. Therefore, we would also recommend using a different cable if you have one available to see if that bears any fruit for you. If it does not, move on to the next method down below.
Disable Touchscreen Driver (if applicable)
As it turns out, for some users, the problem seems to be occurring due to the touch screen driver that is installed on their system. This has been reported by multiple users who were facing the problem on a laptop. Therefore, if you have a laptop that has a touchscreen, you should give this a try to see if that resolves the problem for you. Doing this is pretty simple and you don’t need to uninstall the driver, rather just disable it temporarily to see if the issue is fixed. To do this, follow the instructions that are given down below:
- First of all, open up the Device Manager by searching for it in the Start Menu.

Opening up Device Manager - Then, once the Device Manager window is up, expand the Human Interface Devices list.

Human Interface Devices - Now, from the list of drivers, right-click on the HID-compliant touch screen driver and from the drop down menu, click the Disable device option.
- Once you have done that, check if the problem is still appearing.
Reinstall Drivers
Like we have mentioned above, the problem usually appears when you have a problem with the drivers that are installed on your computer. This includes the display drivers as well as the mouse controller drivers.
When this happens, you can resolve the issue in question by simply reinstalling the mentioned drivers on your computer. For the display drivers, there are actually two ways you can go about it. First, you can let Windows install the drivers automatically for you which is usually fine but they may not be the latest ones available. Second, you can manually download the drivers from your GPU manufacturer’s website and install them on your computer. This will get you the latest drivers that are available for your graphics card. With that said, let us show you how to reinstall the drivers:
- First of all, right-click on the Windows icon on the taskbar, and from the menu that appears, click the Device Manager option.
Opening up Device Manager - Now, on the Device Manager window, expand the Display adapters list.

Device Manager - Right-click on your GPU driver and from the drop-down menu, click the Uninstall device option.

Uninstalling Graphics Driver - After that, if you wish to manually install the latest drivers, head to your manufacturer’s website and download the latest drivers available for you.
- Install these drivers before you uninstall the mouse driver.
- Once you have done that, expand the Mice and other pointing devices list.
- Right-click on the HID-compliant mouse option and click the Uninstall device option.

Uninstalling Mouse Driver - After that, go ahead and restart your computer.
- Once your PC boots up, see if the mouse flickering issue is still there.
Perform a Clean Boot
Finally, if none of the above-mentioned methods have helped you, the problem may not be related to your drivers but rather a third-party application that is installed on your computer. There have been several reports of users where they experienced such an issue due to third-party software. This includes Autodesk, HP Simple Pass, and more that may not be known.
To verify this suspicion, you can perform a clean boot which will start your computer with only the required services enabled. This means that all of the third-party applications will be disabled and thus they won’t be able to cause the issue. If the problem goes away on a clean boot, then it is obvious that a third-party application is a culprit. In such a case, you can start the services one by one to figure out which application is causing the issue. Follow the instructions given down below to perform a clean boot:
- First of all, open up the Run dialog box by pressing Windows key + R on your keyboard.
- After that, in the Run dialog box, type in msconfig and hit the Enter key.

Opening up the System Configuration Window - This will open up the System Configuration window.
- Switch to the Services tab and click the Hide all Microsoft services checkbox.

Hiding all Microsoft Services - After that, click the Disable all button provided and then follow it up by clicking Apply.

Disabling Third Party Services - Then, switch to the Startup tab and click on the Open up Task Manager option.

Opening up Task Manager - In the Task Manager window, click every application one by one and then click the Disable button at the bottom on the Startup tab.

Disabling Third Party Startup Applications - Once you have done that, go ahead and restart your computer to see if the problem fades away.
- In case it does, simply start the services from the Services tab one by one and see which application is causing the issue.