How to Make MP3 Files Louder? (Increase or Decrease the MP3 File Volume)
Most MP3 files will have a little difference in volume. Some will be pretty loud and others will be a bit low volume. Sometimes the speakers or sound devices also play a role in the volume of audio files. There are some quality-dependent devices, which will play the audio files in low volume which can be an issue. In that case, there are applications that provide a feature for increasing or decreasing the volume. Users can use these applications to make the MP3 files loud or soft depending on their requirements. We will show you methods through which you can easily change or adjust the volume for single or multiple audio files.

Increase or Decrease Volume for Single Audio
Use the Audacity Program
There are several different methods in Audacity for changing the volume accordingly. In the below steps, we have used the gain and amplify options. The amplify option will show the max allowed value for the track when opened. That means the number is limited before the waves hit the limit and go beyond the track space. Both options are pretty useful, you can check them and experiment with them according to your need and MP3 file.
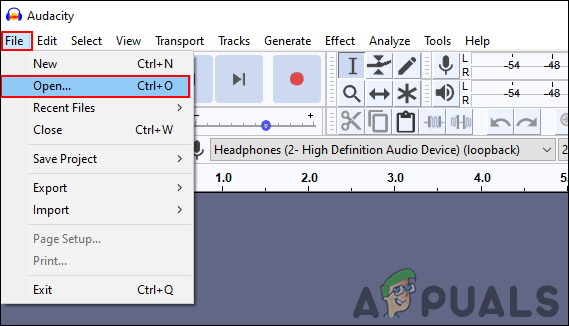
- Open the Audacity program by double-clicking on the shortcut or searching through the Windows search feature.
Note: If you don’t have it installed, simply go to the Audacity official site to download and install it. - Click on the File menu in the menu bar and choose the open option. You can also simply drag and drop the audio file in Audacity.
Opening file - Now select the track and on the left side, you will find the control for gain. You can use the small bar to make the MP3 file louder or softer according to your requirements.
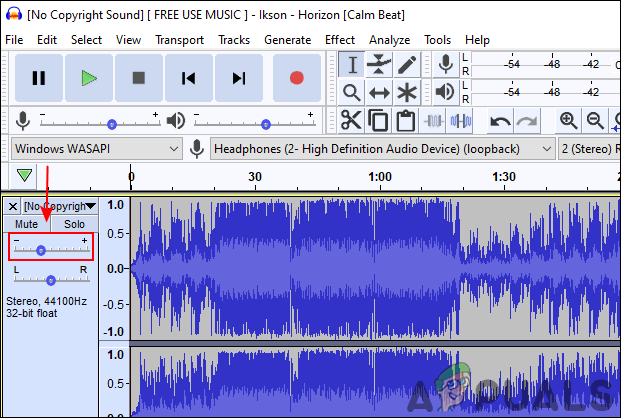
Using gain feature to increase or decrease volume Note: You can also use the Left and Right bar to normalize the balance for the MP3 file.
- Another way is to select the track and click on the Effect > Amplify option. You can make your mp3 louder or quieter using this option It will also provide the same option for increasing and decreasing the volume of the track.
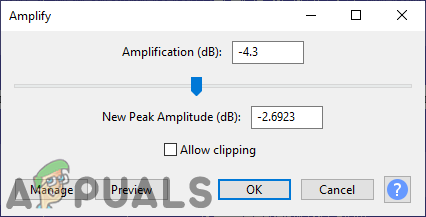
Using Amplification for volume - After that, click on the File and choose the Export > Export as MP3 option. Provide the path and name for the file, then click on the Save button.
Use the Online Converter Site
The online method will save both your time and space for achieving this task. However, each site will provide a different feature for volume conversion. Unlike Audacity, it may not provide the preview option and you might have to spend more time on it. We are using the OlineConverter to demonstrate the method, however; you can also use the mp3cut site for a more friendly interface. Depending on your MP3 and requirements, you can check the below steps to test it out:
- Open your browser and go to the online converter site. It has a feature for increasing and decreasing the volume of MP3 files.
- Click on the Choose File button and upload the MP3 file for which you want to change the volume.
- Click on the volume menu and choose the Increase or Decrease option with a different percentage.
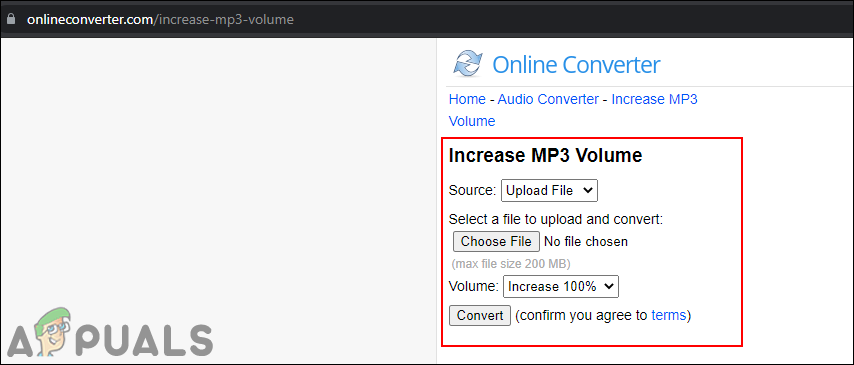
Uploading audio and changing volume - Finally, click on the Convert button to start uploading the file and convert it with defined volume.
- After the conversion is completed, click on the Download Now button to save the file again to your computer.
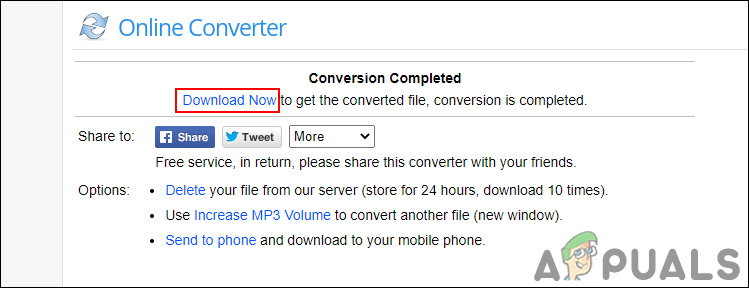
Downloading the audio file back to the system
Increase or Decrease Volume for a Specific Part of MP3
Using the Audacity to Change Volume for Selected Area in Track
The audacity application also provides the option to edit a specific part of the audio file. The selection tool can help in selecting a specific part of the track. After selecting a part of the audio track, you can use the amplification effect to increase or decrease the volume of that part. Check the below steps to see how you can manage to do that:
- Open the Audacity application through the Windows search feature or shortcut.
- Click on the File menu and choose the Open option to open the audio file. You can also drag and drop the file.
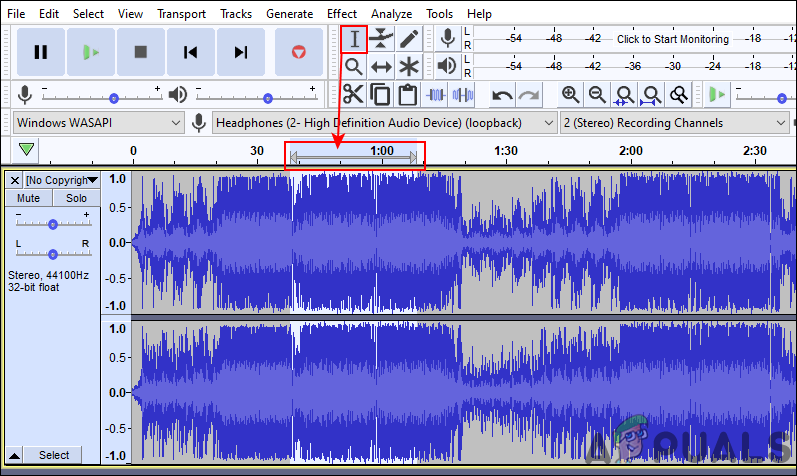
- Now make sure the selection tool is selected. Click and hold mouse left-click from one point to another in the track.
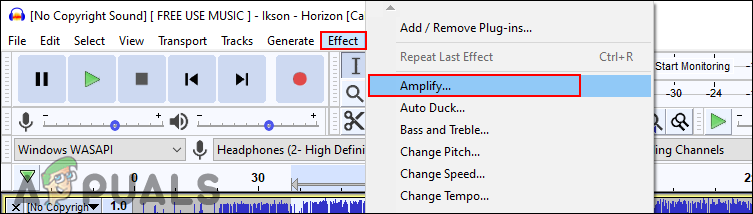
Selecting part of the track - Once the section is selected, click on the Effect menu and choose the Amplify option.
Using Amplify feature - Now change the amplification for that specific section and click Ok. It will only change the volume for the selected area.
Increase or Decrease Volume for Multiple Audio Files at Once
Use the Audacity to Adjust Volume for Multiple MP3s
Audacity is a free, open-source, and cross-platform audio software. It is used for a wide range of different projects, including recording audio, creating music, and editing audio files. It also has the option of increasing and decreasing the volume of audio files. You can also apply the changes for multiple files automatically, rather than doing one by one. Check the below steps to see how to increase or decrease volume for multiple audio files:
- Open the Audacity application by double-clicking on the shortcut or through the Windows search feature.
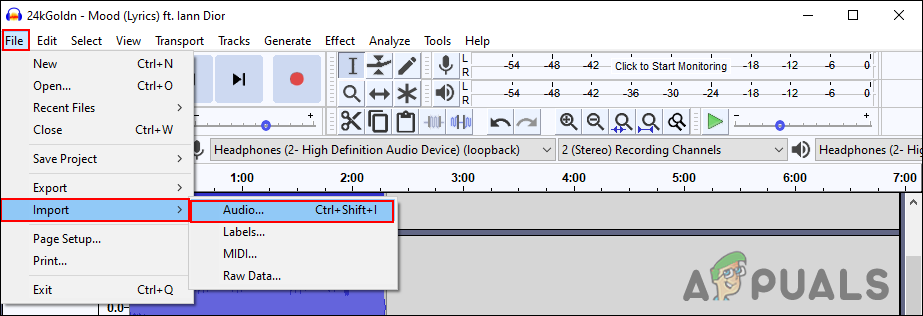
Note: If you don’t have it installed, simply go to the Audacity official site and download it. - Click on the File menu and choose the Import > Audio option. Navigate to your MP3 files, select them all and click on the Open button.
Opening multiple audio files Note: You can also simply drag and drop the MP3 files in the Audacity.
- Press the Ctrl + A to select all tracks, click on the Effect menu in the menu bar, and choose the Amplify option.
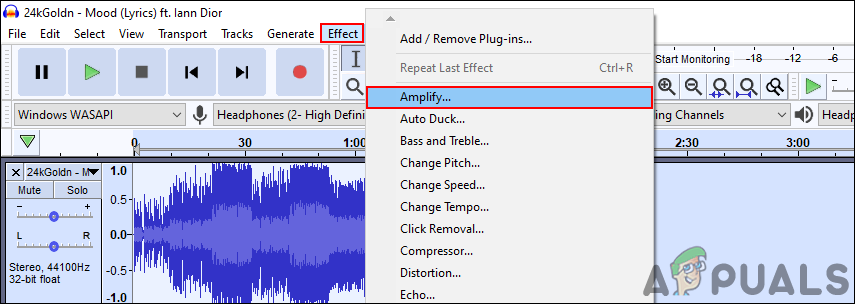
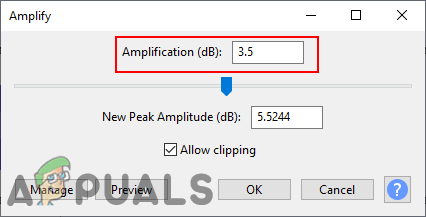
Applying Amplify effect on all tracks - Now change the amplification decibels (dB) to whatever you are trying to change.
Note: If you want to decrease it, then go to the minus side. - For increasing the volume, you need to select the allow clipping option to confirm the action. For decreasing you don’t need to use the allow clipping option. Click on the Ok button once you are done with settings.
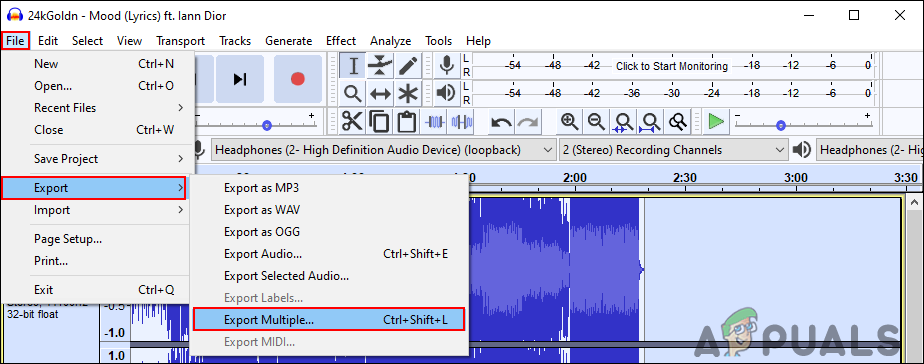
Adjusting the amplification - It will apply amplification to all the tracks. Now click on the File menu, select Export sub-menu, and choose the Export Multiple in the list.
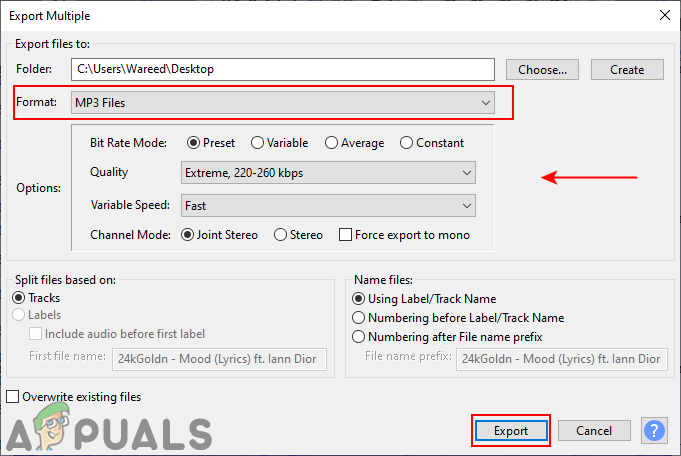
Exporting files - Configure the Path, Format, and other settings for the audio files that you want to export. Click on the Export button to start saving files.
Configuring settings before exporting
Another way to do this in the Audacity application is by using macros. You can create a new macro that will do the amplification and exporting automatically for all tracks.
- Go to the Tools menu and select Macros.
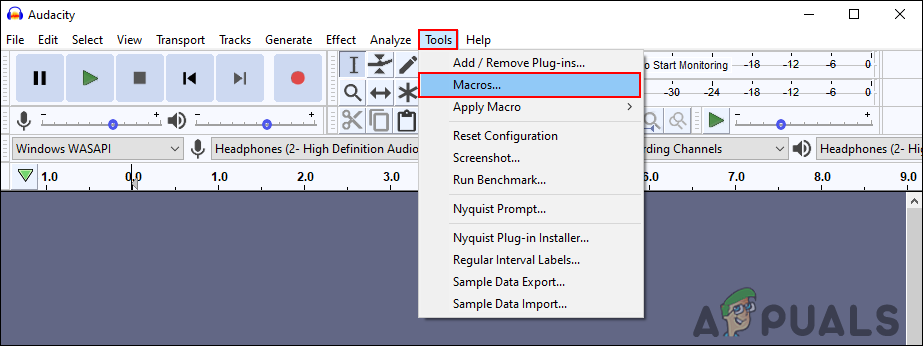
Opening macros tool - Click on the New to create a macro and provide any name that you want. Now click on the Insert button on the right side and choose the Amplify effect. You can also Insert another for “Export as MP3“.
- Select Amplify and click on the Edit button. Change the Amplification dB that you want to apply for all the tracks.
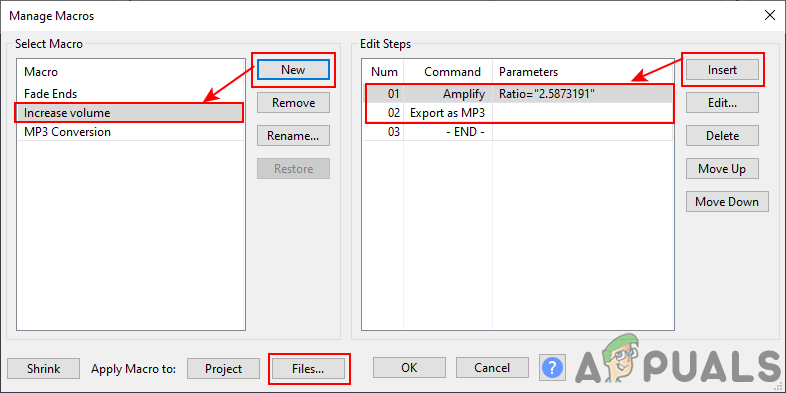
Creating new macro and adding effects - Now click on the Files button in the same window and select the files that you want to apply this effect for.
Note: If there is already a project opened in the Audacity, you must close it to select new files. - Click on the Open button, it will start applying the effect and exporting automatically.
- The files will be saved in the same directory with a folder named “macro-output“.
Use the MP3Gain to Change Volume on Multiple MP3s
The MP3Gain is software used for audio normalization. It analyzes the audio to determine how loud it sounds to the human ear. After that, it will adjust all the audio files with the same loudness without any quality loss. If the volume is low for some files, it will increase it and if the volume is high then decreases it. However, you can also directly increase or decrease it manually; make sure it doesn’t ruin the quality.
Note: Make sure you create the backup of your audio files before applying this method.
- Open your browser and download the MP3Gain application. Install the application by following the instructions.
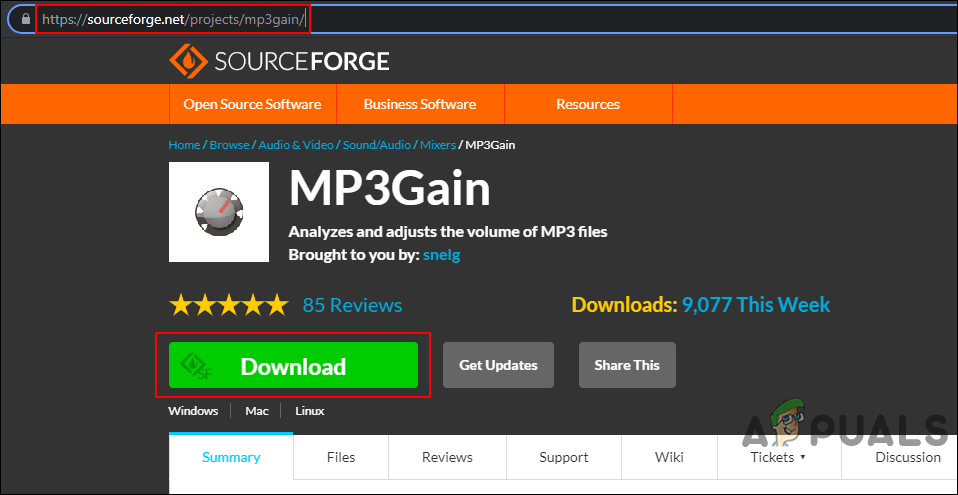
Downloading MP3Gain application - Now open the MP3Gain application by searching it through the Windows search feature.
Note: If you get a component mscomctl.ocx error, you can fix it by checking it here. - Click on the Add Files icon to add the audio files that you want to adjust. You can also simply add a full folder by clicking on the Add Folder option.
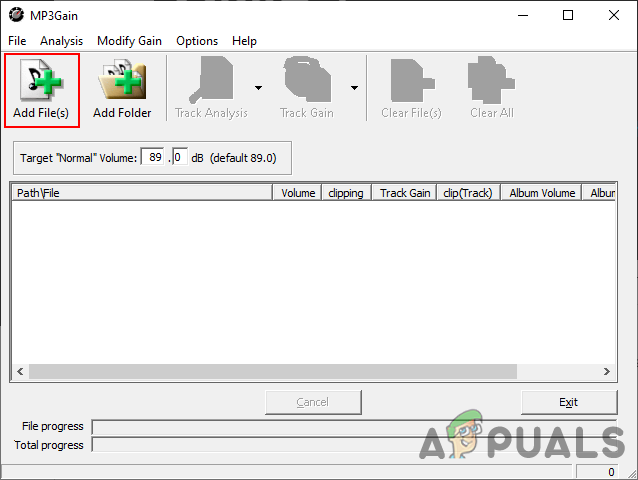
Adding audio files to MP3Gain Note: You can create a backup before doing this because the MP3Gain will simply change the volume of your original files.
- If you want to fix the volume of all files that are high or low to the default value, click on Track Analysis. It will show you the plus and minus value that will apply on track.
Note: 89 dB is the default value in the MP3Gain.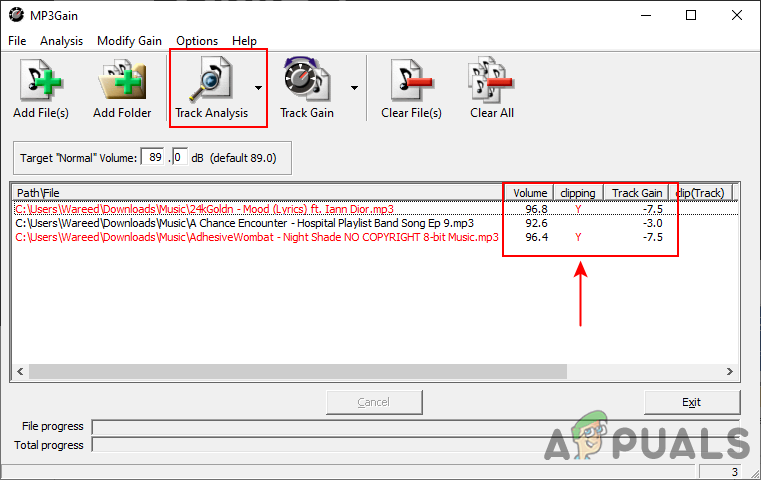
Using Track Analysis for all files - Click on Track Gain to apply the default value to all audio files.
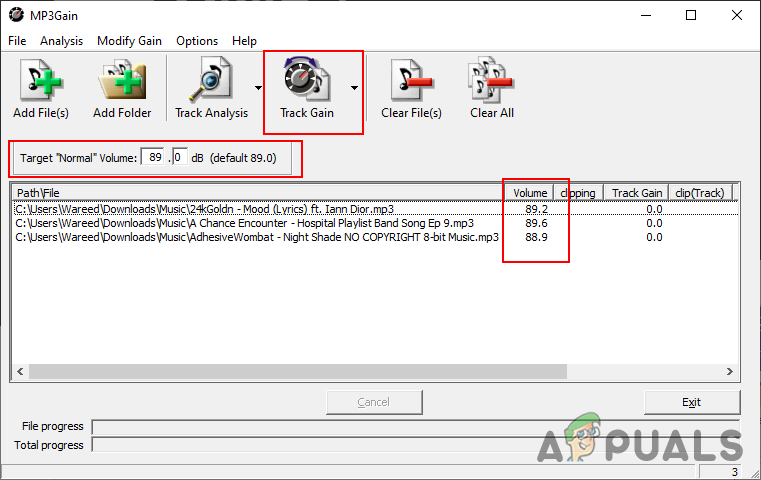
Applying Track Gain on all files - You can also add a custom dB value by changing the default one and using the Track Gain option to change the volume for all.
Note: Sometimes it will mess with the quality if the value is too high.