How to Unlock and Root HTC U12 Plus
The HTC U12+ is a powerful phone that comes with 6GB of RAM, the Snapdragon 845 SoC, and 64/128GB of internal storage. Rooting this phone is fairly easy, once you have the bootloader unlocked.
In this guide, we will show you how to unlock and root the HTC U12+. Follow our directions exactly, and comment if you experience any issues! Note: Unlocking your bootloader performs a factory reset on your device, make sure you backup all important personal data.
Unlocking the Bootloader
- Create an account on HTCDev.com and follow the unlocking process. Leave the page open where it requests an identifier token.
- Shut down your HTC U12 and boot into Bootloader Mode (Volume Down + Power).
- Choose Fastboot mode, and connect your HTC U12 to your PC via USB cable.
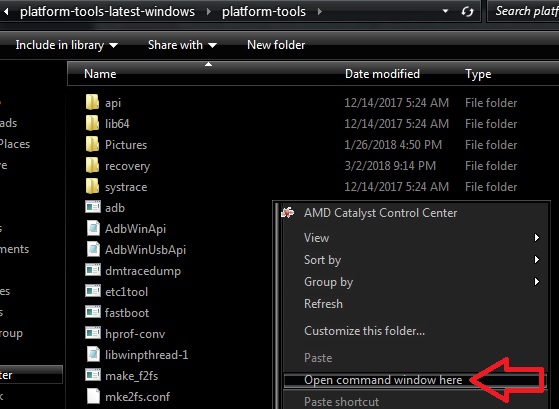
- Launch an ADB terminal on your PC (hold Shift + right click in your main ADB folder and choose ‘Open a Command Window Here’).
- In the ADB terminal, type: fastboot oem get_identifier_token
- The prompt will display a long string of text, copy it into the HTCDev request page.
- You’ll receive an email from HTC with a link to download unlock_code.bin, so download and save it in your main ADB folder (next to ADB.exe).
- In the ADB terminal, type: fastboot flash unlocktoken Unlock_code.bin
- Now follow the instructions on your HTC U12 screen to complete the bootloader unlock process.
Root HTC U12 with Magisk and Temporary TWRP
- Download the Magisk zip here and transfer it to your SD card.
- Download this version of TWRP.
- Place the TWRP .img file in your main ADB folder.
- Place your HTC U12 into Fastboot Mode, and launch an ADB terminal on your PC.
- In the ADB terminal, type: fastboot boot twrp.img
- This will reboot your HTC U12 into TWRP, without installing TWRP. It is only temporary for now.
- In TWRP main menu, tap Install > External SD > Magisk.zip, and swipe to flash it.
- You can now reboot to system. Find Magisk Manager in your apps list to verify root.
How to Root with Patched Boot.img
- Download and install the latest Magisk Manager APK.
- Download a boot.img from the same firmware version as the one you’re currently on (check Settings > About). This XDA thread provides a handful of firmware .zip files, and you can extract “boot_signed.img” from the firmware .zip
- Transfer the boot_signed.img to your SD card.
- Launch Magisk Manager app, and tap “Install” followed by “Patch Boot.Img File”. Choose the boot_signed.img you just transferred to your SD card.
- Allow Magisk to patch it.
- Download this version of TWRP, and place the TWRP .img in your ADB folder.
- Put your HTC U12 into Fastboot Mode, and connect to your PC via USB.
- Launch an ADB terminal and type: fastboot boot twrp.img
- In TWRP, tap “Reboot” (but don’t actually reboot) – this will show you the active A/B slot. Switch to the inactive slot, and then back to the active slot.
- Tap Install > find the patched boot.img, and swipe to flash it
- Tap Reboot > System.
- You should now be rooted.
How to Root HTC U12 – No TWRP Method
- Follow the previous method for creating a patched boot.img using Magisk Manager.
- Enable USB Debugging on your HTC U12 in Settings > Developer Options (Settings > About > tap Build Number 7 times to enable Developer Mode).
- Launch an ADB terminal on your PC, and connect your HTC U12 via USB.
- Type this command into ADB terminal: adb pull /sdcard/MagiskManager/patched_boot.img
- Now reboot into Download Mode with: adb reboot download
- Check which A/B slot your HTC U12 is using: fastboot getvar current-slot
- It should return either A or B, you want to flash to the active slot: So in ADB type: fastboot flash boot_a patched_boot.img or fastboot flash boot_b patched_boot.img.
- If the flash was successful, you can type: fastboot reboot
Post-Root Fixes
- After rooting your HTC U12, you may find that “Face Unlock” is greyed out. There is an easy fix.
- Launch the Magisk Manager app on your device, and in the side menu, tap Magisk Hide.
- It will present a list of apps to try and hide root status from, choose FaceUnlock.
- Go to Settings > Apps > FaceUnlock > Cache / Data, and delete the data.
- Reboot your HTC U12, and FaceUnlock should now be working again.