How to Optimise and Debloat the Samsung Galaxy S10
The Samsung Galaxy S10 / S10+ is the latest flagship device from Samsung. It isn’t rooted yet, though Magisk developer topjohnwu has been working hard on a reliable Magisk root method. There are some problems being encountered though, mostly related to how Samsung treats the bootloader process.
Samsung’s customized bootloader does not follow traditional bootloader logic, and unless someone is able to develop an init-only UI like a dual-boot menu, we probably won’t be seeing TWRP and Magisk at the same time on the Galaxy S10 for the foreseeable future, which means development of a systemless root method is pretty stunted. A system root method is possible, but as we said, topjohnwu is experiencing difficulty. Patience is key!
While we wait for a reliable method to root the Galaxy S10, there are still some things you can do to optimize this flagship device out of the box. In this guide, we are going to show you how to safely debloat the Samsung Galaxy S10, and optimize the battery life with a few essential tweaks.
Snapdragon vs Exynos
According to some tests from XDA forum users, it appears the Exynos version of the Galaxy S10 performs considerably better in power consumption, compared to the Snapdragon variant. With the tweaks we’re going to be showing you, most Exynos users were able to achieve these battery times:
- 7 – 9 hours screen on time: 4G only, maximum brightness, using navigation apps.
- 9 – 12 hours screen on time: 4G, 50% brightness, watching videos and messaging apps.
- 12 – 15 hours screen on time: Minimal brightness, no 4G.
Debloating Apps
It’s a good idea to disable apps you aren’t using. You can do this in Settings > Apps, tap the app you want to disable, and then just tap the “Disable” button.
For example, if you are using Gboard as your keyboard, disable Samsung Keyboard. If you switch to a different home launcher, disable the OneUI Home and Bixby Home. By disabling unused apps, you will greatly reduce overall RAM and CPU usage, as well as wakelocks and alarms.
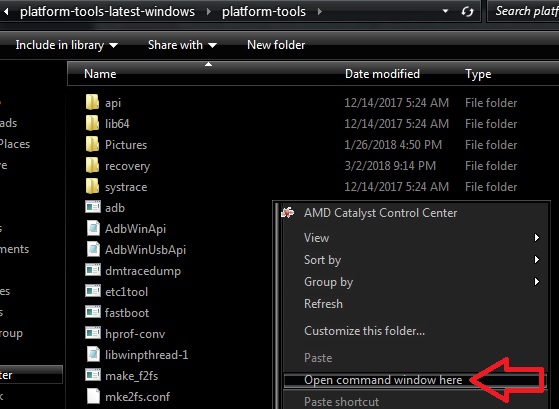
For debloating the Galaxy S10, you need to do this through ADB. See this Appuals guide “How to Remove Bloatware from Android without Rooting via ADB”.
See this list of apps you can safely remove from your Galaxy S10. If you remove Bixby apps, you can replace it with something like Button Remapper.
Themes
Switching your Galaxy S10 to the Black / Night theme will reduce power consumption. The Quickpanel has a shortcut to enable a system-wide Night mode, which also themes a few Samsung apps. If battery is a concern, this should always be enabled.
For the Quickpanel itself, its actually only 85% black, and it forces the Galaxy S10 to drop a few frames whenever it is called up. This is because the Quickpanel blurs the background, which is a taxing effect on the device.
To rectify this, you should download the Good Lock app from the Galaxy Store, then launch the QuickStar module and set BG color to pure black, and disable blur effect.
For the keyboard, Gboard and Samsung keyboard are your best options for ad-free keyboards that offer black themes. A black keyboard theme will result in 30% energy savings while typing, and you should also disable anything like vibrate on typing, typing sounds, etc.
Replace the Launcher
The OneUI Home launcher can appear very elegant, but its ridiculously taxing on the GPU, as it uses a lot of effects (mainly blurring). We recommend replacing the home launcher with something like Nova. In a side by side comparison, Nova dropped zero frames, while OneUI drops frames every time the app drawer is pulled up.
Wallpaper
You should definitely disable animated wallpapers, stick to static wallpapers. Darker wallpapers also have a positive impact, but strangely, not very much.
Connectivity
You should disable various things like “Nearby device scanning”, which is actually used to push ads to you when you’re near malls and points of interest. It’s a form of tracking, really, that also ends up draining your battery.
You should also disable everything under Biometrics and Security > Location > Improve accuracy. You really don’t need this, as modern GPS systems are highly accurate, and scanning for WiFi or Bluetooth for GPS coordinates is just extra work your phone has to do that offers no real benefit in return.
FHD+ vs WQHD+ Display
FHD+ and WQHD+ appear almost exactly the same to an untrained eye, you probably need a microscope to really tell the difference. For that reason, you can pretty much stick to FHD+, as WQHD+ will cause your GPU to process 23% more pixels. This cuts about 30 minutes off your average battery time, and 25% less autonomy in 3D games.
Don’t Use Battery Monitors
Battery monitor apps can actually drain your phone by logging what every app does. You only need a battery monitor if you’re trying to watch for rogue apps that drain your battery, not for normal usage.
Samsung Apps
Samsung’s Device Care is overall a good app, but it shouldn’t be ran manually and used as an app-killer. The best approach is to enable Auto-Optimization, and set it for some late night hours, such as when you’re sleeping. You should also enable auto-restart, incase you’re the kind of person who almost never restarts your phone.
You should disable the built-in “security”, which is just McAfee-sponsored stuff you don’t need. It is actually disabled by default in the EU, because it is considered a tracker. To disable it, go to Settings > Apps > Device Security > Wipe Data.
Android honestly does not need antivirus, unless you are constantly downloading shady apps from third-party app stores. Its true that Google Play is also full of adware. Really the best approach if you’re worried, is to maybe install an antivirus that you manually run every once in a while, but do not allow it to constantly run background activity.
Battery Settings
There are a few profiles to choose. Optimised profile is great, but you can try Medium Power Saving if you experience device lag with the Optimised profile. You can also enable Adaptive Power, which makes your Galaxy S10 silently switch between Optimised and Medium Power Saving, depending on your app usage (it learns from you). It also will enable Medium Power Saving on less than 25% battery.
Putting Apps to Sleep
Samsung actually offers a built-in app sleeper, which is great since we don’t have root yet to use apps like Greenify. Simply go into Settings > Device maintenance > Battery > Always sleeping apps. You can then add pretty much every app to the list, unless you absolutely need notifications from the app.
Disable Animations
You need to enable Developer Options for this. Go into Settings > About phone > Software information > tap on ‘Build Number’ 7 times to unlock developer mode.
Next go into Settings > Developer Options > Animations. You can set the animation speed to .5x for a good balance, and then disable additional animations found in Advanced Features, and Remove Animations found in Accessibility > Visibility Enhancements.
Ad-Blocking
Some adblockers can drain battery (writing logs, consulting whitelists, etc). We recommend using Adhell, which was designed with Samsung devices in mind. You can then important a hosts list from this master collection of hosts lists. In Adhell, make sure you whitelist the Analytics domains, or else they’ll be spammed as Android will keep trying to reach them until they’re whitelisted.
A good alternative to Adhell is Blokada, which is a VPN-based adblocker which doesn’t seem to have battery impact. You can use it with a hosts file and then enable “Always On” so the Android system doesn’t kill it.
Additional Tips:
Google’s Play Services is a known battery drain, especially if you use the “restore apps / backups” function to import stuff from an older device. You can go here to clear your accounts and past locations. It won’t clear your Drive / Photos, we just want to register your device as a new device to Google.
You can then go into Settings > Apps, and wipe data for Google Play Services and Google Play Store.
After that, shutdown your Galaxy S10, then hold Volume Up + Bixby + Power, and when the Android logo appears, release all of the keys. You’ll see a message “Installing system update”, and then the Android recovery will appear. Use Volume Down to highlight “Wipe Cache”, and Power to confirm. After the cache has been wiped, you can reboot system.