How to Draw a Wine Glass on Adobe Illustrator
Adobe Illustrator can be a great program to work smoothly on graphics. You can follow the steps below to draw a wine glass with the ellipses, pen and rectangular tool.
- Open Adobe Illustrator to a new artboard.

Open a new Artboard - Select the Ellipses tool from the left toolbar, by clicking the right button of your mouse on the shape tool that appears on the left toolbar.

Select the shape tool, we will use ellipse tool for this - Draw an oval shape. Expand it according to the size you have in mind. If you want it to be small, you can make it smaller. Either way, you can always alter the shape later, but it is always good to start your work in the dimensions you wish them to be in instead of altering the image later.

Draw an oval shape for the top of the glass - You will draw another ellipse, horizontally for the upper portion of a glass.

Horizontal Ellipse for the top part - Select both the shapes by using the selection tool on the left, which is the first tool from the left which looks like a cursor.

Group the shapes - Open Pathfinder by going to Windows on the top toolbar, and as you scroll down, you will find pathfinder as highlighted in the image below.

Pathfinder
Windows>Pathfinder - These are all the settings under pathfinder that can help you make an image.

options under pathfinder to edit image - For the top part of a wine glass, you will select the second option, which is
‘Minus Front’, to make the shape look more real. You will select the shapes, press Alt on your keyboard, and click this tab for Minus Front.

- Once step 8 is done, you will ungroup the shape, and find the shape like this.

Ungroup the shapes. 
The top end has become a separate shape after applying the minus effect You can remove the top part of the ellipse now.

Delete the extended part And draw another ellipse to add a real impact to the Note: the width of the ellipse on the top should not be too wide, otherwise, it will not look like a wine glass.

Draw another ellipse to give the depth impact 
Your top part of the glass is ready - Now, select the rectangle shape tool from the same tool from where we selected our ellipse tool. We will now make the stem using the rectangle tool.

Select the rectangle tool now - Draw a rectangle.

draw a rectangle according to the top of the shape. Make sure it is not too wide - Curve the edges. The options for curves appear when you click on the lines of the shape.

making the edges of rectangle curvy - To curve the stem from the center, you will first go the pen tool icon, select the pen tool, make anchor points on the rectangle that you just drew, and select the Anchor Point Tool.

adding anchor points, and adding a curve to the center part of the stem - Once the Anchor Point Tool is selected, you will now choose the direct selection tool, and slightly curve the center lines of the stem. To make it look more like a wine glass.

Curved Stem - You can draw the ellipses for the stem, after the previous step as well. Once you have made them, you will now Unite the shape using Pathfinder.

After drawing the ellipse for the stem, unite them Your stem will look something like this now.

United Draw another ellipse for the base of the wine glass.

The base of the glass This will be larger than all the ellipses that you have made for the wine glass. This is because the glass has to stand on this. If you look at a wine glass, in reality, you will notice that the base of the glass is wider than the rest of the glass so that it can stand on any surface without falling.
- Select the shape for the stem and the base, and group it.
- To make the stem a part of the glass, I simply placed the stem at the back of the top part of the glass. This can be done by clicking right on any shape that you want to move to the back and transforming it, by sending it back or to the front.
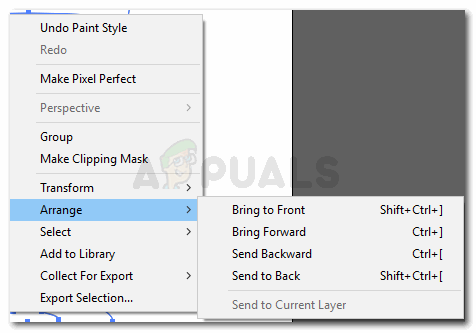
Arrange - To change the color of the glass, select the whole shape, go to Effects on the top toolbar, and click on Stylize. Click on Inner Glow from the options that appear.A box will appear. You can change the color of the glass, by clicking on the white icon in front of mode. Where the code of a color is written, you will write the following code there for a glass effect, and shift the mode to ‘Multiply’.

Adding the glass color You will also remove the outline color of the glass, to show the glass impact.

Remove the outline