How to: Disable User Account Control (UAC)
User Account Control, often abbreviated as UAC, is a security feature that Microsoft introduced to the Windows Operating System a while ago with the release of Windows Vista. While UAC is designed to enhance the integrity of the Windows OS and help protect it from outside use and other threats, many a Windows user believe it to be nothing more than a nuisance that not only notifies them but also asks them for confirmation when they do even the littlest of things – from installing new software to simply accessing the Registry Editor or opening a Command Prompt that has administrative privileges.
Microsoft means well with UAC, but the fact of the matter is that most Windows users don’t like to be bugged by UAC about almost every single thing they do. For those of you who value your freedom on your Windows computer a tad bit more than a small yet practical security feature, Windows has left the ability to completely turn User Account Control off to the user. However, it would be wise to understand that disabling UAC is likely to leave your computer vulnerable in more than one ways. If you want to disable User Account Control nonetheless, here’s how you can do so:
On Windows 7 and Vista:
Option 1: Turn UAC off manually
The easiest, although not the shortest, route to disabling UAC on Windows Vista and 7 is doing so manually. To turn UAC off manually, you need to:
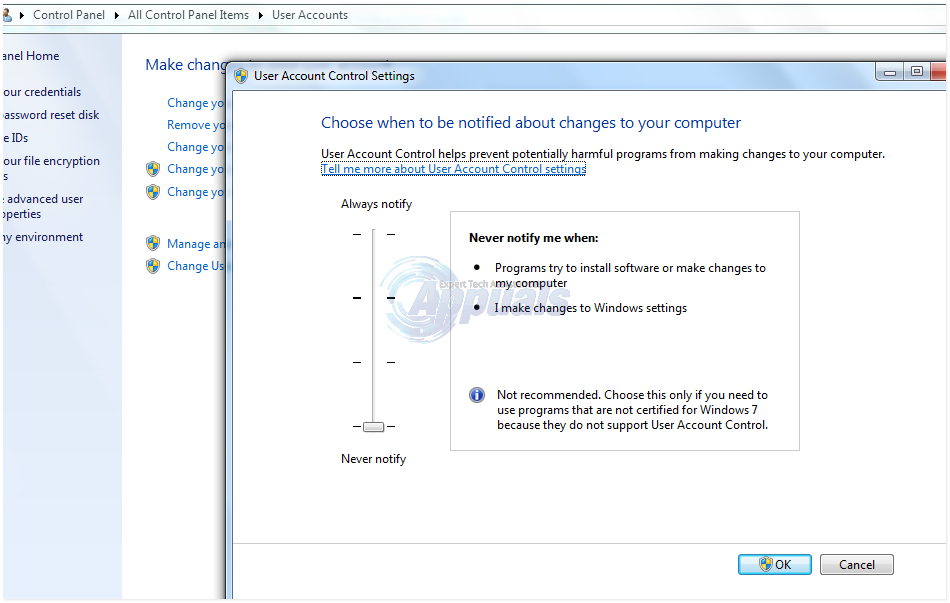
Open the Control Panel -> Navigate to User Accounts and Family Safety > User Accounts -> Open your User Account and click on Change User Account Control settings.
The UAC slider has four positions. Move the slider to the bottom-most position, which is the Never notify
Click on OK. If prompted by UAC for confirmation, confirm the action.
Restart your computer. The change will take effect and UAC will be disabled as soon as the computer restarts.
Option 2: Turn UAC off using Disable UAC
Disable UAC is a piece of freeware capable of disabling UAC on a Windows Vista/7 computer that is only 115KB in size, does not require the user to install it on their computer and has been around ever since Windows Vista was introduced to the world. To turn UAC off using this option, you need to:
Click here and download Disable UAC.
Launch Disable UAC.
Select Disabling UAC (User Account Control).
Click on Apply.
Restart your computer.
This program can also be used to enable UAC after disabling it, but if you do not plan on using it anytime soon after disabling UAC, you should feel free to delete it.
On Windows 8:
Open the Control Panel.
Navigate to User Accounts and Family Safety > User Accounts -> Open your User Account and click on Change User Account Control settings.
Move the slider to the lowest position – the Never notify
Click on OK. If prompted by UAC for confirmation, confirm the action.
Restart your computer.
While moving the UAC slider to the Never notify position completely disabled UAC on Windows Vista and 7, it does not do so entirely on Windows 8 for, according to Microsoft, the user’s own protection. While doing so does disable almost all UAC features, it leaves some – such as UAC prompts for when an application tries to modify system settings – still active, arguably for the user’s own good. However, there is a way to disable even these features in Windows 8, although it will also result in you receiving a “This app can’t open” error whenever you try to launch a Metro style application. To disable the leftover features of UAC, you need to:
Press Windows Logo key + R to open a Run. Type regedit into the Run dialog and press Enter.
In the left pane of the Registry Editor, navigate to the following directory:
HKEY_LOCAL_MACHINE\SOFTWARE\Microsoft\Windows\CurrentVersion\Policies
Click on System in the left pane to have its contents displayed in the right pane.
In the right pane, locate and double-click on a value titled EnableLUA.
Replace whatever is in the Value data field with 0. Click on OK. Close the Registry Editor. Restart your computer.

On Windows 10:
Option 1: Disable UAC manually
Open the Control Panel.
Navigate to User Accounts and Family Safety > User Accounts -> Open Your User Account and click on Change User Account Control settings.
Move the UAC slider to the bottom-most position – the Never notify
Click on OK. If prompted by UAC for confirmation, confirm the action.
Restart your computer.
Option 2: Disable UAC using a .REG file
You can also disable UAC on Windows 10 by downloading and launching a .REG file designed to set UAC to never notify. To do so, you need to:
Click here to begin downloading the .REG file that you need.
Once the .REG file has been downloaded (it shouldn’t take very long!), navigate to the directory where you downloaded it.
Double-click on the downloaded .REG file to launch it and have its contents merged with your computer’s registry.
If asked if you really want to launch the .REG file, click on Run.
Is prompted by UAC to confirm your action, click on Yes.
If asked if you really want the contents of the .REG file merged with your computer’s registry, click on Yes.
When the contents of the .REG file have been merged with your registry and you receive a prompt that says so, click on OK.
Restart your computer. Once your computer restarts, the change will have taken effect and you should feel free to delete the .REG file that you downloaded earlier.
Note: No matter what method you use to disable UAC or what version of the Windows OS you disable UAC on, you are going to have to restart your computer before the change takes effect. However, in most cases, only disabling UAC requires a restart of your computer and enabling it after it has been disabled does not.