How To Control The Fan Speeds Of Your Newly Built Gaming PC
You can invest in the most powerful and performance promising components. You can overclock and tweak the voltage and clock parameters of your processor, RAM, CPU, and GPU to push their performance to the advertised levels that you’re paying for. You can overclock them even further to hit the maximum manufactured capacity. Beyond that, you can go ahead and trade up for even bigger and better components, but if you’ve got a system that’s overheating, none of your components are going to deliver the performance you’re hoping for and you’ll risk damaging them as well.
Diagnosing The Problem
Before getting into any hardware enhancements or system manipulations, the first thing you want to assess is whether any such system changes are necessary. We’re going to assume that you’re here reading this because you’ve already established that your system is overheating and you’d like to do something to adjust the fan speeds so that it can be cooled down. Regardless, it doesn’t hurt (and, on the contrary, is actually advised) to gain some empirical data on the situation you’re up against. (P.S. getting a sense of this will also give you a good benchmark to compare against to see how far your manipulations have helped).
Hence, before jumping into automated fan controlling, some things you want to look for in an overheating PC are dust build up, placement (and ventilation), and your computer usage. Begin by taking a can of compressed air and blowing it in through the side vents of your PC. You may choose to open up your PCs casing a little bit to perform a deep clean around the components but be careful not to disturb any of the connections or get more dust and debris inside.
Next, check where you’ve placed your PC setup. If it’s kept on an insulating material with limited flow of air (especially around the inflow fan, exhaust, or side vents), that’s going to be your major culprit. It’s no use investing in state of the art cooling technology or optimizing your system’s fan speeds if you’re going to block the airflow and not give your fans anything to work with. Ensure that your PC is kept away from carpeting or cloth-like materials and kept instead on wood, tiles, or glass, that too with a centimeter raise gap from the base material to allow air to flow beneath it and not have direct material contact.
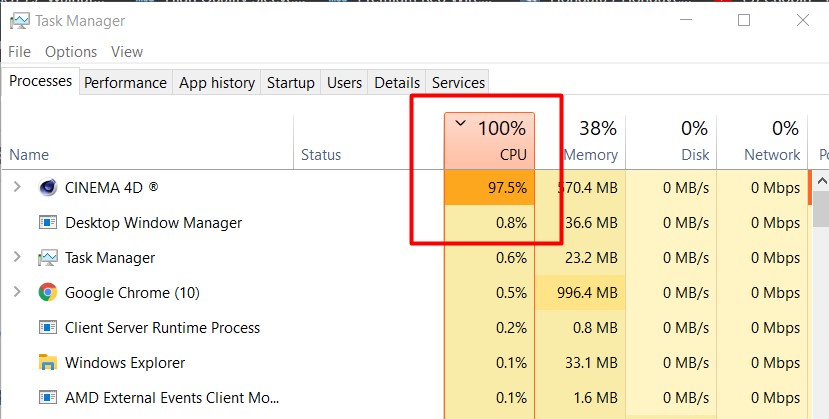
Lastly, open up your computer’s task manager and take a look at the processes that are running in the foreground as well as the background. If there’s anything running, particularly in the background, that is unnecessary or has a high impact on your CPU or memory, it’s best to consider disabling that process or closing that application. Be wary of the startup processes on your computer as well that turn on whenever you boot up your PC and run continuously in the background; turn these off.
Now that you’ve checked and remedied some of the basic things that cause system overheating, switch off your computer. Let it rest for a while and cool down. Then, boot it up again. Observe your starting temperature and check again after about forty minutes of your regular usage (the kind of usage that you want your system to remain cool enough for, whether it’s gaming or basic processing).
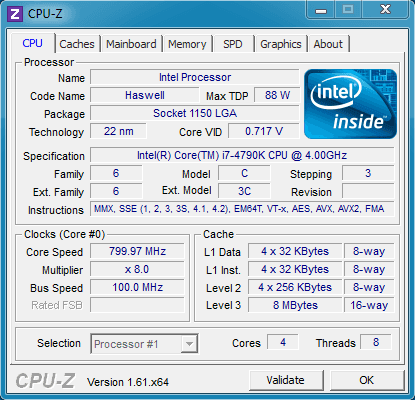
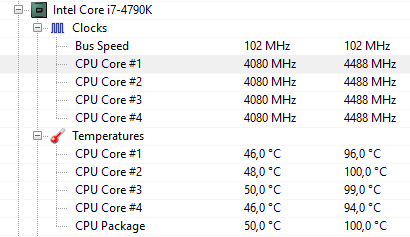
Download the freeware CPU-Z which, by now, through all the optimization guides we’ve made, you should’ve guessed is an incredibly useful monitoring software when it comes to any sort of device overclocking or hardware optimization. Use this to check your system’s temperature both immediately after booting up and forty minutes or an hour into your activity. The recommended temperature ranges and thresholds for different processors vary, but as a general rule, the CPU temperature should not go beyond 80C (170F) and will usually be in the range of 75C to 80C (167F to 176F) in gaming PCs. If you’re hitting the threshold or going beyond it, that is your cue to look into some automated fan speed optimizations.
The reason for having you take all these steps first is to diagnose your overheating problem thoroughly and not directly jump into something that may be unnecessary and may or may not solve the problem. When it comes to any sort of hardware manipulations, always be sure that they’re necessary and viable before performing them.
Software Fan Control: BIOS
Once again, before jumping into system manipulations, you’ll need to understand what parameters your device will let you modify and how you can use those to cool it down. The first thing you need to understand from a hardware standpoint is that the fans interfaced with your motherboard have either 3-pin or 4-pin adapters and the sockets on your motherboard may either be 3-pin or 4-pin as well. A 4-pin socket allows for pulse width modulation (PWM) control which is a signal your system provides the fans that directly correlates with their RPM (speed). 3-pin fans can sometimes be connected to 4-pin sockets but unless all 4 pins of the socket are engaged, you won’t be able to adjust your PWM.
Thus, the line of questioning you need to follow when trying to figure out what exactly you can manipulate is: (note that you will need to open up your PC to observe this)
Scenario 1
Do you have 4-pin sockets on the motherboard?
Do you have 4-pin fan adapters connected to them?
If so, you’ll be able to adjust your fan PWMs to adjust their speeds.
Scenario 2
Do you have 3-pin fan adapters connected to your motherboard?
Does you motherboard allow you to tamper with the voltage? (Check manufacturer guides)
If so, you’ll be able to adjust your fan speeds through the voltage you supply them.
Scenario 3
If scenarios 1 and 2 did not pan out for you, this means that your fan speeds cannot be adjusted through any software manipulations and you’re out of luck. You’ll have to look into manual hardware adjustments instead.
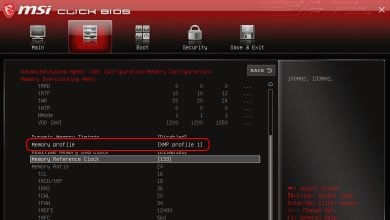
If you’ve concluded that either scenario 1 or 2 are applicable, you can either find your manufacturer’s pre-loaded application on your computer (such as HP CoolSense) which may let you make adjustments to optimize your computer or you may step into your system’s BIOS by rebooting your computer and pressing the appropriate key when it boots up (usually F2, but it will be specified on the startup screen regardless).
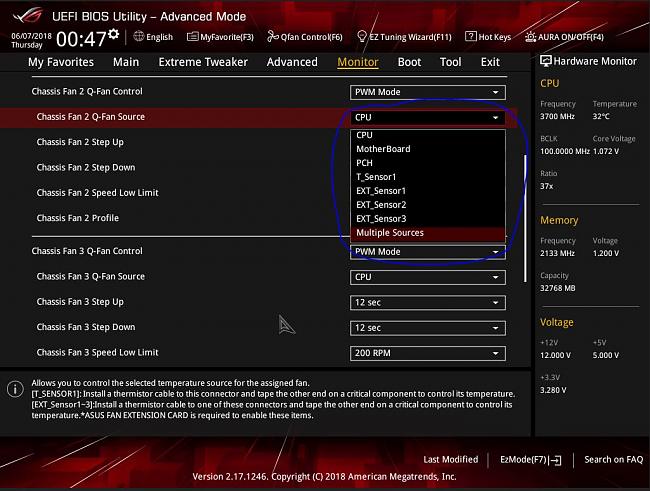
In case you’ve opted to enter the BIOS (after already optimizing your system through the provided application), once you enter the main screen, find a navigation that says “Status” or “Monitor” or something along that line which will vary from manufacture to manufacturer. There should be an option or set of options to adjust the fan speed and target system temperature under that navigation. You may be able to adjust the fan speed through a specified RPM or percentage value. Note that smart fans speed up depending upon how hot your system is beyond the target temperature. If it’s hotter, then your fan will spin faster to cool it down quicker. Your PC health status may also be visible under this navigation to see the impact of the current settings.
The limitation you’ll face in adjusting your fan speeds through the application or your BIOS is that they’ll cater to your CPU temperature and adjust your fan activity accordingly. Knowing you have a particular component in your system that heats up more than the rest or creates heat pockets in certain areas and heats up the entire system, you may choose to program your fan speeds so that they gauge that component’s temperature (i.e. a hard disk) to decide whether to speed up or slow down. For this, you’ll need to perform some more advanced system manipulations. Lastly, if you’re running your PC on and old stock cooler, now is the perfect time to replace it with something similar to these coolers.
Software Fan Control: Advanced
Perform component targeting manipulations only if you’ve diagnosed particular components as overheating troublemakers with certainty. For this, you’ll need to download and install an application called SpeedFan. Once you’ve set it up, enter your BIOS and disable your fan settings so that they don’t interfere with the adjustments you’ll make via SpeedFan. Note that some motherboards or fans are not compatible with the software so you will have to check your compatibility before you begin.
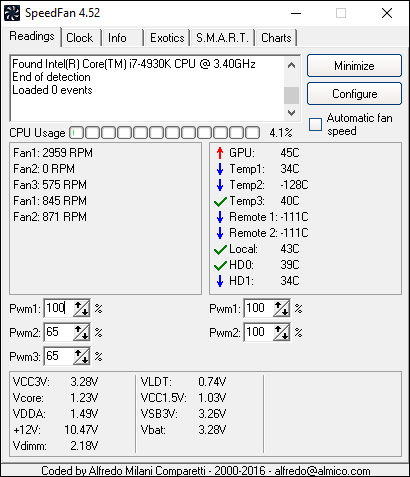
When you launch the application, on the main screen under the “Readings” tab, you’ll see all of your fan speeds listed down. On the right side of the screen you’ll see temperature readings across the different components in your PC, including the GPU temperature and hard disk temperatures as well.
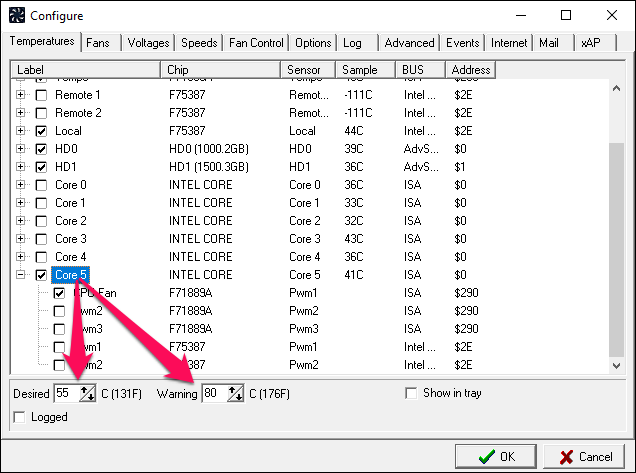
When you open up this application, you’ll instantly notice a few things. Firstly, this application does not clearly label the temperature readings, so you’ll have to spend some time understanding which temperature corresponds to which component or area. Secondly, some of the readings do not make sense. For example, you cannot have a -111C temperature in any area because that is virtually impossible in a PC from a physical standpoint. These readings are false readings displayed for areas where sensors are not present. Thirdly, you’ll notice that not all system temperature readings are present. For this, you can configure more of the inbuilt sensors through the “Temperatures” tab and select the ones you’d like to see.
To make your fan speed adjustments, in the configuration menu (where you were able to add more sensors), head into the “Advanced” tab and set the “Chip” to the motherboard you’re using. If you’ve got multiple chipsets, then you may need to tweak the settings for all of them individually by selecting them in the drop down menu one by one.
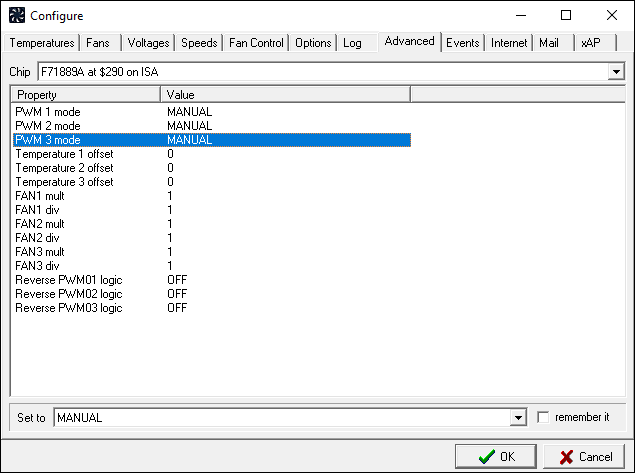
Once you’ve selected a chipset, ensure that all of your PWM modes are set to “Manual.” Next, head into the “Options” tab (in the same line as “Advanced”), and check the box that says “Set fans to 100% on program exit.” The reason for doing this is to ensure that in case you close SpeedFan, your system will automatically kick up your fans to 100% capacity and not let your system overheat if nothing is actively controlling the fans. You can save and exit this menu now and head back to the main screen where you’ll see controls towards the bottom to adjust your PWMs.
You can raise the PWMs to increase your fan RPMs. You’ll have to identify which PWM corresponds to which fan yourself, owing to the poor labelling and the fact that different PCs are configured differently resulting in a world of possibilities. You can also rename your fan labels by heading back into the “Configure” window and renaming them under the “Fans” tab. This will give you a better sense of which parameter you’re adjusting after you identify which vague label corresponds to which fan.
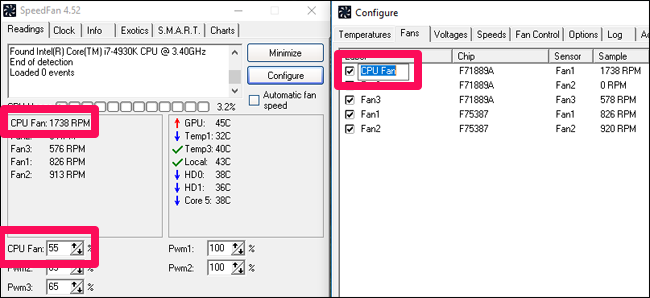
Under the “Temperatures” tab in the “Configure” window, you’ll be able to set the “Desired” and “Warning” temperatures of different components by clicking on them. Once you set your temperatures, you can expand the drop down below the component and manually select which fans to operate to cool down that particular component. It’s important to identify which PWM corresponds with which fan and where that fan is located to do this accurately. Back in the main screen, make sure you check the box next to “Automatic fan speed” to facilitate the new temperature-based controls you’ve set.
Lastly, ensure two things: that SpeedFan starts up automatically whenever you restart the computer and that closing the application does not exit it. For the latter, in the “Configure” window under the “Options” tab, check the box beside “Minimize on close.” For the former, find the location of your SpeedFan application by right clicking it and clicking on “Open file location.” Copy the shortcut, type “shell:startup” in your Windows Explorer address bar, and paste it into this directory. This will ensure that the application starts up when your computer does.

Final Thoughts
No matter what technology you’ve invested in to give yourself a prime performance gaming and computing setup, if your system is overheating, your components will fail to deliver what they promise and may become permanently damaged. It’s no surprise that maintaining a healthy PC temperature is thus integral to maintaining optimal PC performance. The few methods outlined above: namely, via a built-in application, BIOS, or SpeedFan will help you achieve control your PC’s fans speeds. However, these software manipulations will only be possible if your hardware setup allows for voltage or PWM adjustments, so look inside your PC and check your motherboard’s manufacturer guides to assess whether or not you’ll be able to improve it digitally.
Once you’ve made the changes suggested above, load up your CPU-Z application upon reboot and then observe your system temperature again after forty minutes to an hour of activity to see how far these changes have helped. A last resort will be trading in for more capable fans or getting more heat-tolerant processors if your system does not cool down despite maxing its fan speeds out too.