How to Fix Netflix Error Code H403 / H404?
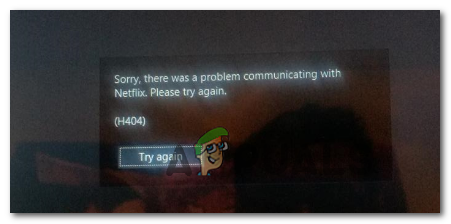
Some Windows 10 users are reporting that they are suddenly unable to open the Netflix 10 UWP (Universal Windows Platform) application. The error that they get is “Sorry, there was a problem communicating with Netflix. Please try again.” accompanied by the Error Code H403. In most cases, the issue is reported to occur when they try to open the Netflix application or when attempting to stream some content.
The Netflix Error Code H403 typically points down to some issue with the temporary information that is being stored on your computer. If this scenario is applicable, you should be able to fix the issue by signing in on another device, refreshing the Netflix UWP app, or reinstalling the app altogether.
If you’re encountering the Error Code H404, you’re probably seeing that message due to the fact that your UWP application is outdated. In this case, you can fix the issue by updating the application using the Windows Store updating function.
However, if all else fails, you should consider using the System Restore utility or even clean installing or repair installing to resolve a software conflicting or a badly installed Windows update.
Updating the Netflix UWP app
If you’re only encountering the Error Code H403 when attempting to stream content via the UWP (Windows 10 app), it’s possible that you’re seeing the error due to the fact that the application is outdated. In this case, you can resolve the issue easily by forcing the Netflix application to update.
This operation can be enforced directly from the Microsoft Store menu. A lot of affected users have confirmed that this operation finally allowed them to use the Netflix application normally.
Note: By default, the Microsoft Store is configured to auto-update UWP applications whenever the user is not using a UWP application.
Here’s a quick guide on updating the Netflix UWP application to the latest version:
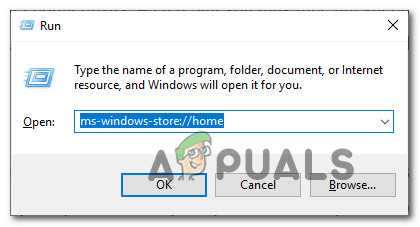
- Press Windows key + R to open up a Run dialog box. Next, type ”ms-windows-store://home” and press Enter to open up the default dashboard of the Microsoft Store.
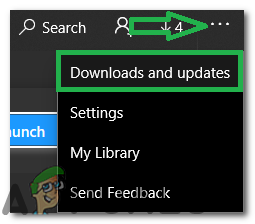
Opening the Microsoft store via Run box - Inside the Microsoft Store, click on the action button (top-right corner) and then click on Downloads and Updates from the list of available options.
Clicking on the action button and selecting “Downloads and Updates” - Inside the Downloads and Updates screen, hit the Get Updates button and wait until the Netflix app is updated to the latest version.

Selecting the “Get Updates” button - After the latest Netflix UWP version is installed, reboot your Windows machine and see if the issue is resolved at the next system startup by attempting to stream content from the app once again.
Signing in on Another Device
As it turns out, if you’re constantly switching between mobile and desktop when streaming Netflix content, it’s possible that the Netflix Error H403 appears due to some temporary data that is being stored locally. If this scenario is applicable, you should be able to fix the issue by signing in on another device that’s using the same network as the computer that’s triggering the Netflix Error H403.
Note: Keep in mind that if you are already signed with the same account on another device (outside your network), sign out of it first, then follow the instructions below.
Ideally, you should sign in with a mobile device connected to the same network in order to clear the temp data associated with your account.
Here’s a quick guide on signing on another device in order to resolve the Netflix Error H403:
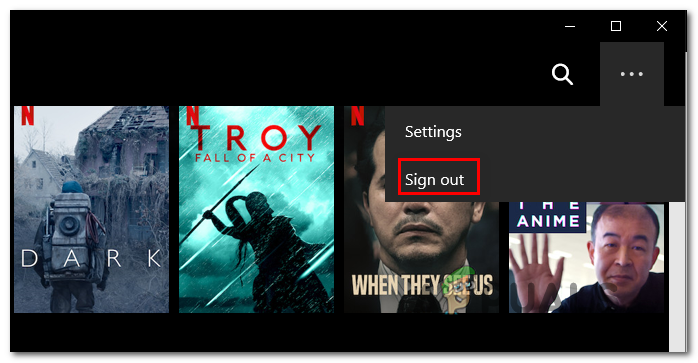
- On the computer that you’re encountering the issue on, open the Netflix app and click on the action button (top-right corner). Next, click on Sign Out from the newly appeared context menu.
Signing out of the UWP version of Netflix - Once you have successfully signed out of your Netflix UWP app, pick up a mobile device and connected to the same network that your desktop (PC or Mac) is connected to.
- After the mobile device is correctly connected to the same network, open the Netflix app and sign in with the same account.
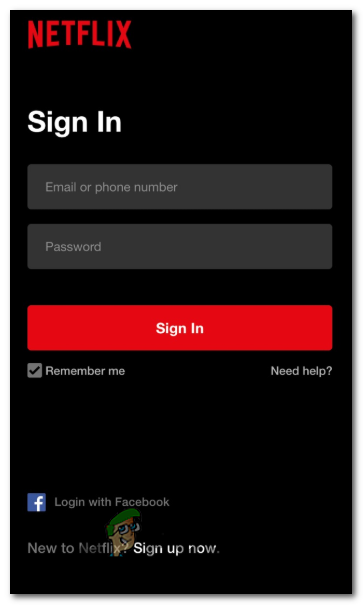
Signing up with the mobile Netflix app - After you have successfully signed in on your mobile device, stream any type of content, then sign out again and re-sign in on your desktop device.
- Once the temporary data associated with your account is cleared, you should no longer encounter the Netflix Error H403 when using the Windows 10 UWP app.
Resetting or Uninstalling the Netflix UWP app
If the methods above didn’t allow you to resolve the issue, there’s a high chance that the issue is occurring due to a series of temporary files that are being stored locally. Most likely, the inconsistency end up forcing the Windows Store launcher to open an older version even though the newest version was installed.
To resolve the issue in this case, try resetting the application along with the Netflix temp folder or by uninstalling & redownloading the application. This particular fix is also recommended by Netflix support in order to resolve the “Sorry, there was a problem communicating with Netflix. Please try again.” (Error Code H403).
Start with the guide below and only proceed with the second one in case resetting the Netflix app doesn’t resolve the issue:
Resetting the Netflix app
- Press Windows key + R to open up a Run dialog box. Next, type ”ms-settings:appsfeatures’ and press Enter to open up the Apps & Features menu of the Settings app.
- Inside the Apps & Features menu, move down to the right section of the screen and scroll down through the list of installed UWP applications and locate the Netflix pp.
- Once you manage to locate it, click on it once to expand the menu, then click on Advanced Options.
- As soon as you do this, scroll down to the Reset tab and click on the Reset button (twice in order to confirm the operation).
NOTE: This operation will clear any temp data associated with the Netflix app and revert every local setting to the default. - After the operation is complete, launch the Netflix UWP app again and see if the issue is now resolved.
Reinstalling the Netflix app
- Press Windows key + R to open up a Run dialog box. Next, type ”ms-settings:appsfeatures” and press Enter to open up the Programs & Features tab of the Settings app.
- Next, locate the Netflix app by going to the Program & Features and scrolling down through the list of applications.
- After you do this, select the Netflix app and click on the Advanced Menu hyperlink. From the new menu, click on Uninstall (under the Uninstall section) in order to confirm the uninstallation process.
- Once the operation is complete, reboot your computer and wait for the next startup to complete.
Note: After performing this step, your Netflix UWP installation is effectively reverted. - After the next startup is complete, press Windows key + R to open up another Run dialog box. This time, type ”ms-windows-store://home” and press Enter to open up the Microsoft Store.
- Next, use the Microsoft Store’s search function (top-right section of the screen) to search for Netflix.
- Click on the Get button associated with Netflix in order to download & install the application.
- Once the application is installed again, launch Netflix UWP again and see if you’re still encountering the Error Code H403 error when attempting to stream some content.
Using System Restore
If you’re only noticed the Error Code H403 appearing after a recent Windows Update or none of the methods above have allowed you to resolve the issue, it’s very likely that the problem appears due to a badly installed WIndows update or due to some kind of 3rd party inconsistency (most commonly caused by an overprotective 3rd party suite).
If this scenario is applicable, your last chance at fixing the issue without any data loss is to use the system restore utility to bring back your machine to a healthy state in which the circumstances that are currently causing the error code where no occurring.
If you’re unsure of how to use the System Restore utility, follow the instructions here. It will walk you through the steps of finding a suitable restore point and using it to return your computer back to a healthy state.
Note: In case you were unable to find a suitable System Restore point or the issue is persisting even after you’ve used this utility, your last options are to perform a repair install or a clean install.