Fix: Wacom Pen not Working
Wacom produces high-end graphics tablets and other accessories targeting designers and people who like to be creative by using a pen to carry out their tasks on the computer. With that being said, a specific issue arises where the Wacom Pen doesn’t work on many applications. These applications range from Adobe Photoshop to Paint.
The reasons why this problem occurs are very widespread and range from a broken Windows update to incorrect drivers installed for your device. We will iterate through the workarounds one by one and see if the problem gets solved.
Solution 1: Restarting Wacom Service
We will try restarting the Wacom service as our first step in solving the problem. This will restart the entire procedure, refresh currently stored configurations and try detecting your tablet again. There is a known problem with the Wacom Service on Windows 10.
- Press Windows + R to launch the Run application. Type “services.msc” in the dialogue box and press Enter.
- Navigate through all the services until you find the one named “TabletServiceWacom” and “Wacom Professional Service”. Right-click it and select “Restart”.
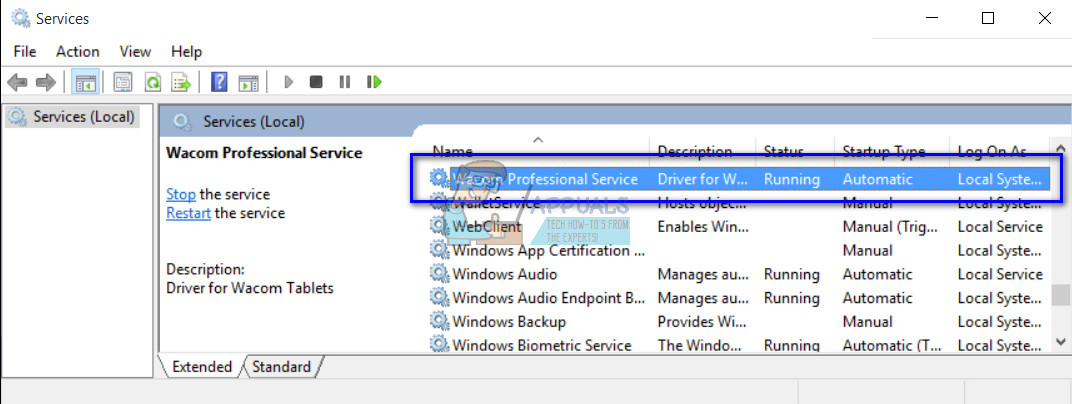
- Now check if the problem is solved.
Solution 2: Disabling Windows Ink
Windows Ink is a software in Windows 10 which contains support for applications towards pen computing. The suite of applications that come alongside is Sticky notes, Sketchpad, etc. On a tablet PC that supports pen input, Windows Ink is enabled by default. Windows Ink also provides various features for Wacom pens. Some of these features include:
- Digital Ink: Usage of enhanced digital markup and inking tools found on the Review tab in applicable applications.
- Windows Input Panel: Use handwriting or an on-screen keyboard to directly enter text with the Wacom pen.
- Handwriting recognition: Convert your handwriting directly to the text.
However, despite the additional features Windows Ink has to offer, it seems that at the moment, Wacom doesn’t work properly. This may be due to the fact that the configuration of the pen and the Ink feature isn’t optimized enough for a flawless operation. By default, Windows Ink is enabled. We can try disabling it and see if this fixes the problem for us.
- Navigate to the Settings of Wacom and open ‘Wacom tablet Properties’.
- Select the tab ‘Mapping’ and make sure the option “Use Windows Ink” is unchecked. Save changes and exit.
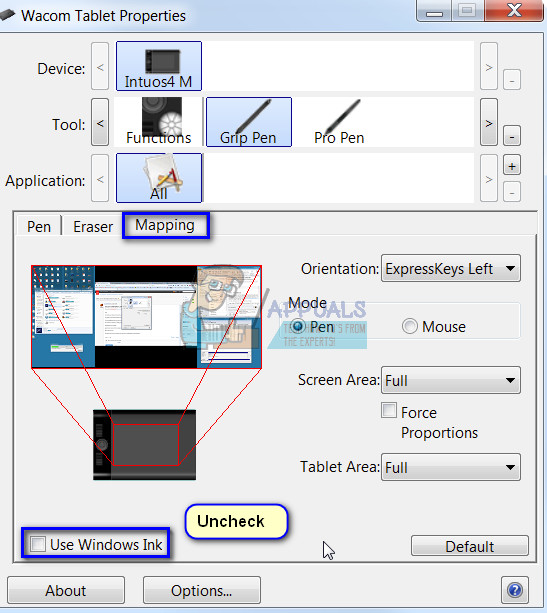
- Consider restarting your tablet and check if the problem at hand got solved.
Solution 3: Changing Bamboo Ink Protocol
Bamboo Ink is a stylus optimized for Windows Ink Workspace within the Anniversary Update for natural writing and sketching with pen and paper on all the devices which are compatible. This Ink is great for people who want a more genuine pen experience on their device.
It was observed that there was a problem with the Bamboo Ink Protocol and where you have to change it from the default AES to MPP. Bamboo Ink requires that a correct protocol is set for your device. The protocol which is saved by default is Wacom AES Protocol. You need to switch between this protocol and Microsoft Pen Protocol (MPP) according to the compatibility.
- You need to press both side buttons at the same time for two seconds to switch between different protocols. One blink means that your device is in AES protocol and two blinks mean it is in MPP mode.
You can also power cycle your device after making the changes to make sure that they were implemented.
Tip: Another workaround that seemed to work for people was selecting the mouse mode in Bamboo settings. Navigate to Bamboo Settings, select Pen and go to Tracking. Select the Mouse Mode and check if this fixes the problem.
Solution 4: Changing Touch Settings
Another issue which was noted with Wacom pens was that they didn’t work properly in right-click mode. As you know, there are different modes available in the pen which allow you to select either Left or Right click mode according to your preference. If the right-click mode is not working, we have to change some settings.
- Press Windows + S, type “pen and touch” in the dialogue box and open the application.
- At the bottom of the screen, you will see a sub-section “Pen buttons”.
- Check the box which says “Use the pen as a right-click button equivalent”.
Whenever you select the right-mode on your Wacom, it should automatically change this setting to the touch settings too. However, it seems that this doesn’t occur and hence we have to change it manually.
Solution 5: Reverting back Windows Update
It is not new to anyone using Windows to know that Windows Updates break different components very often. It was noted around December 2017 – January 2018 that the latest Windows Update conflicting with Wacom services and proved it useless. Windows update is designed to fix various bugs and introduce new capabilities to the operating system. But sometimes, when the update is rolled out, it conflicts with another thing.
You can try uninstalling the Windows Update and see if this does the trick. Make sure that you backup all your important data before following this solution.
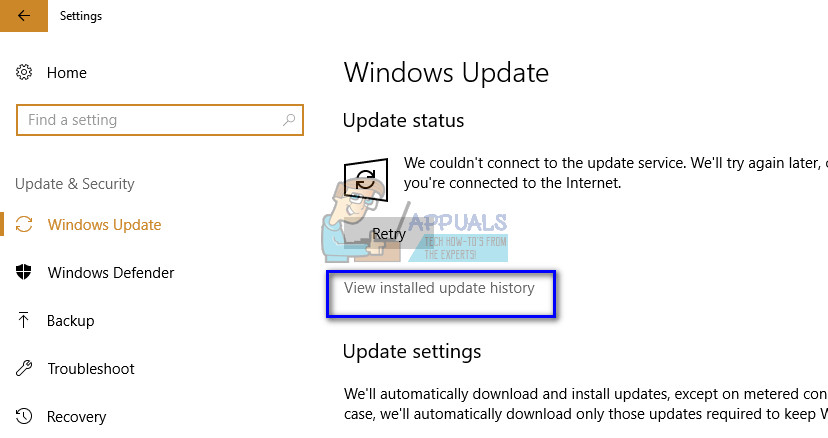
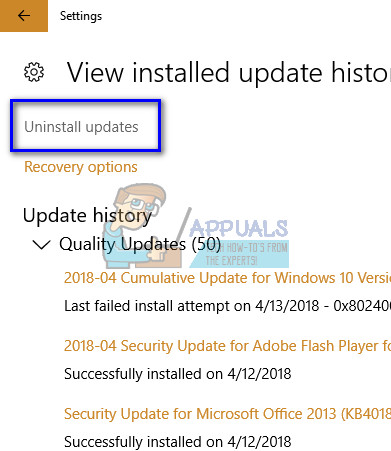
- Press Windows + S, type “settings” in the dialogue box and open the application.
- Once in Settings, click on “Update and security”. Here, under the heading of Update status, click “View installed update history”.
- Click “Uninstall updates” present at the very top of the screen.
- A new window will be brought in front of you consisting of all the updates installed on your computer. Right-click on the one which was recently installed and click “Uninstall”.
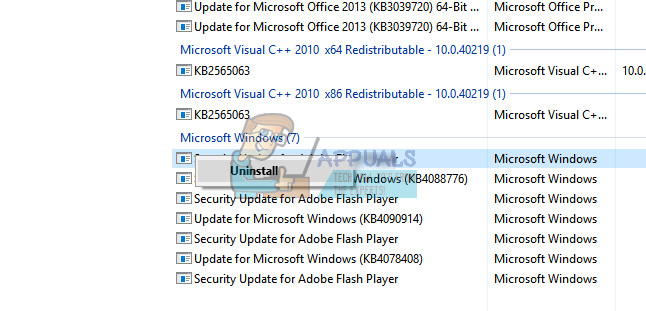
- After uninstalling the update, power cycle your computer and Wacom device and check if the problem at hand got solved.
Solution 6: Installing Older Drivers
If all the above solutions don’t work, we can try either updating the driver or downgrade it to an older one. First, we will remove the driver and then uninstall all related applications. Reinstalling the applications and drivers will make sure that all misconfigurations are dealt with and the computer will recognize the tablet-like it was plugged for the first time.
Note: If the tablet still fails to be detected after installing the latest drivers, try rolling back drivers. Rolling back means installing a previous version of drivers. You can easily download them from the official website.
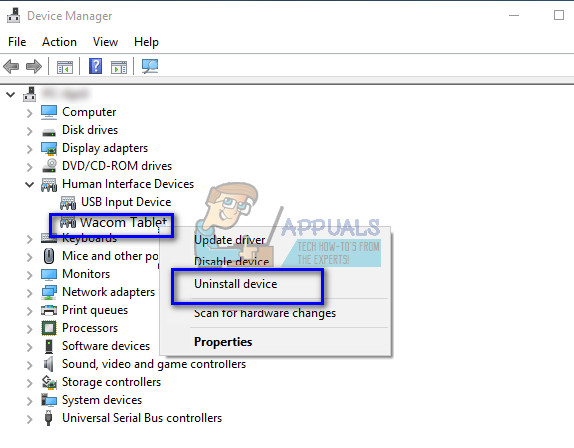
- Press Windows + R to launch the Run application. Type “devmgmt.msc” in the dialogue box and press Enter. This will launch the device manager.
- Navigate through all the devices until you find the category “Human Interface Devices”. Expand it and select “Wacom Tablet”. Right-click it and select “Uninstall Device”.
- Press Windows + R to launch the Run application. Type “appwiz.cpl” in the dialogue box and press Enter. A new window will come forth consisting of all the programs installed on your computer.
- Navigate through all of them until you find any application related to Wacom. Right-click it and select “Uninstall”. Do this for all the applications which you can find which are related to the tablet.
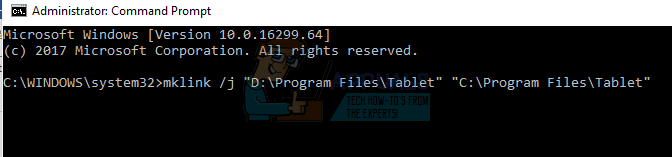
- Press Windows + S to launch the search bar. Type “cmd” in the dialogue box, right-click on the application and select “Run as administrator”.
- Once at the command prompt, execute the following instruction:
mklink /j "D:\Program Files\Tablet" "C:\Program Files\Tablet”
In this case, the custom location for Program Files is D drive. You can replace “D” with whatever your drive happens to be.
- Head over to the Walcom official website and download the latest drivers available. Same them to an accessible location as we will be accessing them later on.
- Press Windows + R to launch the Run application. Type “devmgmt.msc” in the dialogue box and press Enter. This will launch the device manager.
- Locate Walcom Tablet from the list of devices, right-click it and select “Update driver”.
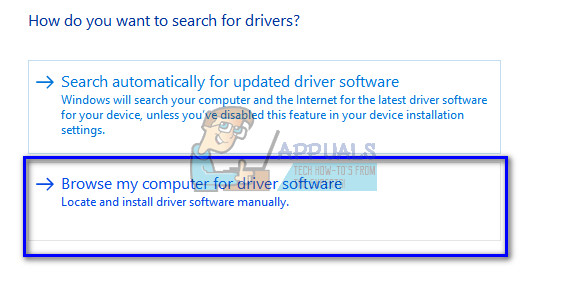
A new window will pop up asking whether you want to update the drivers automatically or manually. Select the second option (manually). Browse to the location where you downloaded the drivers and install them.
- Restart your Wacom device and plug it back in.
- Press Windows + R, type “services.msc” in the dialogue box and press Enter.
- Navigate through all the services until you find “Wacom Professional Service”. Right-click it and select “Restart”. Now check if the problem is solved.
Tip: Holding the Ctrl key will allow you to select some text on the screen but it will be only momentarily. By pressing the shift key, you will be able to select more than text without any problems.
Solution 7: Reinstalling Wacom Software Completely
If all the above methods don’t work and you are still not able to get your Wacom device recognized, we can try reinstalling all the related components of Wacom completely. First, we will uninstall and remove all the registry values (including temporary folders) to make sure Wacom is completely erased from the computer. Once this is done, we will only install the latest drivers from the website. This means that you cannot install the drivers which came with the hardware.
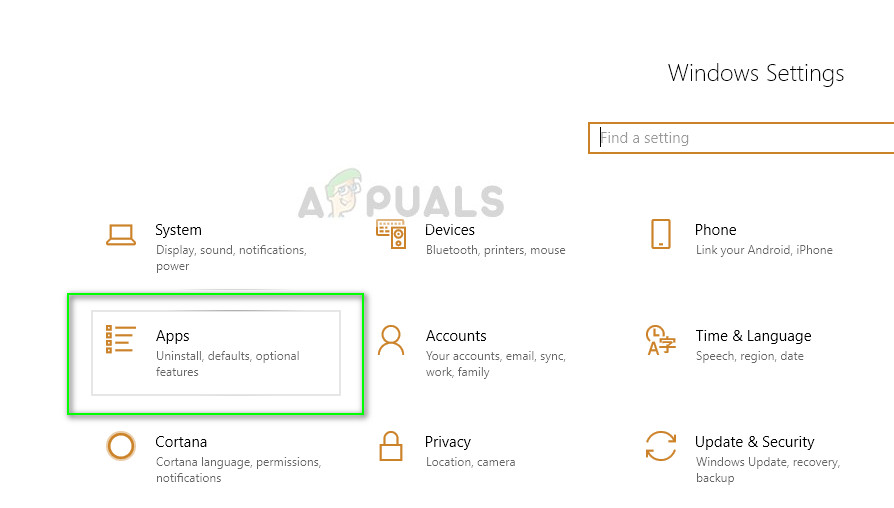
- Disconnect the Wacom tablet from your computer. Now press Windows + S, type Settings in the dialogue box and open the application. Once in Settings, navigate to Apps.
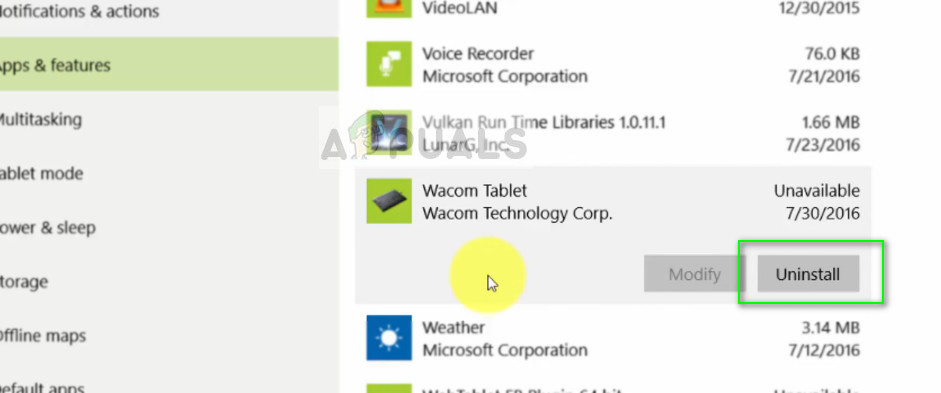
- Now search for the entry “Wacom Tablet”. Click on it once and select Uninstall.
- Restart your computer after uninstalling the software. Now press Windows + E to launch the File Explorer and search for Wacom in the search box and wait for the search results to return. Make sure that you delete each temporary folder and leave no residual files behind.
- Press Windows + R, type “regedit” in the dialogue box and press Enter. Once the Registry Editor opens up, press Windows + F and search for Wacom. Delete each registry associated with it.
Disclaimer: Registry keys contain sensitive information required to run your computer. Make sure that you delete only keys that are associated with Wacom. You should make a backup of your registry before proceeding as a precaution.

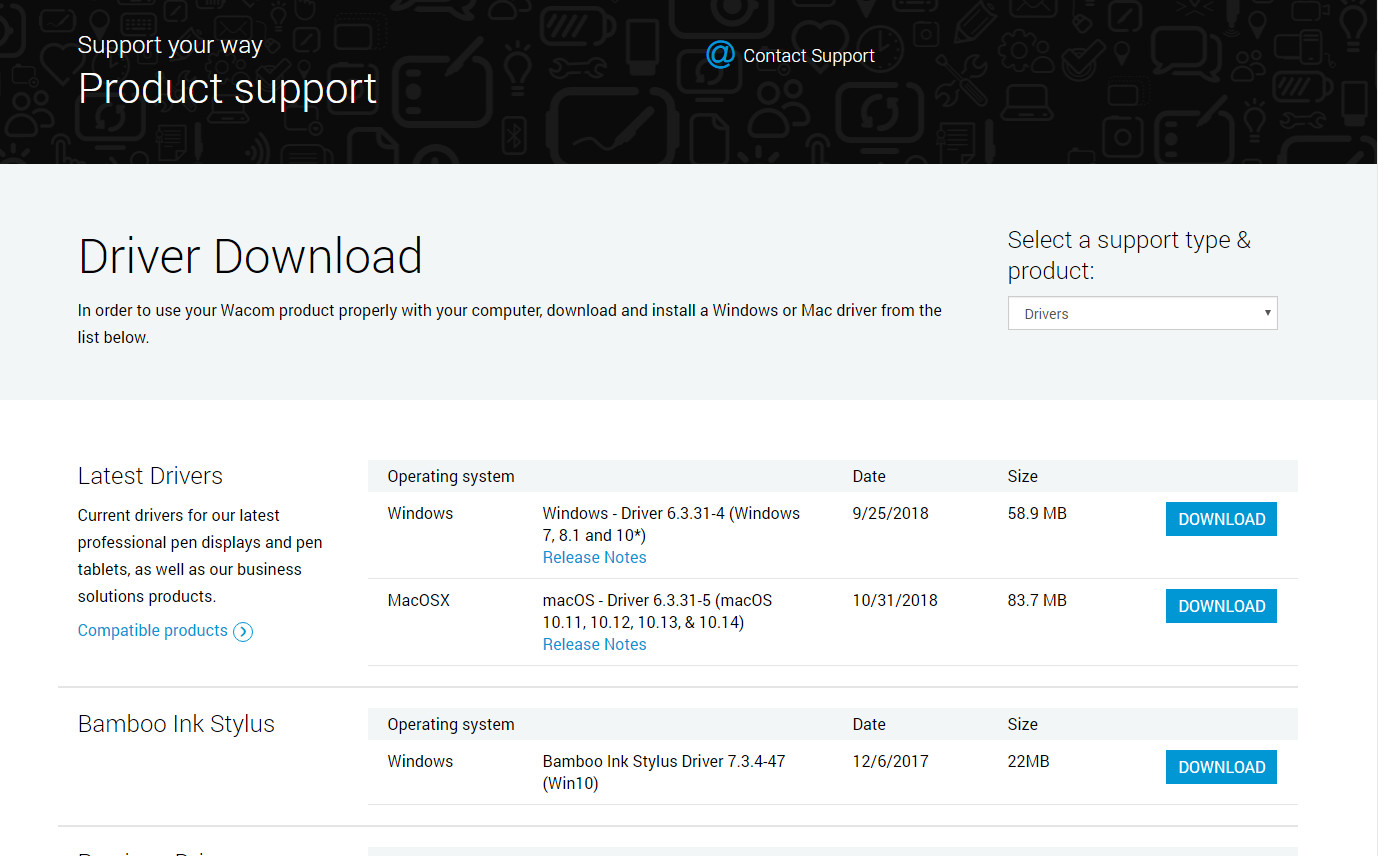
- After all the associated registry keys are deleted, navigate to Official Wacom Drivers website and download the relevant drivers to your computer.
- Now install only the downloaded drivers as we did earlier (by navigating to the device manager). Or you can just launch the executable while your Wacom tablet is connected to your computer.