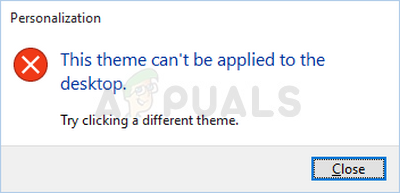
Fix: This Theme cannot be Applied to the Desktop Windows
The ability of users to tweak the appearance of their Windows UI was one of its greatest features from the start and users have always wanted to keep their desktop fresh and unique. However, sometimes when users try to change the theme on their computers, this error pops up along the “This theme cannot be applied to the desktop” text.
The error is not that serious but it can be annoying to see you’re unable to change the theme of your PC. We have gathered several working methods which can bring that functionality back so make sure you follow the methods below!
What Causes the “This theme cannot be applied to the desktop” Error?
Among the many causes for this specific problem, some of them stand out as being the most commonly occurring ones. The error’s nature is not problematic and it can be caused by the silliest problems. Here is the list:
- Syncing themes across multiple accounts. This was noted as problematic and it should be turned off in Windows 10 Settings.
- Themes or Desktop Window Manager services may not be running properly and you should make sure to turn them on and set their startup type to Automatic.
- The Remove background images (where available) option available in Control Panel’s Ease of Access Center has also proven itself to be quite problematic when dealing with this issue and it should be disabled.
Solution 1: Turn of Theme Syncing Across Your Accounts
This solution can mean the world of difference and it has helped numerous users suffering from the same problem. Technically, it’s easy to perform it and it’s the most likely methods used to solve this problem. You don’t want to sync themes across multiple accounts on one or more computers.
- Use the Windows Key + I key combination to open Settings on your Windows 10 PC. Alternatively, you can search for “Settings” by using the search bar located at the taskbar or you can click the cog icon right above the Start menu button after it opens
- Locate and open the “Accounts” sub-entry in the Settings app by clicking on it once.
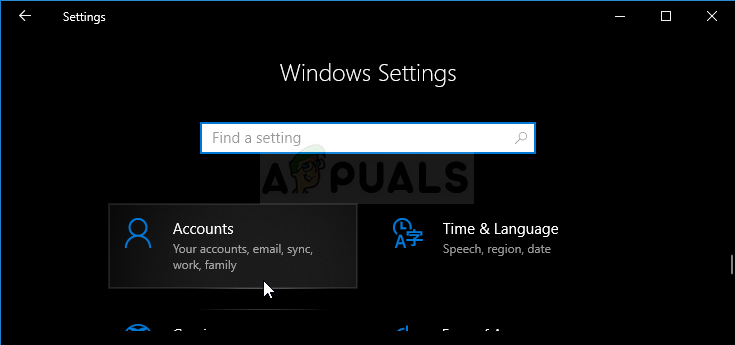
- Navigate to the Sync your settings tab and check under the Individual sync settings section for the entry called “Theme”.
- Slide the slider by clicking on it or by dragging it in order to disable theme syncing and click the Apply button right below.

- Restart your computer immediately and try running changing the theme of your computer to see if the “This theme cannot be applied to the desktop” error comes up!
Solution 2: Make Sure the Themes and Desktop Window Manager Services are Running
Changing and applying themes is closely related to these services and they absolutely must be running if you want to remain free of these errors. The Themes services and the Desktop Window Manager (DWM) should be started and their startup type should be set to Automatic.
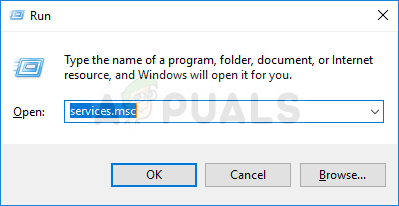
- Open the Run utility by using the Windows Key + R key combination on your keyboard (press these keys at the same time. Type “services.msc” in the newly opened box without the quotation marks and click OK in order to open the Services tool.
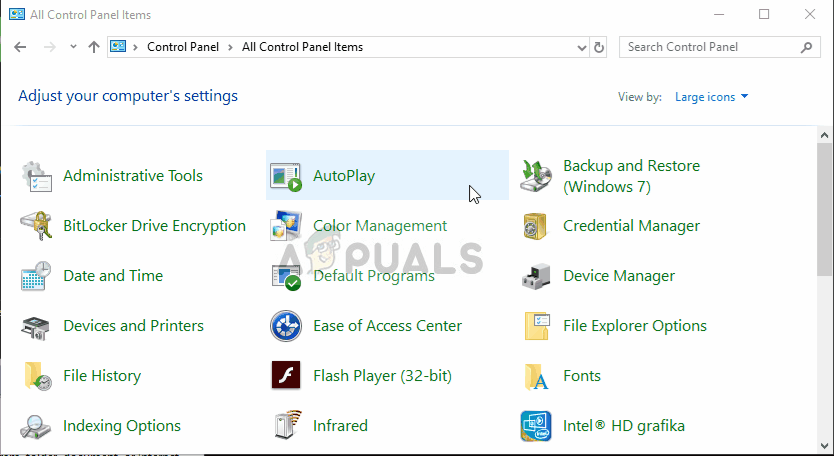
- The alternative way is to open Control Panel by locating it in the Start menu. You can also search for it using the Start menu’s search button.
- After the Control Panel window opens, change the “View by” option at the top right part of the window to “Large Icons” and scroll down until you locate the Administrative Tools entry. Click on it and locate the Services shortcut at the bottom. Click on it to open it as well.
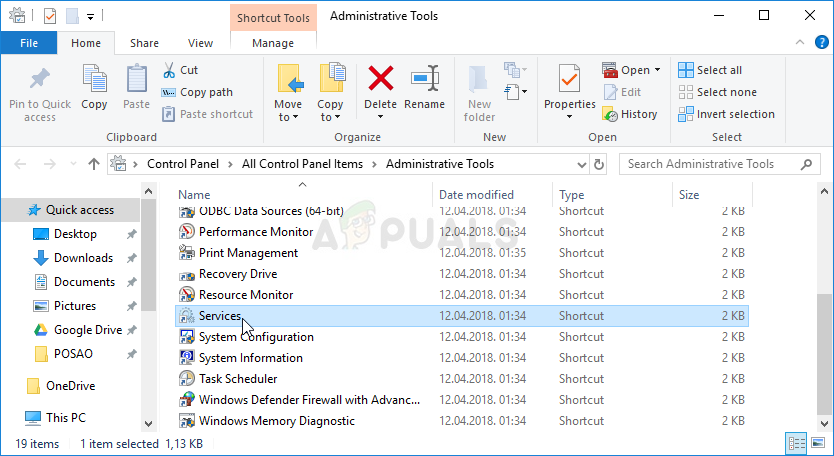
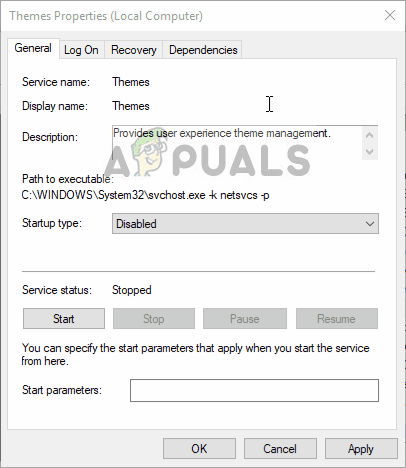
- Locate the Themes or the Desktop Window Manager service on the list, right-click on it and select Properties from the context menu which appears.
- If the service is started (you can check that just next to the Service status message), you should stop it for now by clicking the Stop button in the middle of the window. If it is stopped, leave it stopped until we proceed.
- Make sure that the option under the Startup type menu in the service’s properties window is set to Automatic before you proceed with other steps. Confirm any dialogue boxes which may appear when changing the startup type. Click on the Start button at the middle of the window before exiting. Make sure you repeat the same process for both of the services we mentioned.
You may receive the following error message when you click on Start:
“Windows could not start the service on Local Computer. Error 1079: The account specified for this service differs from the account specified for other services running in the same process.”
If this happens, follow the instructions below to fix it.
- Follow the steps 1-3 from the instructions above in order to open the service’s properties window. Navigate to the Log On tab and click on the Browse… button.

- Under the “Enter the object name to select” entry box, type in your account’s name, click on Check Names and wait for the name to become available.
- Click OK when you are finished and type in the password in the Password box when you are prompted with it if you have set up a password. It should now start without issues!
Solution 3: Uncheck “Remove background images (where available)” Option in Ease of Access Center
This annoying option might prevent you from being able to change your theme. The option might be useful for some uses but it prevents you from being able to change your theme to nothing but a solid color. Disable this option to fix the “This theme cannot be applied to the desktop” problem.
- Start up the Control Panel by searching for the utility in the Start button or by clicking the Search button (Cortana) button at the left part of your taskbar (bottom left part of your screen.
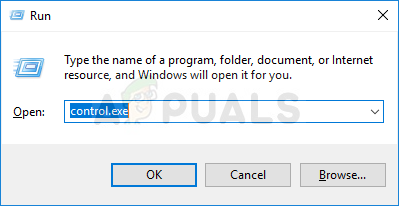
- You can also use the Windows Key + R key combo where you should type “control.exe” and click Run which will also open Control Panel directly.
- After Control Panel opens, change the view to Category and click on Ease of Access in order open this section. Note that you will have to solve the problem using Control Panel and not Settings on Windows 10.
- Under the Ease of Access Center section, locate the Optimize visual display option, left-click on it once, and scroll until you see the Make things on the screen easier to see section.
- Uncheck the box next to the Remove background images (where available) option and Apply the changes you have made. Check to see if the problem still appears!