Fix: macOS Could not be Installed on Your Computer
If you are a Mac user and you encountered the error message that is saying macOS could not be installed on your computer, it can be very confusing and frustrating. You may face this problem when you are reinstalling your Mac or installing updates and, in many cases, when you just turn on your computer. But there are a few ways and methods that this error can be fixed. In this article, we will show you how to solve the macOS could not be installed on your computer error, and you just follow our lead.
Method #1. Check the Date and Time.
This problem on your Mac can be caused by the wrong date or time on your computer. If time and date are wrong you will unable to install the macOS.
- Press and hold the power button to turn off your Mac. After your Mac is shut down, press and hold the power button in order to turn on your Mac.
- Open the System Preferences on your Mac.

Open System Preferences - Open Date & Time.
- Check if the date and time are the same as your current time zone. If they are not the same, click the lock to enable to make changes and enter the correct date and time.

Click the lock to make changes - Tick the checkbox on where says Set date and time automatically.
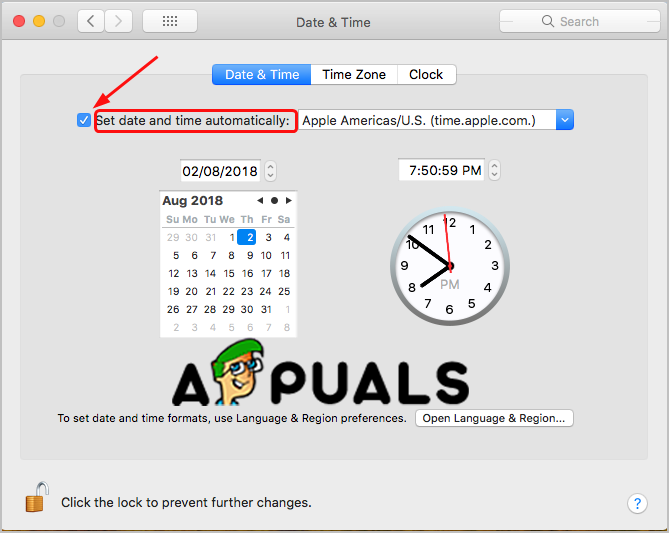
Set Date and Time Automatically
If the date and time are troublemakers you can try to install updates or reinstall macOS on your computer.
Method #2. Reset the NVRAM on your Mac.
NVRAM stands for nonvolatile random-access memory. In more simple words, NVRAM is a small amount of memory that your computer is using to store settings (time zone, start-up disk selection, display resolution and more) and access them really fast.
So, this error message can be shown because your startup settings are stored wrong in your NVRAM, and you will unable to install macOS on your Mac. The simple solution to this is to reset your NVRAM.
- Press and hold the power button to shut down your Mac. Then press the power button once more in order to turn it on.
- Then immediately, press and hold the following keys together: Option + Command + P + R for about 15-20 seconds.
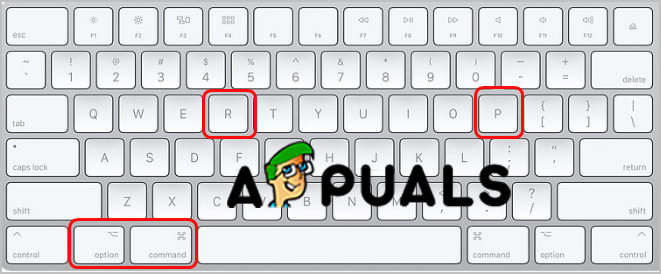
Press and Hold the keys - When your computer is finished with the startup, open the System Preferences to change any settings that were restored.
When you are done with this method you can try to install updates or reinstall macOS on your computer.
Method #3. Restore from Time Machine backup.
You can try to boot your Mac with the Recovery Mode in order to restore it from Time Machine when your macOS is stuck and cannot be installed.
- Press and hold the power button to shut down your Mac. Then press the power button once more in order to turn it on.
- Then immediately, press and hold the Command + R buttons When you see the Apple logo, release the buttons. Your computer will boot into the Utilities. And if it doesn’t try this step once more.
- Select your preferred language and then click continue.
- Select Restore from Time Machine backup.
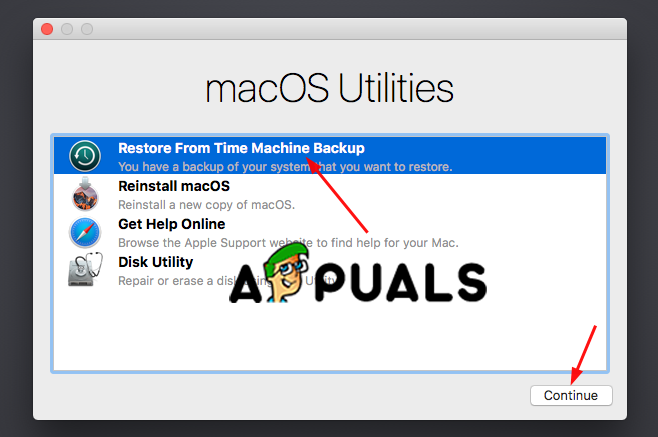
Restore From Time Machine Backup - Click Continue.
- Select Time machine backups and the again Continue.
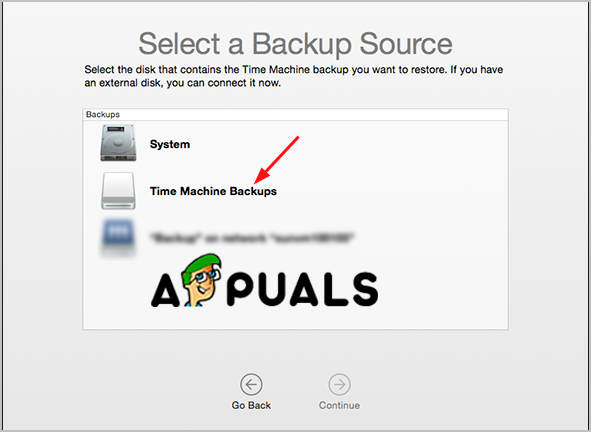
Select a Backup Source - Select the most recent backup.
Wait for the process to be finished and then check if the problem is still there.
Method #4. Run Disk Utility’s First Aid in Safe Mode.
When you are seeing this error on your Mac the problem can be in your Disk volume. And this method to run the Disk Utility to check and repair the volume can solve this problem.
- Press and hold the power button to shut down your Mac. Then press the power button once more in order to turn it on.
- Then immediately, press and hold the Shift key. This will boot your Mac into Safe Mode.
- Log in the system using your credentials.
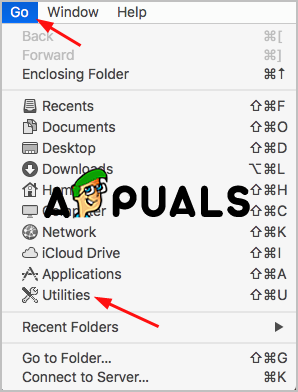
- Open Utilities from your home screen.
Open Utilities - Open Disk Utility with a double-click.
- Open First Aid, and then Run to start to check the volume for errors. Here you must choose your main HDD as the volume that should be repaired if you have multiple volumes on your computer.

Open First Aid - First Aid will check for errors and if it is corrupted, it will repair the volume.
Method #5. Free up Storage Space on Your Mac.
Also, very common issue why this error is showing and the problem happens is not enough space on your computer to install updates. So, the best solution is to free up some space on your Mac.
- Select what files you are not using and delete them. You can move those files in the Trash and then delete them permanently. Usually, most unused files are in the Downloads folder and you should go to the folder and choose what you don’t need anymore.
- Move some of your larger files to an external drive or even a USB.
- You can install third-party software in order to clean your computer, also the duplicated files and the applications that are not necessary for your computer to work and also system junks.