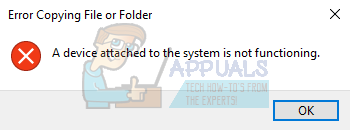
Fix: A Device Attached to the System is Not Functioning
The error message “A device attached to the system is not functioning” means that your computer is not able to properly communicate and transfer data. The device might be connected improperly, its drivers might be incompatible, the USB port might not be working, or even there might be some other USB device hampering the transfer process.
Many users face this problem in their daily life when they are transferring data/media from their smartphones, cameras, tablets, USB’s, or even transferring data from one hard drive to another. This is a very common problem so nothing to worry about. Take a look at the steps listed below.
1. Changing the Transfer to Mac or PC Settings (only for iPhones)
If you are getting this error while transferring files/photos from an iPhone to the computer you will have to change some settings on your iPhone to allow this transfer otherwise it won’t work smoothly and sometimes it can also be interrupted in the middle of the transfer which can corrupt the data. Follow these steps if you want to fix that setting:-
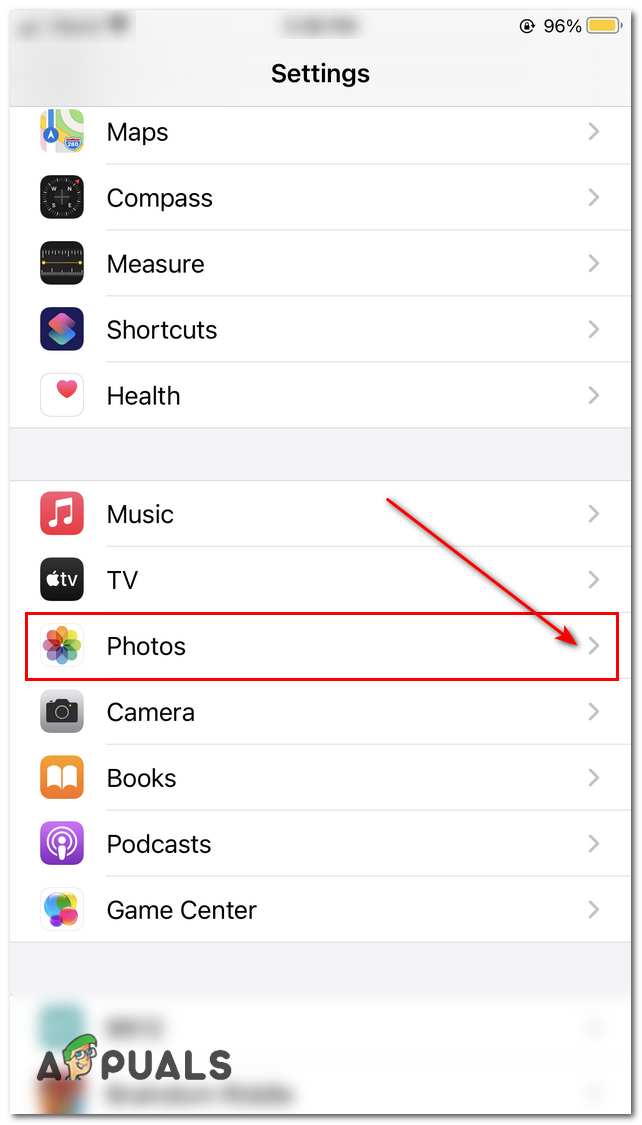
- First of all, head over to the Settings app on your iPhone.
- Now scroll down till you find “Photos” settings and click on it.
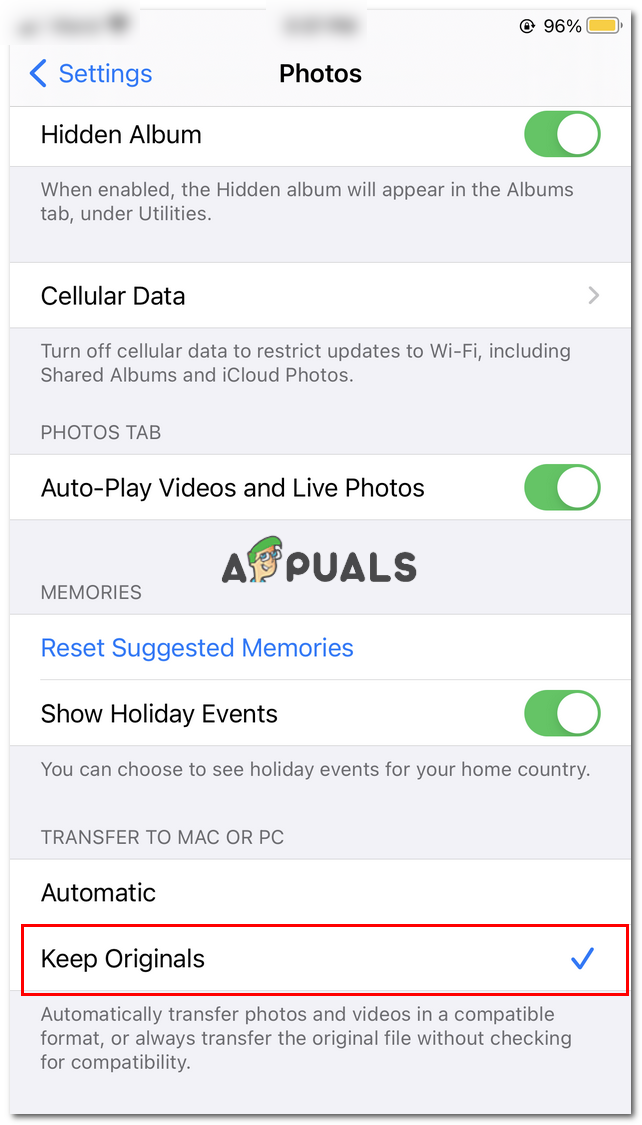
Changing the “Photos” Settings - Once you are in the Photos settings scroll all the way down to “Transfer to Mac or PC Settings”.
- Now select the option “Keep Originals” here and try transferring the files again.
Changing the transfer settings to PC - Check to see if the issue persists.
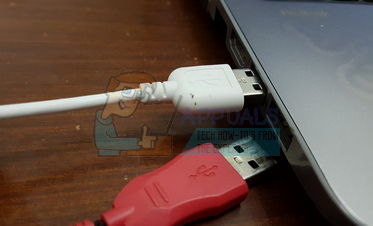
2. Reconnecting and Trying another USB Port
This error might occur if there is an improper connection between the USB storage and your computer. It is possible that the connector is not properly connected to the port or the cable you are using is defective. You can try reconnecting the device and if you are using a cable, make sure that the cable isn’t defective and readily supports data transfer. Try using a different cable and also try plugging your device into another USB port.
If you have other USB devices connected to your computer, remove all of them. In one case the error popped up and after disconnected a joystick, it vanished automatically and the transfer was successful. Try out all possibilities before proceeding as this is the main troubleshooting step.
3. Restarting Computer
In many numerous cases, restarting the computer fixed the problem for many users. It is possible that there are some modules with incorrect configurations or just that your computer needs a restart after installing some programs. In some cases like Windows Update, a restart is essential as it implements the changes required. Restart your computer properly and make sure that the device isn’t connected. After the computer has properly restarted, connect your device and check if the problem got fixed.
4. Formatting your Device
This error also occurs for many USB devices if your device isn’t formatted properly. Incorrect formatting means that the sectors/blocks are not properly allocated in your storage device and this might be the cause of the error.
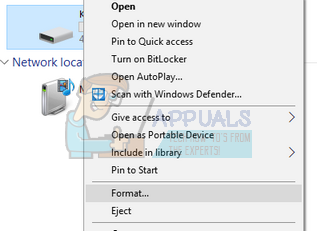
- Press Windows + E to launch the File Explorer. Click on “This PC” present in the left navigation pane. Now you would be able to see your USB device connected.
- Right-click it and select “Format”.
- A new window will pop up consisting of all the settings. If you are not sure what to select, just leave it be and click “Start”.
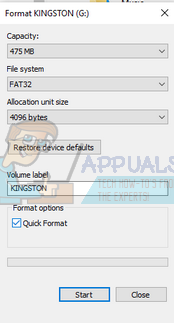
- After the format is complete, try using your USB device and check if the problem is solved.
5. Running SFC and DISM Commands
It is also the possibility that there are some corrupt files present on your computer which are leading to this error. For this, we can try running SFC and if there are errors present, run the DISM command.
System File Checker (SFC) is a utility present in Microsoft Windows which allows the users to scan their computers for corrupt files in their operating system and is a very useful tool for diagnosing the problem and checking if any problem is due to corrupt files in windows.
We can try running SFC and see if our problem gets solved. You will get one of the three responses when running SFC.
- Windows didn’t find any integrity violations
- Windows Resource Protection found corrupt files and repaired them
- Windows Resource Protection found corrupt files but was unable to fix some (or all) of them
- Press Windows + R to launch the Run application. Type “taskmgr” in the dialogue box and hit Enter to launch your computer’s task manager.
- Now click on the File option present at the top left side of the window and select “Run new task” from the list of options available.

- Now type “Powershell” in the dialogue box and check the option underneath which states “Create this task with administrative privileges”.
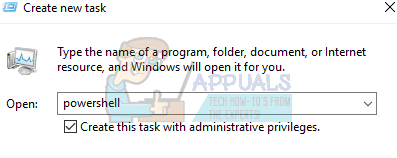
- Once in the Windows Powershell, type “sfc /scannow” and hit Enter. This process may take some time as your entire Windows files are being scanned by the computer and being checked for corrupt phases.

- If you encounter an error where Windows states that it found some error but was unable to fix them, you should type “DISM /Online /Cleanup-Image /restorehealth” in the PowerShell. This will download the corrupt files from the Windows update servers and replace the corrupt ones. Do note that this process can also consume some time according to your internet connection. Don’t cancel at any stage and let it run.
If an error was detected and was fixed using the above methods, restart your computer and check if the error goes away.
6. Updating Device Drivers
This error might also be appearing because your device drivers are not up to date and the computer is having difficulty in transferring data. In this case, you can try updating the device drivers and check if the problem gets solved. There are two ways to update the drivers: automatically and manually. In the automatic method, you select the first option when the choice comes. Here you don’t have to do anything and Windows will automatically search for the best driver out there and install it on your computer.
If you are having no luck updating the drivers automatically, you can head over to your manufacturer’s website, download the required drivers and update them manually. Below is the method on how to update them manually.
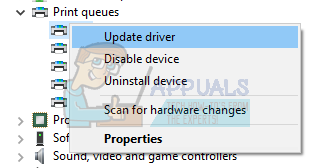
- Press Windows + R to launch the Run Type “devmgmt.msc” in the dialogue box and hit Enter. This will launch your computer’s device manager.
- Navigate through all the hardware, and right-click on the device you are experiencing the error, and select “Update driver”.
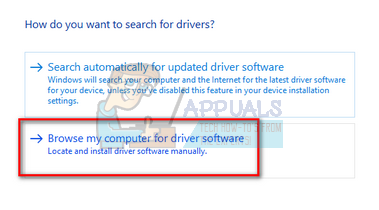
- Now Windows will pop a dialogue box asking you which way do you want to update your driver. Select the second option (Browse my computer for driver software) and proceed.
Select the driver file you downloaded using the browse button when it appears and update it accordingly.
- Restart your computer and check if the problem gets resolved.
7. Repairing your Windows
If you are experiencing an error within the computer i.e. this error pops up when you try to move data to/from a drive, you can try repairing your Windows. It is advised that you backup your data and save all your work before continuing with this process. This process can also consume some time so it is advised that you start it when you are sure there will be no interruptions. Follow our instructions in our article which explains how to repair your Windows 10.
Note: Carry out this solution when you are sure that all the above troubleshooting steps have failed and the problem lies in the operating system.
If none of these methods/solutions worked out for you, it’s possible that there is something faulty in your computer or your iPhone, In that case, you will have to do a wireless transfer by using apps such as Shareit or SendAnywhere to achieve the same results. They are available for both your iPhones or Android phones so there shouldn’t be any problems regarding availability. Here are the Download links:-
Shareit (iPhone)
Shareit (PlayStore)
SendAnywhere (iPhone)
SendAnywhere (PlayStore)
Keep in mind that you will also need a desktop client to receive/send files as well so here are the links for both Clients, Shareit and SendAnywhere.