[FIX] ‘CAS System Was Unable to Initialize’ in WOW
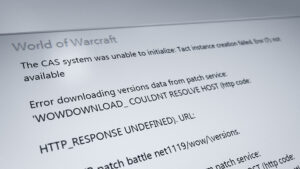
Some World of Warcraft players is suddenly unable to start the main game client in order to access the game. This issue is manifested by 2 different error messages: ‘The CAS system was unable to initialize’ and ‘Initialization error: failed to create storage component‘. This problem is not specific to a certain Windows version since it’s reported to occur on Windows 7, Windows 8.1, and Windows 10.
After investigating this issue thoroughly, it turns out that there are several different causes that might produce this problem with Word of Warcraft. Here’s a shortlist of potential culprits that might cause this problem:
- Corrupted installation inside Battle.net or FireStorm – As it turns out, this type of issue is often reported to occur as a direct result of some type of corruption that’s affecting the local installation of WOW. In this case, depending on your launcher (Battle.Net or Firestorm), yous should be able to fix the problem by using the Analyse & Repair or Scan & Repair function respectively.
- Remnant registry values – According to some affected users, you might also see this error occurring in an instance where you previously had WOW installed on the same machine and uninstalled unconventionally. If the reason why you’re seeing the error is some unused registry keys that are conflicting with a new installation, a CCleaner Registry scan should allow you to fix the problem.
- Installation is using an incorrect server– it’s also possible that you’re seeing this error due to a version mismatch. Most commonly encountered in situations where a VPN or Proxy server is actively in use, this problem can be fixed by adding a command-line argument to the settings menu inside Battle.Net or Firestorm.
- Secondary Logon service is Disabled – If the Secondary logon service is disabled by default on your Windows installation, the launcher might not receive the necessary permissions to make changes to the game files when a new game version is available. To rectify this behaviour, you can fix the problem by accessing the Services screen and changing the Startup behavior of this service.
- Corrupted temporary files – As it turns out, you might also see this error in an instance where the problem is being caused by some type of corrupted temporary data that is currently being stored inside the indices or cache folders. In this case, you can delete these two folders in order to force the launcher to establish clean instances.
- The main WOW folder is Read-Only – If you see this error occurring after installing a major Windows update or after migrating the WOW installation from another computer, you might be dealing with a permission issue. In this case, you might be able to fix the problem by disabling Read-Only setting from the Properties menu.
Now that you know every potential culprit that might be causing this issue with World of Warcraft, here’s a lost of methods that other affected users have successfully used to fix the problem with their WoW installation:
Method 1: Repairing WOW using the Firestorm Launcher
If you are encountering this issue while attempting to launch World of Warcraft via the Firestorm launcher, it’s likely that this problem is occurring due to some kind of file corruption that is affecting the WOW legion installation.
Several affected users that were previously dealing with the same problem have confirmed that using the Analyse & Repair function inside the FIrestorm launcher finally allowed them to launch World of Warcraft without seeing the same ‘The CAS system was unable to initialize’ error.
If you find yourself in this particular scenario, follow the instructions below to repair World of Warcraft using the Firestorm Launcher:
- First things first, restart your computer and close any unnecessary program and service once the next startup is complete.
- Right-click on the launch executable of Firestorm launcher and choose Run as administrator from the context menu.
- When prompted by the UAC (User Account Control), click Yes to grant administrative privileges.
- Once you’re inside the Firestorm Launcher, click on Legion from the vertical menu on the left, then move over to the right-hand menu and click on Settings.
- From the context menu of Settings, click on Analyze and repair and hit Yes at the final prompt to complete the operation.
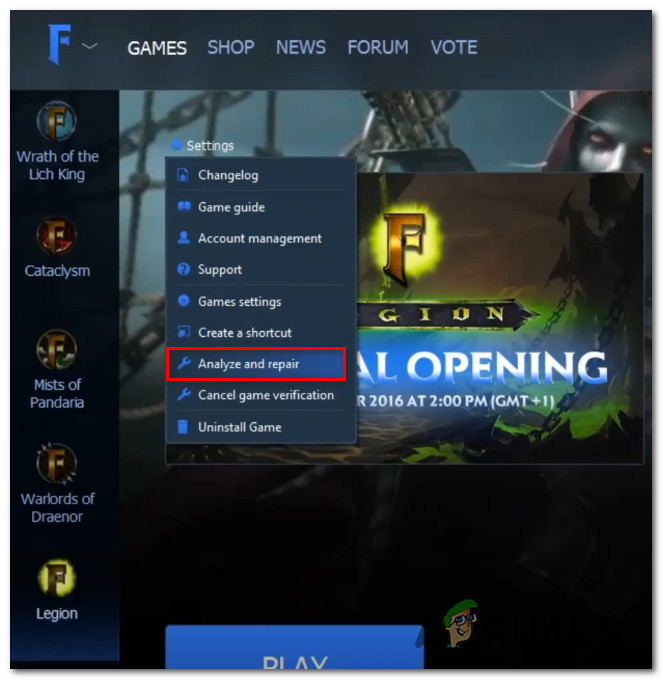
Repairing Legion using the Firestorm - Once the operation is complete, restart the Firestorm launcher and see if the problem is now fixed.
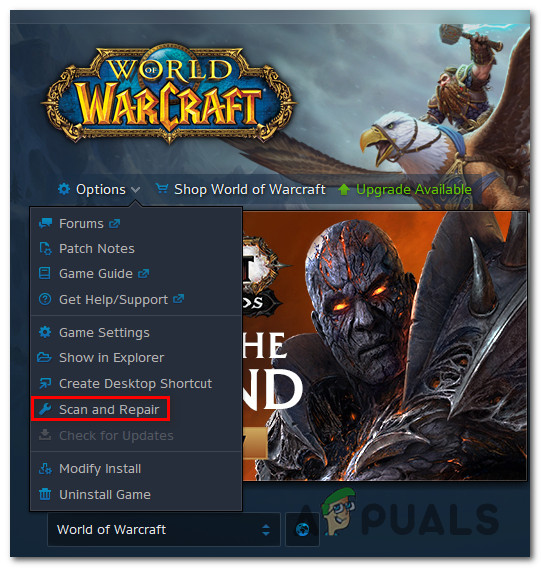
Note: If you are using Batlle.Net as the default launcher, use the Scan & Repair function instead, by right-clicking on the World of Warcraft icon.
In case you’re still seeing the ‘The CAS system was unable to initialize’ or ‘Initialization error: failed to create storage component‘ error, move down to the next potential fix below.
Method 2: Running a CCleaner Registry scan
As it turns out, another potential scenario that might cause this problem is a selection of remnant registry files left behind by an old installation of Word of Warcraft (or the Firestorm launcher) that are conflicting with the current game version.
Several affected users have confirmed that the problem was resolved after they deployed a 3rd party registry scan using the CCleaner utility to remove any unused registry keys and values that might facilitate the conflict.
If you find yourself in a similar scenario where you might see this error occurring due to a Registry conflict, follow the instructions below to clear any unused Registry files from an old WOW / Firestorm installation via CCleaner:
- First things first, open your default browser and visit the official download page of Ccleaner.
- Inside the download page, the download should start automatically after a couple of seconds. But in case this doesn’t happen, click on the download hyperlink to start the download manually.
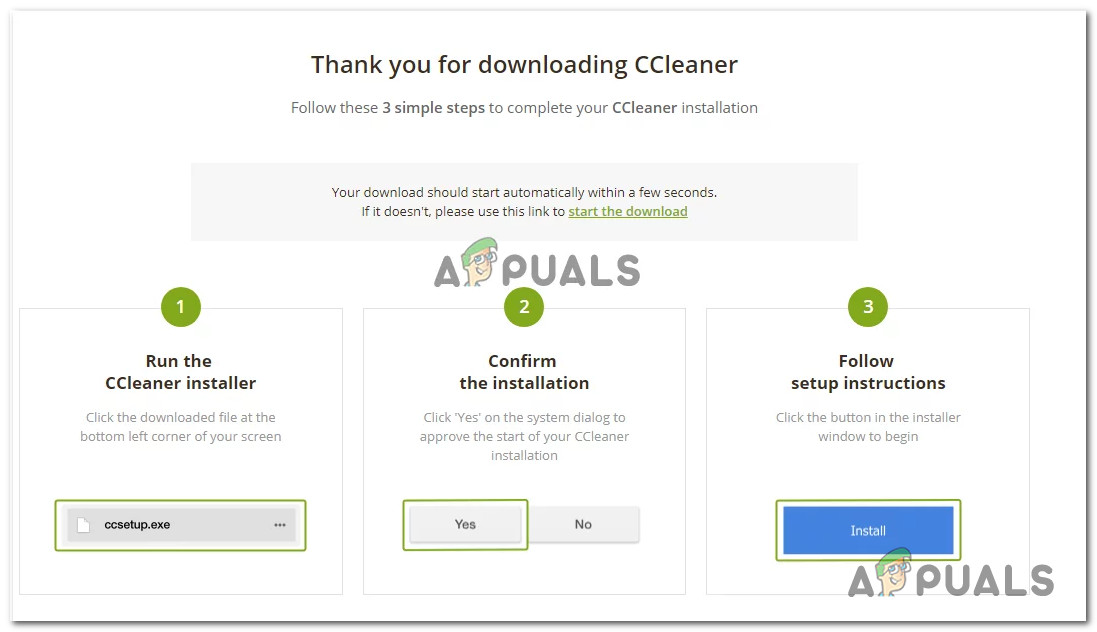
Downloading CCleaner - Once the installer is completely downloaded, double-click on it and hit Yes at the UAC prompt to grant the necessary permissions to complete the uninstallation.

Installing Ccleaner - Once the installation is finally complete, move over to the left-hand side of the screen and click on Registry.
- After you’re inside the Registry screen, click on Scan for Issues and wait for the operation to complete.
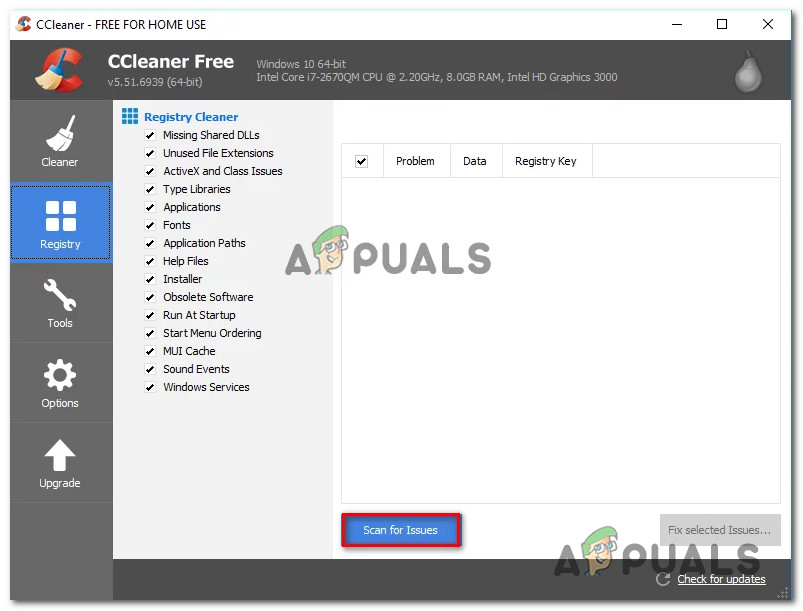
Performing a Registry scan with Ccleaner Note: This type of cleanup will ensure that every unused instance of a registry value will be removed. This will serve the purpose of eliminating a conflict between your current WOW installation and any remnant files from an older installation
- Once the Registry scan is complete, click on Cleaner (from the menu on the left-hand side) and initiate a standard cleaning scan.
- Attempt to launch WOW once again and see if the problem is now fixed.
In case the same problem is still occurring, move down to the next potential fix below.
Method 3: Adding a command-line argument to Battle.Net (if applicable)
As it turns out, this problem might also occur due to a version mismatch. Several affected users facing the same problem have managed to fix this problem by using the Battle.Net launcher to add an additional command-line argument to the Word of Warcraft: Legion game.
Note: This is only reported to be effective in those instances where this problem has occurred with the sub error message ‘Error downloading versions data from patch service: WOWDOWNLOAD_NOT_FOUND.URL.‘
If you haven’t tried this quick fix yet, follow the instructions below to add a command-line argument to the game listing on Battle.Net in order to ensure that the game is able to download the correct version data:
- Open Battle.Net launcher with administrative features by right-clicking on the executable and choosing Run as Administrator.
- Next, sign in with your Battle.Net account if the process is not automatic.
- Once you have successfully signed in, click on the listing associated with World of Warcraft, then move over to the right-hand menu and click on Options.
- From the context menu resulted from the Options menu, click on Game Settings.
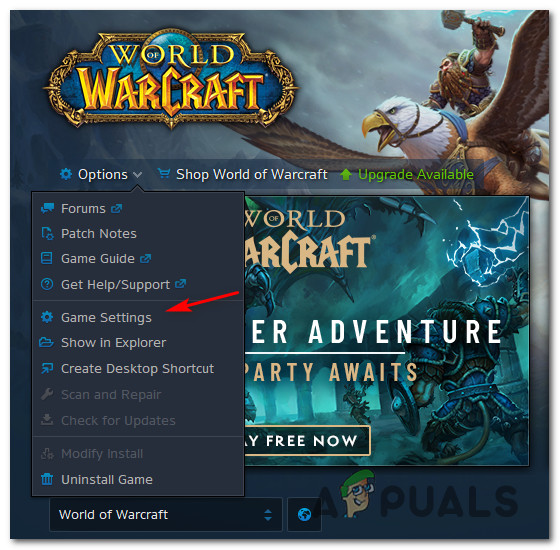
Opening the Game Settings menu of WOW - Inside the Settings menu, ensure that you select the Game Settings tab, then move over to the right-hand section and check the box associated with Additional command-line arguments.
- Once the Command-line argument box becomes visible, enter the following command and click on Done to save the changes:
-uid wow_engb
- After the command argument is saved, launch World of Warcraft once again and see if the problem is now fixed.
Method 4: Enabling the Secondary Logon Service
As it turns out, you can expect to see the ‘CAS System Unable to Initialize ClientHandler’ error occurring due to the fact that your system doesn’t have the Windows Secondary Logon service turned on. This service essentially allows administrators to log on with a non-administrator account to perform administrative tasks without having to log off.
If this scenario looks like it could be applicable, follow the instructions below to ensure that the Secondary Logon service is Enabled inside your Services screen:
- Press Windows key + R to open up a Run dialog box. Next, type ‘services.msc’ inside the text box and press Enter to open up the Services screen.

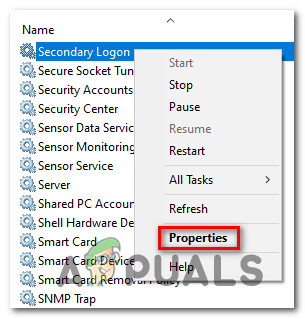
Accessing the Services screen - Once you’re inside the Services screen, scroll down through the list of services and locate the Secondary Logon service. Once you see it, right-click on Properties from the context menu that just appeared.
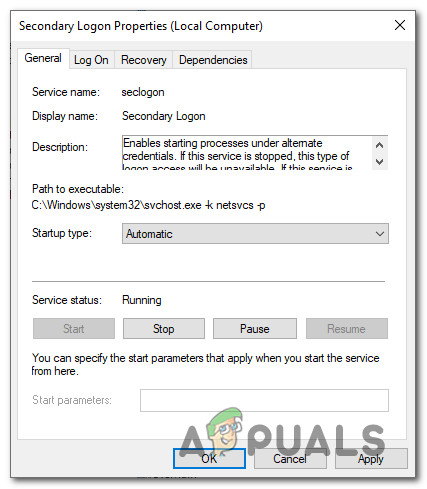
Properties screen of Secondary Logon Service - Once you’re inside the Properties screen, click on the General tab from the menu at the top, then change the Startup type to Automatic and hit Apply to save the changes.
Enabling the Secondary Logon service - Now that you’ve enabled the Secondary Login service, launch the game once again and see if the issue is now resolved.
If you are still unable to launch World of Warcraft and you’re seeing the ‘CAS System Unable to Initialize ClientHandler’ error still occurring, move down to the next method below.
Method 4: Deleting the Indices Folder
In case you recently downloaded and installed World of Warcraft after having it installed on a different computer, you might see the “The CAS system was unable to initialize: Unable to create storage component” error occurring when you initially try to launch the game.
If this scenario is applicable, you should be able to fix the problem by navigating to the location where you installed the game and deleting the folder the cache folder called indices. There are a lot of affected users confirming that they finally managed to run the game normally after navigating to the game application folder and removing the indices folder.
Here’s a quick step-by-step guide that will walk you through the process of deleting the indices folder of your WOW installation:
- Ensure that every instance of the game is closed as well as the launcher (Battle.Net or Firestorm)
- Open File Explorer or My Computer and navigate to the location where you installed World of Warcraft. By default, that location is C:/Program Files/World of Warcraft/
- Once you’re inside the correct root folder of WOW, double-click on the data folder. Once inside, look for a folder named indices and once you see it, right-click on it and choose Delete from the context menu.
- After you have successfully deleted the folder called indices, go ahead and delete the cache folder.
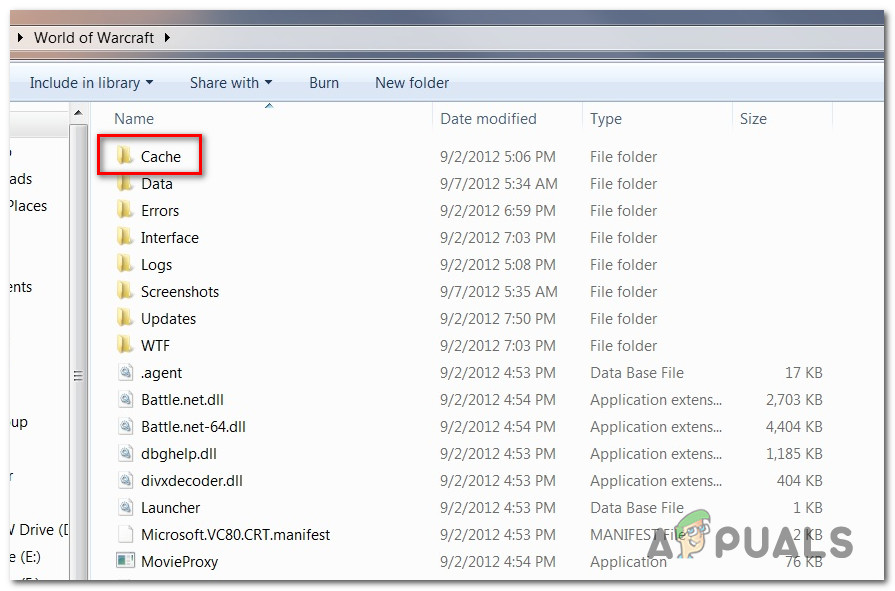
Deleting the cache folder in World of Warcraft - Once both folders have been deleted, restart your computer and open the launcher once the next startup is complete in order to allow it to recreate the folders that you deleted at steps 3 and 4.
- If the same ‘CAS System Unable to Initialize ClientHandler’ error is still appearing, move down to the next method below.
Method 5: Disabling Read-Only settings for WoW folder
Another reason why you might be seeing the ‘CAS System Unable to Initialize ClientHandler’ error appearing is that the local installation of WOW is missing writing permissions. Write permission is required to update, patch and otherwise make changes to game files and folders.
Keep in mind that by default, folders and folders might be locked by default when you copy them from different hard drives or computers or when you install a cumulative Windows Update or you upgrade to Windows 10 from an older Windows version.
If this scenario is applicable in your particular scenario, follow the instructions below to unlock the files and folders related to the WOW installation, giving the necessary writing permissions by disabling Read-Only settings:
- Open File Explorer and navigate to the location where you have installed World of Warcraft.
- Once inside, right-click on the main folder and choose Properties from the context menu.
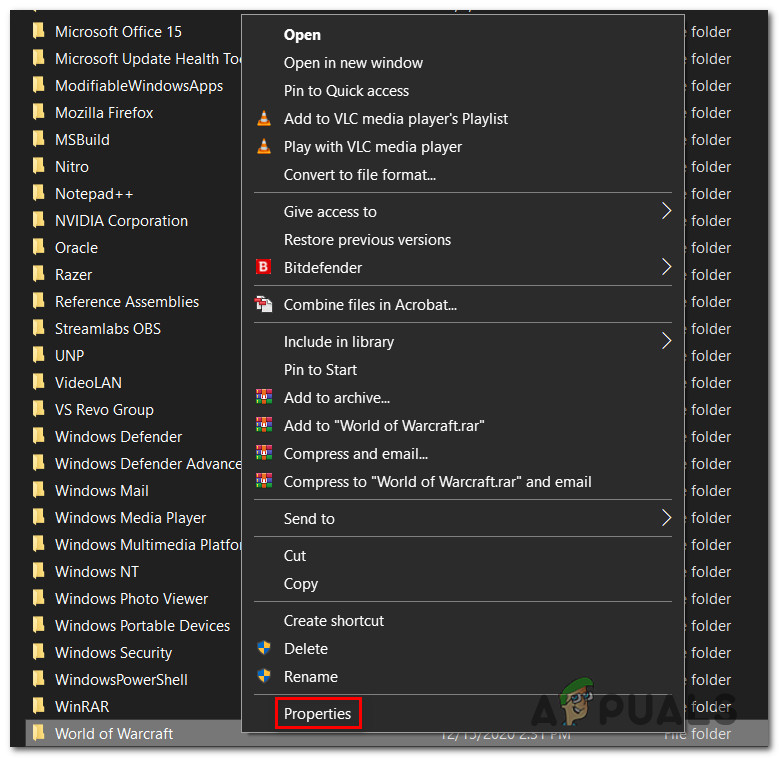
Accessing the Properties screen of the WOW folder - Inside the Properties screen of the main World of Warcraft folder, access the General tab from the menu at the top, then uncheck the box associated with Read-Only (Only applies to files in folder).
- Finally, save the modifications by clicking Apply and run the game (via the main launcher) once again and see if the problem is now fixed.


