Fix: Cannot Add or Use Internet Calendar in Outlook
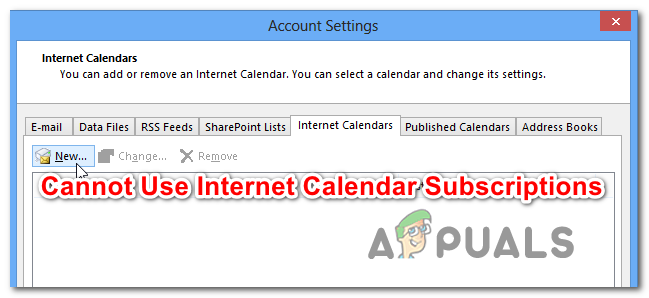
Some Windows users are encountering the “You cannot use Internet Calendar Subscriptions. Your system administrator has turned off this feature.” error when attempting to use the Internet Calendar feature in Outlook. In most documented cases, this issue occurs with Outlook 2010 and older versions – Typically Outlook 2013 and newer no longer shows this error when opening .lcs files.
If you’re encountering this issue on Windows 10, there’s a high chance that the issue is being caused by two distinct policies that are enabled in your Registry – DisablePST and webcal. To fix the issue in this case, you’ll need to change the value of these keys to 0 in order to disable then.
In case you are using Microsoft Outlook 2010 when you are encountering this issue, the problem is most likely caused by the missing of an essential system admin template. You can fix the issue in this case by downloading the collection of Office 2010 Administrative Templates manually and importing the outlk14.adm template manually before configuring it.
However, if you’re unable to import any calendar data into your desktop version of Outlook but you don’t get an error message, it’s most likely due to the newest authentication server method that Outlook 2016, Outlook 2019 and Office365 use. The most efficient way to import the calendar data, in this case, is to use the OWA (Outlook Web App).
Method 1: Modifying Registry keys linked with .ICS Files
As it turns out, there are 2 different policies enforced through Registry Editor that could end up creating the “You cannot use Internet Calendar Subscriptions.” error. DisablePST and webcal are two policies that aren’t found on Windows 8.1.
Several affected users have reported that they managed to fix the issue by changing the values of these two policies two 0 in order to ensure that they are not producing effects. After doing these modifications and restarting the computer, most affected users have confirmed that they no longer encountered the error while trying to add an Internet Calendar file into Outlook.
Here’s a quick guide on modifying the values of DisablePST and webcal in order to fix the ‘You cannot use Internet Calendar Subscriptions’ Error:
- Press Windows key + R to open up a Run dialog box. Next, type ‘regedit’ inside the run text box and press Enter to open up Registry Editor. When you’re prompted by the UAC (User Account Control), click Yes to grant administrative privileges.

Running the Registry Editor - Once you’re inside the Registry Editor, use the left-hand section to navigate to the following location:
Computer\HKEY_CURRENT_USER\Software\Microsoft\Office\16.0\Outlook
Note: You can either navigate manually via the menu on the left or you can paste the location directly into the navigation bar and press Enter to get there instantly.
- After you manage to arrive at the correct location, move over to the right-hand side menu and double-click on DisablePST.
- Inside the DWORD (32-bit) Value Edit window associated with DisablePST, set the Base to Hexadecimal and set the Value Data to 0 and click Ok to save the changes.

Setting the value of DisablePST to 0 - After this modification is operated, navigate to the following location using the left-hand side menu or by pasting the location directly into the navigation bar:
Computer\HKEY_CURRENT_USER\Software\Microsoft\Office\16.0\Outlook\Options
- Once you arrive at the correct location, move over to the right-hand section and double-click on the webcal Dword registry.
- Inside the Edit screen associated with the webcal dword value, set the Base to Hexadecimal and the Value data to 0.
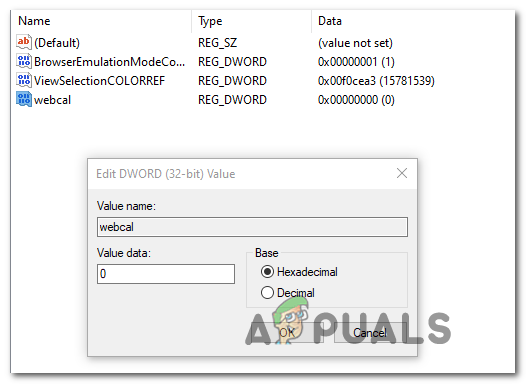
Changing the value of webcap - Once you’ve ensured that the two policies are disabled, restart your computer and wait for the next startup to complete.
- After your computer boots back up, repeat the action that was previously causing the “You cannot use Internet Calendar Subscriptions.” error and see if the issue is resolved.
In case the same problem is still persisting, move down to the next potential fix below.
Method 2: Installing System Admin templates (if applicable)
As it turns out, this issue is often reported to occur due to one particular missing Office Admin template (outlk14.adm). This is only encountered to occur with Office 2010 or older since newer versions will automatically install this template during the initial setup.
If this method is applicable, you can get the issue resolved by downloading the entire collection of Office system admin templates and then using the Gpedit (Local Group Policy Editor) to add and disable the policy associated with ‘Do not include Internet Calendar Integration in Outlook’.
Note: Keep in mind that depending on which Windows 10 version you’re using, the Local Group Policy Editor might not be available on your computer. If you’re using Windows 10 home, follow this article to enable gpedit utility.
Here are the step by step instructions to fixing the issue by adding the outlk14.adm template and configuring it via Local Group Policy Editor:
- Visit this link (here) and click on the Download button to download the collection of Office 2010 Administrative Template files.
- After the download is complete, open the executable appropriate to your OS bit version (AdminTemplates_32.exe or AdminTemplates_65.exe) and click Yes at the UAC (User Account Control) prompt.
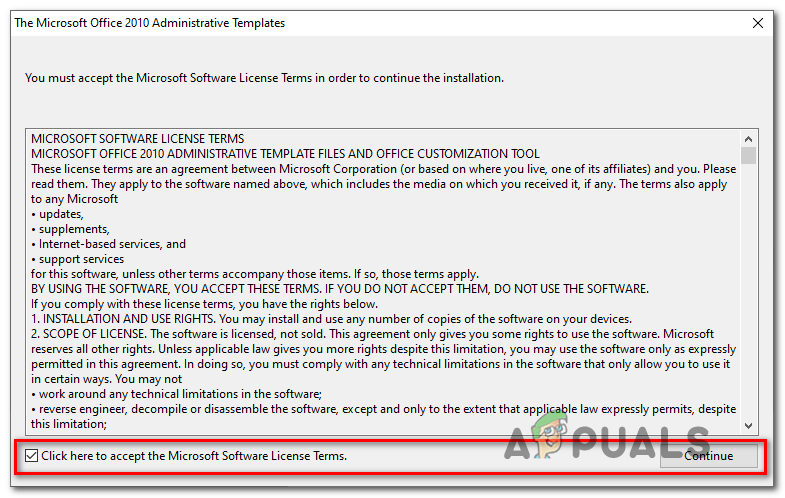
- At the first prompt, check the box associated with Click here to accept the Microsoft Software License Terms, then click on Continue.
Accepting the license agreement of Microsoft Office 2010 Administrative Templates - Choose a suitable location where you want to extract the collection of templates that you just downloaded.
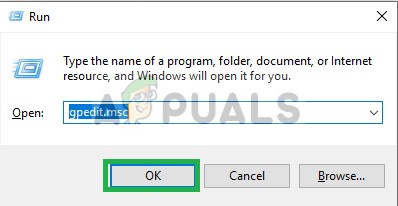
- Press Windows key + R to open up a Run dialog box. Inside the text box, type ‘gpedit.msc’ and press Enter to open up the Local Group Policy Editor. When you’re prompted by the UAC (User Account Control), click Yes to grant administrative privileges.
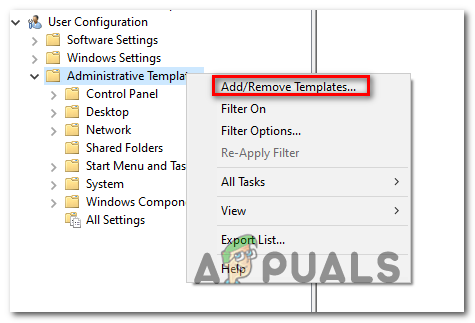
Typing gpedit.msc in RUN - Once you’re inside the Local Group Policy editor, use the left-hand section to right-click on Administrative Templates and choose Add / Remove Templates…
Add or Remove Templates - Once you’re inside the Add / Remove Templates screen, click on the Add button in the bottom-left corner of the screen.
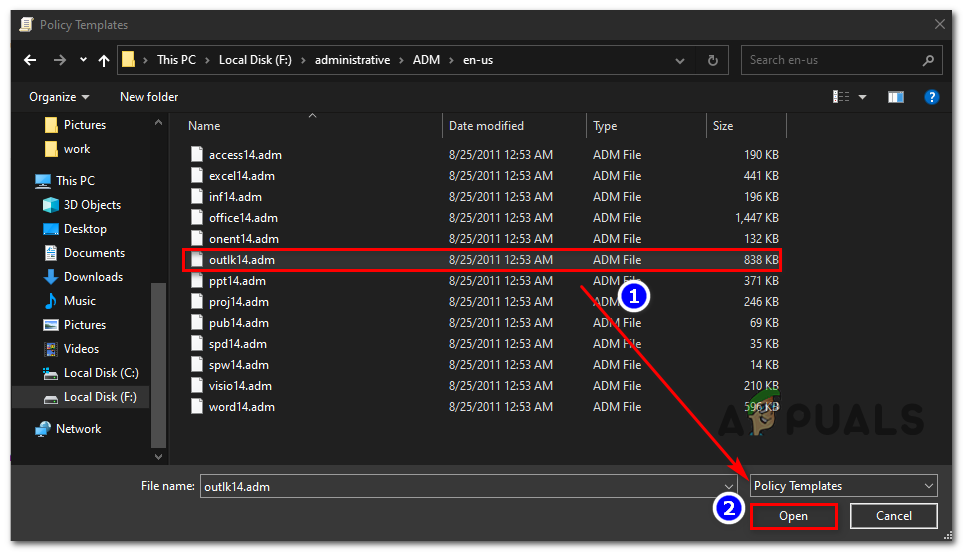
- Use the Policy Templates window to navigate to the location where you previously extracted the Office 2010 Administrative Template and select outlk14.adm (ADM > en-us > outlk14.adm) before clicking Open.
Importing the admin template - After you return to the Add / Remove Templates, click on Close.
- Next, navigate to Administrative Templates > Classic Administrative Templates (ADM) > Microsoft Outlook 2010 > Account Settings > Internet Calendars and then double-click on Do not Include Internet Calendar integration in Outlook.
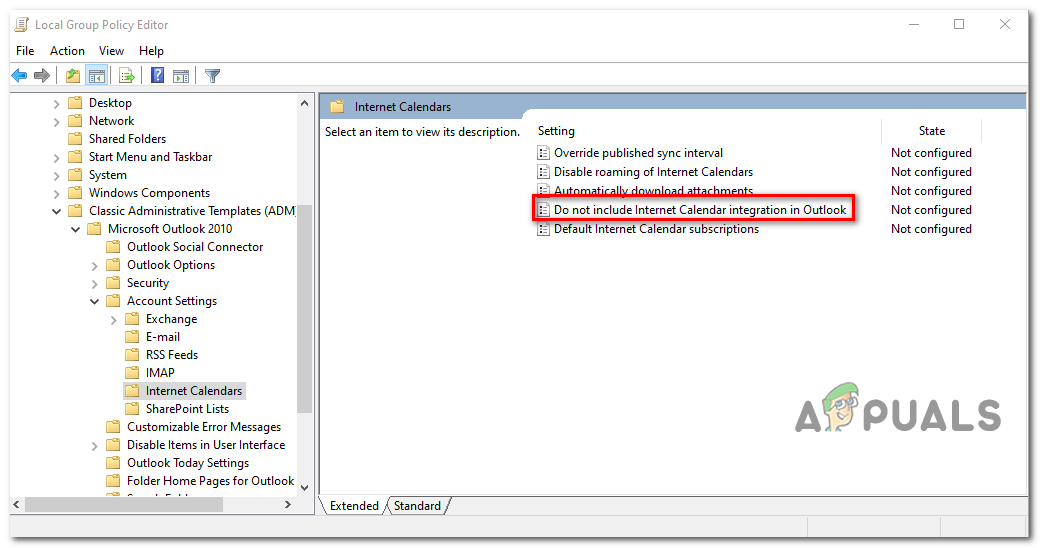
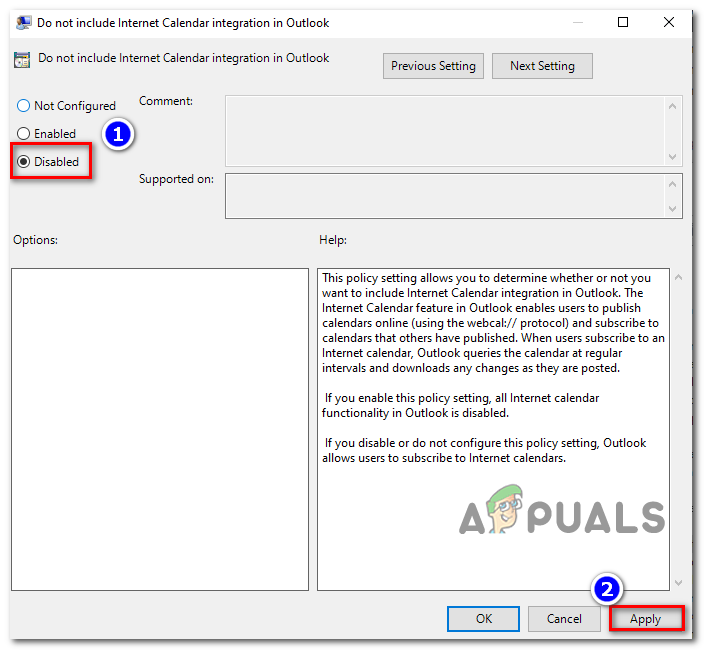
Do not Include Internet Calendar Integration policy - Inside the Do not include Internet Calendar integration in Outlook policy, set the status of the policy to Disabled, then click on Apply to save the changes.
Disabling the Internet Calendar integration policy - After the policy is enforced, restart your computer and see if the issue is resolved at the next computer startup.
In case the same “You cannot use Internet Calendar Subscriptions.” error is still occurring, move down to the final potential fix below.
Method 3: Using the Outlook Web app instead
In case you are unable to add an Internet Calendar in Outlook 2016, Outlook 2019 or Office365 but you don’t really receive an error message, the issue is most likely occurring due to a modern authentication server containing the calendar than only newer Outlook versions use.
While in most cases the server responds by supporting this modern authentication method, some servers end up considering this to be an invalid client request, thus forcing the Outlook client to cancel the attempt to add to the calendar.
If this scenario is applicable, you should be able to work around this issue by using the Outlook Web APP (OWA). As opposed to the desktop versions of Outlook, the OWA equivalent doesn’t have the same authentication header behavior, so you should no longer encounter this problem.
Here’s a quick guide on using the Outlook Web App to add the calendar:
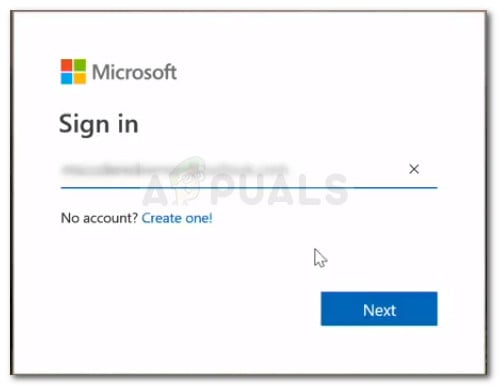
- Visit this link here and sign in to the Outlook Web App using your Outlook Account.
- Click on the Sign In button (top-right) corner, then insert your user account credentials to complete the sign-in process.
Sign in to Microsoft account - Once the sign-in process is complete, switch to the Calendar module by clicking on the associated icon (bottom-left corner).

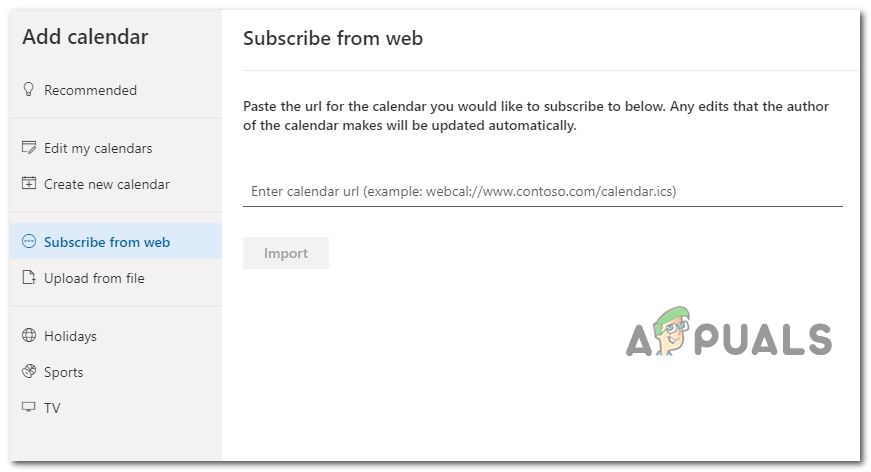
Accessing the Calendar module - Once the Calendar module is fully loaded, click on Add calendar option from the left-hand side menu.
- Inside the Add Calendar menu, use you’re preferred way of adding the calendar to your Outlook account using the left-hand vertical menu, then complete the process by clicking on Import.
Importing the Calendar via the OWA app