Fix: An Error Occurred ‘try again’ Playback ID on YouTube
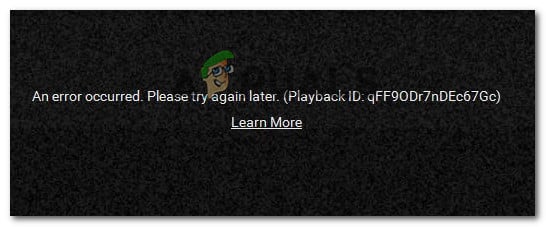
Some users are encountering the “An error occurred. Please try again later. Playback ID” when trying to play certain videos on Youtube. Most of the time, the issue is encountered with all videos, while other affected users report that they only see this error with several videos. This particular error is not specific to a certain Windows version or to a certain browser – We managed to identify reports of it occurring on Windows versions from 7 to 10 on browsers like 3rd party browsers like Chrome, Firefox, and Opera.
Note: The Playback ID is specific to each video.
What is causing the ‘Youtube an Error Occurred Playback ID’ error?
We researched this particular error message by looking at various user reports and the repair strategies that they used to get the issue resolved. Based on our investigations, there are several common scenarios that will trigger this particular error message:
- Corrupted browser files – This issue might be triggered by some missing/corrupted browser files. This can happen due to some badly cached data or after you become the victim of a browser hijacker (there are also cases where this issue occurs after the threat has been removed). In this case, reinstalling the browser should take care of the issue.
- The network connection has been modified – This particular YouTube error is known to occur with Dynamic IP configurations. In this case, a temporary but very quick fix is to restart the router or modem and allow the network configuration to refresh by itself.
- Badly cached DNS data – The error might also occur if your DNS Resolver Cache holds data that interferes with your outgoing connections. Clearing the DNS cache will resolve the issue if this particular scenario can be applied.
- The Automatic DNS is causing the issue – In a lot of cases, the culprit that was triggering the issue was an automatic DNS assigned by the ISP. A better alternative that might also resolve the issue is to use Google’s Public DNS for your connection.
If you’re struggling to resolve this particular error message, this article will provide you with several verified troubleshooting steps. Down below, you’ll discover a selection of verified fixes that other users in a similar position have used to resolve the ‘Youtube an Error Occurred Playback ID’ error.
For the best results, follow the methods below in the order that they are presented. You should eventually encounter a fix that will resolve the issue in your particular scenario.
Method 1: Reinstalling your browser
If the “An error occurred. Please try again later. Playback ID” error only occurs with a particular 3rd party browser, you might want to start by reinstalling the software. Sure, you can also avoid the issue entirely by using a different browser, but let’s see if we can fix this without having to switch to other software.
We could try to clear the cache or force the browser to create a new user profile, but these steps are specific to each browser version. A better approach would be to reinstall your browser completely. This will force your OS to delete any corrupted cached data some corrupted user preferences that are saved locally – this is true regardless of your browser version. Several affected users have confirmed that this method enabled them to resolve this particular error message.
Here’s how to reinstall your browser in order to resolve the “An error occurred. Please try again later. Playback ID” error:
- Press Windows key +R to open up a Run dialog box. Then, type “appwiz.cpl” and press Enter to open up the Programs and Features window.

Type appwiz.cpl and Press Enter to Open Installed Programs List - Inside Programs and features, scroll down through the list to locate the browser that is causing the “An error occurred. Please try again later. Playback ID” error.
- Once you see it, right-click on it and choose Uninstall.
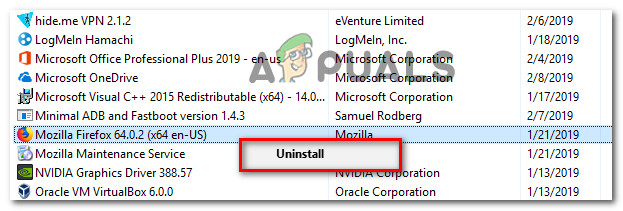
Uninstalling your browser - Then, follow the on-screen prompts to remove the browser from your computer. If you’re asked whether you want to remove cached data or the user preferences, click the appropriate button to confirm.
- Once your browser has been uninstalled, restart your computer.
- At the next startup, use a built-in browser (Internet Explorer or Edge) to navigate to the download page of the 3rd party browser that you previously uninstalled and download the installation executable. Here are some download links for the most popular browsers:
Chrome
Mozilla
Opera - Open the installation executable and follow the on-screen prompts to reinstall the browser.
- Open the recently installed browser, navigate to a Youtube video that was previously failing and see if the issue has now been removed.
If you’re still encountering the same error message, move down to the next method below.
Method 2: Restarting your router/modem
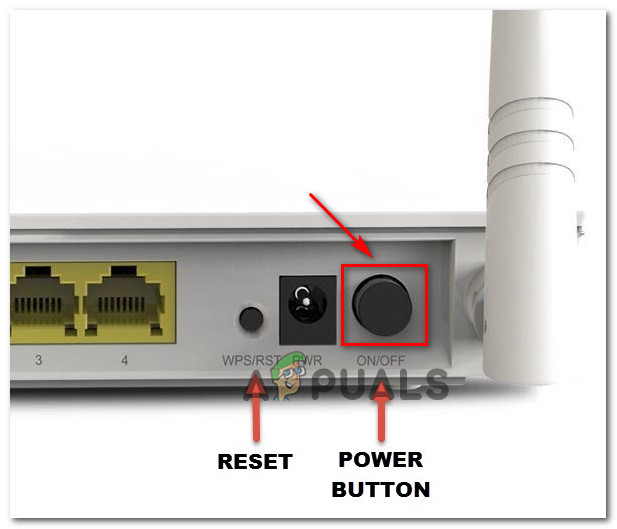
Several affected users have reported that in their case, the fix was as simple as forcing a restart on their router/modem. What this essentially does is force the device to recreate the connection, which mind end up resolving the issue automatically.
Most routers will have a power button, so it’s best to press it to turn it off, wait a couple of seconds, then press it again to turn it back on. You can also disconnect the power cable for a couple of seconds to achieve the same effect. However, avoid pressing the reset button (on the back of your router), because this has the potential of resetting your network preferences (network password, forwarded ports, user preferences, etc).
Once you manage to restart your modem, wait until the connection is recreated, then open a YouTube page that was previously failing and see if the issue has been resolved.
If you’re still encountering the same error message, move down to the next method below.
Method 3: Flushing the DNS Cache
Flushing your DNS (domain name servers) cache is known to fix a lot of browser-related issues, and this error is no exception. Several affected users reported that the issue was no longer occurring for YouTube videos after they flushed the DNS Resolver Cache. This particular fix is mostly reported to be effective in those situations where the same error message is encountered on multiple browsers.
Unfortunately, most affected users that managed to resolve the error using the procedure below reported that it was only temporary (the error returned after several errors). However, it still makes up for a quick fix if you’re in no mood to do extensive troubleshooting.
Here’s how to flush your DNS cache in order to resolve the “An error occurred. Please try again later. Playback ID” error:
- Press Windows key + R to open up a Run dialog box. Then, type “cmd” and press Ctrl + Shift + Enter to open up an elevated Command Prompt. If prompted by the UAC (User Account Control), click Yes to grant administrative privileges.

Opening Command Prompt via Run dialog box - Inside the elevated Command Prompt, type the following command and press Enter to flush your DNS cache:
ipconfig/flushdns
Note: What this essentially does is remove all information stored in the DNS cache, forcing your computer to find new DNS information.
- After you receive the confirmation message, open a Youtube video that was previously displaying the “An error occurred. Please try again later. Playback ID” error and see if the problem has been resolved.
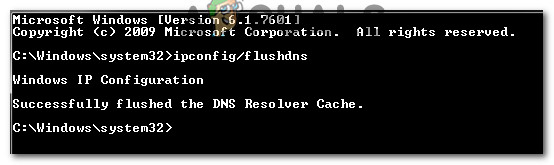
Example of a successfully flushed DNS Resolver Cache
If the same problem is still occurring, move down to the next method below.
Method 4: Changing your DNS Google’s Public DNS
Most ISP’s will set your DNS (domain name servers) automatically via Dynamic Host Configuration Protocol (DHCP). Several affected users discovered that changing the DNS switchboard from the default one (provided by the ISP) to Google’s Public DNS managed to resolve the issue permanently.
But to do this, you’ll need to explicitly change the DNS settings in your operating system to use the Google Public IP addresses. The procedure of doing this will vary a little depending on your Windows version, but we’re going to feature a method that is universal (will work for every Windows version).
Here’s how to change your current DNS to Google’s public domain name server in order to resolve the “An error occurred. Please try again later. Playback ID” error:
- Press Windows key + R to open up a Run dialog box. Then, type “ncpa.cpl” and press Enter to open up the Network Connections window.

Run this in the Run dialog box - Next, select the connection that you want to configure the Google Public DNS for. If you want to do it for your wireless network, right-click on Wi-Fi (Wireless Network Connection) and choose Properties. If you want to do it for an Ethernet (cabled) connection right-click on Ethernet (Local Area Connection) instead.
- Inside the Wi-fi/Ethernet Properties screen, go to the Networking tab and go to the settings box under This connection uses the following items. Next, select Internet Protocol Version 4 (TCP/IPv4) and click the Properties button.
- Inside the Internet Protocol Version 4 (TCP/IPv4) Properties screen, go to the General tab. Next, select the toggle associated with Use the following DNS server address and replace the Preferred DNS server and the Alternate DNS server with the following values:
8.8.8.8
8.8.4.4
- Save the changes, then repeat steps 3 and 4 with Internet Protocol Version 6 (TCP/IPv6), but this time, use these values for the Preferred DNS server and the Alternate DNS server:
2001:4860:4860::8888
2001:4860:4860::8844
- Restart your network connection. After your connection is restarted, open your browser. load a Youtube video that was previously failing and see if the issue has been resolved.
Method 5: Doing a system restore
This issue might also occur due to a bad codec that recently got installed on your system. But the thing with codecs is it’s not always easy to pinpoint the software that installed them in the first place. This is why in situations like this it’s better to just use the System Restore wizard to revert your machine to a point where everything was functioning just fine.
Several users that we’re struggling to resolve the “An error occurred. Please try again later. Playback ID” error have managed to resolve it by using a System Restore point older than the apparition of this issue.
Here’s a quick guide on how to do this:
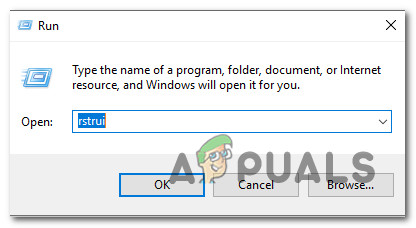
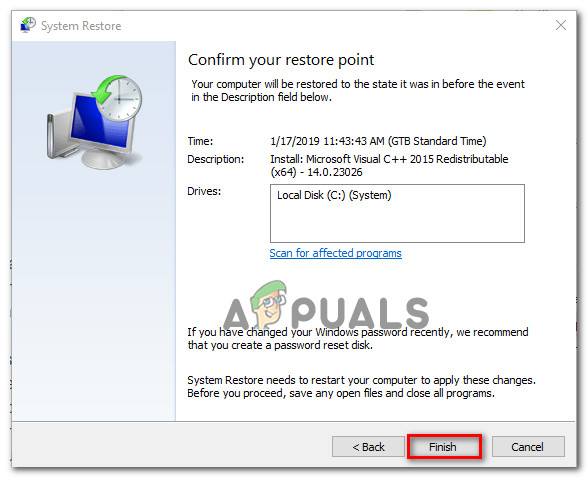
- Press Windows key + R to open up a Run dialog box. Then, type “rstrui” and press Enter to open the System Restore wizard.
Opening the System Restore wizard via Run box - Inside the System Restore wizard, press Next at the first screen.

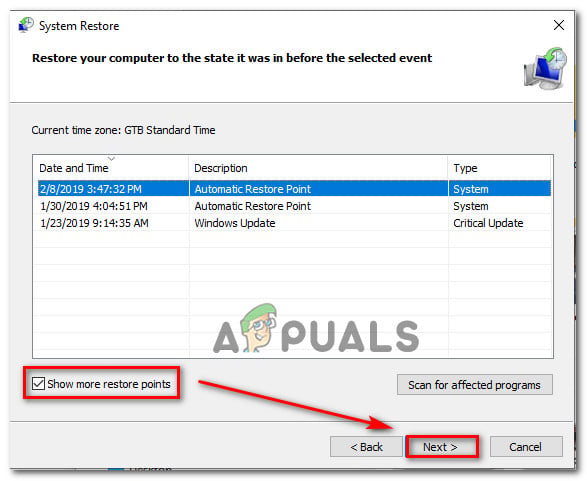
Getting past the initial screen of System Restore - In the next screen, start by checking the box associated with Show more restore points. Next, select a system restore point that is dated before you first started to deal with this particular error. Then, click Next to advance.
Restoring your system to a previous point in time Note: Keep in mind that all changes (installed apps, user preferences, etc.) that you made since that restore point was saved will be lost once this procedure is complete. This process will restore your computer to the exact state in which it was when the restore point was taken.
- Click Finish, then Yes at the confirmation prompt to start the restoring process. Your computer will then restart and the older state will be enforced at the next startup.
Starting the System Restore process
Method 6: Switching Accounts
In some cases, the issue wasn’t with the browser or the computer, the error was reported to be triggered due to the Google Account that the user was using to sign in to Chrome. Therefore, in this step, we will be switching the Google Account in an attempt to fix this error. For that:
- Launch your browser and open a new tab.
- Click on the “Account” tile on the far right of your screen that contains the first initial of your username.
- Click on the “Add Another Account” option and follow the onscreen prompts to add another account to the browser.
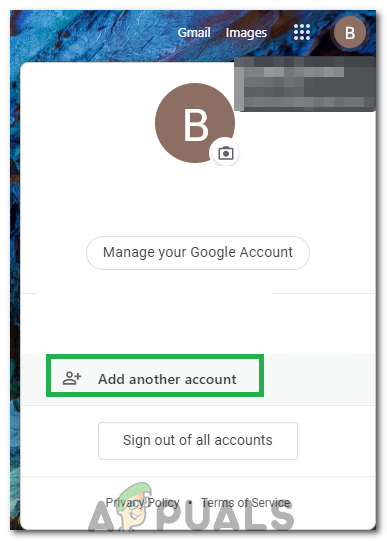
Clicking on the “Add Another Account” option. - After adding the account, open Youtube with the same account and check to see if the issue persists.
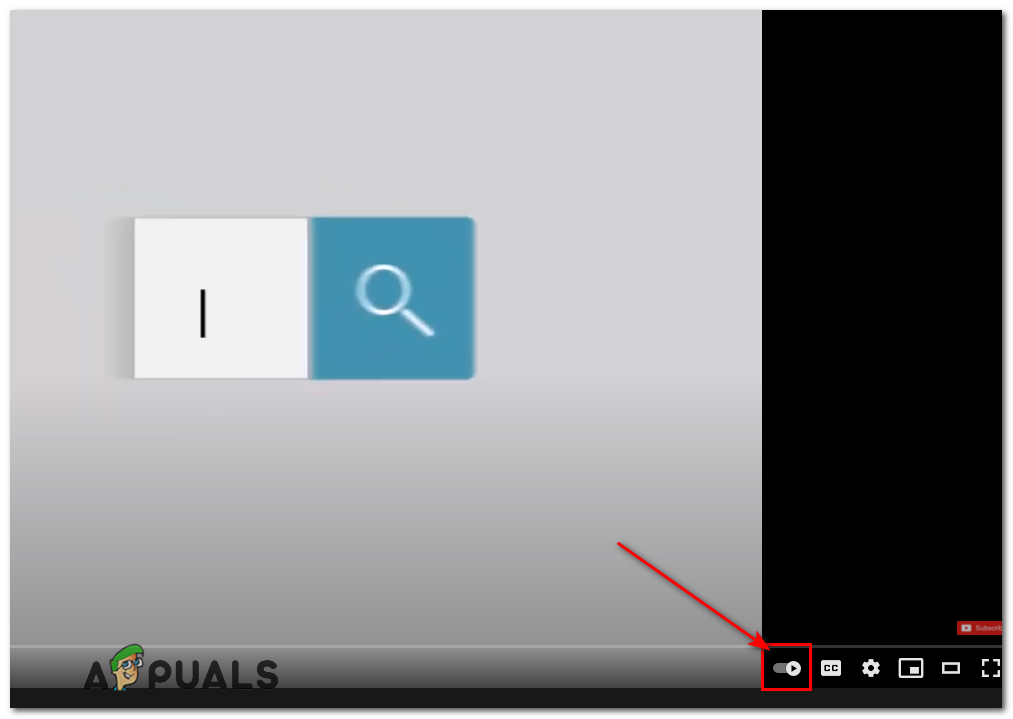
- If it does persist, click on the “Autoplay” toggle once to disable it and then again after some time to enable it back up.
- That should fix the issue.
Method 7: Disable and Enable Autoplay
Many users reported that disabling and enabling YouTube’s autoplay feature seems to fix this issue for them. So follow these steps in an order to get this issue resolved:-
- Head over to YouTube and open any video you want.
- Once the video is opened, if the autoplay is enabled, disable it. If it’s disabled, enable it.
- Reload the page and do the same thing again, now restart your Chrome Browser.
- Check to see if the issue persists.
Method 8: Toggling Shields on Brave Browser
On the Brave Browser, there is often the “Shield” option on every site which is kind of a protective feature of the browser. Toggle the button Off and then turn it ON, check if that fixes the issue.
Method 9: Disabling Extensions
In certain cases, some extensions might prevent some functionalities of Youtube due to which this error might be triggered. Therefore, in this step, we will be disabling all extensions and it is also recommended that you disable all adblocking software before continuing.
- Launch Chrome and click on the “Three Dots” on the top right.
- Click on the “More Tools” tab and then select “Extensions” from the list.

Clicking on the More tools option and selecting “Extensions” - Click on the “Toggle” to disable all unnecessary extensions and especially “Iridium”, “Improve Youtube”, “h264” and adblocking/VPN extensions.
- Check to see if the issue persists after disabling these extensions.
- Now, if you want to continue using AdBlock, add the following line to the exception rules to allow both Youtube and Reddit.
www.reddit.com https://www.youtube.com/get_video_info xmlhttprequest allow
Method 10: Using Incognito Mode
In other situations, the error was fixed simply by using Incognito or private browsing mode on the browser. Seeing as this mode disabling certain tracking features of the browser and prevents history from being recorded, it seems like an easy workaround.
Method 11: Whitelisting Site in Adblock
It is possible that your AdBlock is preventing ads from loading on Youtube and due to that, the error is being triggered. Therefore, it is recommended that you whitelist Youtube in your Adblock so that it can finally load Ads and this error is fixed.
Note: This is a temporary issue with the browser and can be fixed only from Google’s end. Until the functionality is restored, you will have to use this other account to access Youtube without any errors. Some users have reported fixing the issue by putting “&disable_polymer=true” this command at the end of the individual video URLs but it is still an annoying issue to deal with so you can just install the “Youtube Classic” add-on to get around it if putting the code works.